


I download a lot of music. My wife takes a lot of digital photos. My kids also like to save music and photos. Between all of us, we have a lot of media that quickly accumulates on our home PCs. The task of sharing this media between us is a challenge. My wife didn't know how to burn data CDs and my kids didn't have a CD burner. What we needed was a home file server: A dedicated computer used storage and sharing of our files. My research found a ton of products available that would do the job. There are several dedicated Network Attached Storage (NAS) devices that I could purchase, but even the cheapest ones are still several hundred US dollars. Then there is the server software to consider. Microsoft has its Windows Storage Server software that is also several hundred US dollars. There is also many different Linux solutions that require a working knowledge of the linux file system and command line.
In the end I settled on a free product called FreeNAS. As the title suggests, FreeNAS is free network attached storage software, but that is not all. It also has numerous features that make it extremely easy to set up, manage and expand. Plus it has features that allow you to use it as a media server for various devices. Since its hardware requirement is very minimal, this seemed like an ideal product for me to use. With FreeNAS, I was able to use my old desktop PC (a Pentium 4 with 256 MB RAM), as my file server.
Installation and setup:
To set up FreeNAS as a home file server, you must make sure you have all the proper hardware first. This means you need a multiple port router, or switch to connect your file server to as well as a network cable for the server. For the actual server, you will need a PC with at least one hard drive (I started with 2) and a CD-ROM drive.
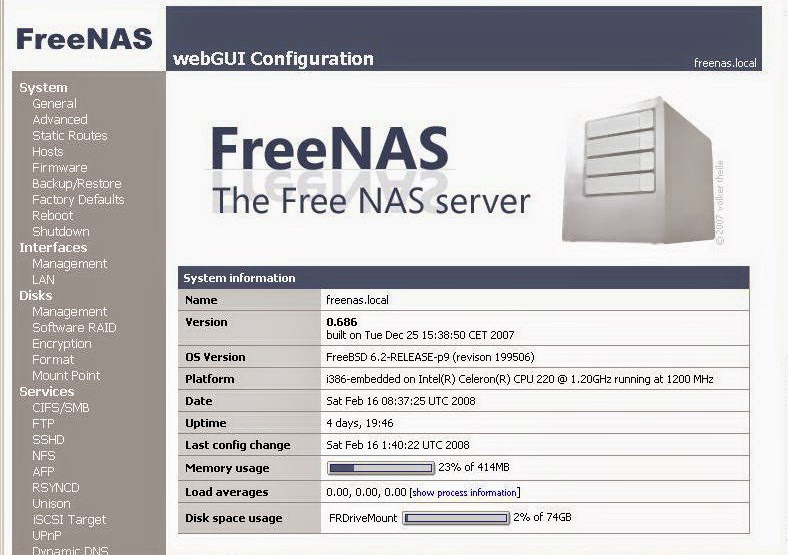
The setup process was very easy. I downloaded the FreeNAS ISO file and created a Live CD which I inserted into my old PC. If I wanted to, I could have started using it as a file server right there (by simply changing the IP address of the server), but I wanted something that I could use in the long term... something that could auto restart with no user intervention in the event of a power failure. This meant installing it to the hard drive. FreeNAS setup made this easy to do. I simply selected which hard drive to install to, and that was it. After a reboot, I had to set up the network interface. FreeNAS auto-detects which network adapter you have, so selecting it was simple. Next I had to assign an IP address. FreeNAS setup has a default address you can use if you want, but it may not work on your home network. Its best to find out your workstation's IP address (typically assigned by your ISP through DHCP) and set up your FreeNAS server on a similar address. Once this is done, you are pretty much done with working directly with that machine and can now access all your other options through the web interface, which I found very easy to use.
Setting up file shares:
This is probably the most challenging part of the entire setup, but it was still relatively easy to do. Setting up the server to share files is done in 4 steps: Adding a drive, formatting the drive, adding a mount point, then setting up the share. At first the task was a bit daunting, but after grasping the basic concept, it was really quite straight forward. When I added 2 more hard drives to my server, it was simple to configure them for file sharing and within 15 minutes, I had easily tripled my file server storage capacity.
Additional Features:
Even though storage is its primary feature, there is much more that really makes this product shine. It has the ability to support multiple network protocols, including AppleTalk, NFS, FTP, Unison, and iSCSI. It also comes bundled with many extra services like the Transmission Bittorent client, a UPnP server, iTunes server and a basic web server. This means that it is capable of more than just storage. It can be used as part of your home entertainment setup, serving your media to your Home Theater PC, PSP, iPod, or other network devices.
Conclusion:
I'm happy to say that FreeNAS does a great job storing and sharing my files. Since my initial installation of the product, I added and updated 3 hard drives on my server and the process was very easy and straight forward. FreeNAS easily recognized my new hard drives and allowed me to add and share them for storage with no problems. I use the Transmission Bittorrent client to download my media, so I am not tying up my workstation with a separate bit torrent client. If I decide later to add a Linux PC to my home network, I can simply enable the appropriate protocol on my server and have instant access to all my files. Ultimately my goal is to build a home theater PC, so when that is ready, I will already have the media server ready to serve up my media.
I heartily recommend FreeNAS if you are looking for a free (or very inexpensive) solution for a file server. You will need to know some basic technical information about your home network, like your IP address setup, and you will need to have a multiple port router or switch on your home network, but beyond that, it is relatively easy to manage and expand.
Resources:
Website: http://www.freenas.org/
Download: http://sourceforge.net/projects/freenas/files/
Installation instructions: http://www.installationwiki.org/Installing_FreeNAS
FreeNAS Blog: http://blog.freenas.org/
FreeNAS Knowledgebase: http://www.freenaskb.info/kb/
FreeNAS Support Forum: http://sourceforge.net/apps/phpbb/freenas/index.php


0 comments:
Post a Comment