Showing posts sorted by date for query Apple. Sort by relevance Show all posts

Mar 11, 2015

Share My Top 10 iPhone Apps

About 60,000 Apple iPhone applications available till date and making the list of top 10 apps, is certainly a daunting task. Some applications are best for users who access social networking sites, while some work great for music lovers. Some work as virtual assistants to photographers and some guide students round the clock to minify their distance to academic propensity. Here is an attempt to enlist the top 10 iPhone apps for one and all.


Top 10 iPhone Apps of All Time

Pandora Radio
This list will be incomplete if Pandora Radio is not included in it. Pandora Radio creates customized radio stations and you can listen to your favorite tracks and singers without changing the radio stations every now and then.

Instapaper
If you frequently visit blog sites then you must have this iPhone application. Instapaper enables you to save the online stories and blogs and you can read them in your free time. To use this iPhone application, you have to register on Instapaper.com and create an account.

AroundMe
AroundMe is a must have application for people who roam a lot. This iPhone application provides you information about important services that are available in your surrounding, which include, coffee shops, petrol stations, bars, banks, restaurants, movie halls and hospitals.

ShoZu
ShoZu is a handy and useful application for those who frequently upload images and videos on the web. With this application you can upload videos and photographs on almost 50 sites at a time. These include, Flickr, Facebook, Twitter, Blogger, Photobucket, WordPress, MySpace and Photoshop.

Jott
This iPhone application transcribes your voice memos into text. All you need to do is simply tap on the record button and start speaking. You can record the voice messages and save them for future use. This application is useful for saving addresses and phone numbers on the go.

Google Mobile App
With this iPhone application you can make a quick and easy search of any data in your iPhone. Whether it's searching for a contact number or finding an address, Google Mobile App scans your mobile and helps you find the required data. This application also supports Google Docs, Gmail, YouTube, Picasa and Blogger.

Tweetie
Tweetie is a must have iPhone application for active users of Twitter. With this iPhone application you can access to more than one Twitter account at a time and perform all the tasks that can be performed on a desktop. You can download this application at $2.99 at your App Store.

Meebo
With this iPhone application you can stay connected to your friends and chat them by instant messaging on Yahoo, MSN, AIM, Gtalk, etc. Using Meebo is a nice way to cut down SMS and you can chat with your friends on the go.

WritingPad
A must have iPhone app for those who send e-mails and need to type text frequently. While using this application all you need to do is drag your finger along the letters and spell out the words. Initially the application is difficult to use, but with gradual use it becomes quite easy to handle.

Facebook
Having a Facebook application is need of the time! With this free iPhone application you can stay online on your Facebook profile and go social all the time. You can chat, check your wall, upload and view photos and do many more things.

Top 10 Apps for Kids
  • Mad Libs Lite
  • Toddler Teasers: Shapes
  • Airport Mania: First Flight Lite
  • Freshwater Aquarium
  • Sneezies
  • Squiggles
  • Weetwoo! Kid Videos
  • Chuzzle
  • Itsy Bitsy Spider
  • Old MacDonald
Top 10 Apps for Business
  • ClockIn
  • eBay Mobile
  • Evernote
  • iTerminal
  • Encamp
  • mbPointer
  • iBank
  • Analytics App
  • LinkedIn
  • Quickoffice Mobile Office Suite
Top 10 Free iPhone Apps
  • iBooks
  • GodFinger
  • Windows Live Messenger
  • Apple Store
  • Find My iPhone
  • Chop Chop Tennis
  • Facebook
  • Pandora Radio
  • Twitter
  • Skype
Top 10 Apps for Students
  • BigWords
  • iStudiez Pro
  • EZ Read
  • SimpleMind
  • EverNote
  • Wikipanion
  • Dictionary.com
  • myHomework
  • PI83 Graphing Calculator
  • Chegg
Top 10 Apps for Photographers
  • PhotoArtista Oil
  • Image Blender
  • AutoStitch Panorama
  • SketchMe
  • Pano
  • Photoshop Express
  • Pro HDR
  • ShakeItPhoto
  • Instagram
  • Iris Photo Suite
I now wrap up this piece, content, that you have digested some information on the top 10 iPhone apps. So, how about finding the best iPhone application that suits your need and getting it from the App Store... Now!

How-To iPhone Data Recovery

iPhone being the giant star in the world of mobile telephony that it is, is prone to a number of untimely damages, both external and internal. If you're clueless about how to recover the lost photos, e-mails, messages, and other important data that were trustfully put into your iPhone, because of the fact that a wonderful information repository this device is, allow me to discuss a few easy software you need to install for successful data recovery on your iPhone. Mind you, the ones discussed here are not free of cost. However, they ensure the recovery of data of even a formatted iPhone. Let's awaken the pirates in us, and locate the lost treasures with the help of the methods discussed below.


Data Recovery Software

While the iPhone is a complicated device, loss of data is no new thing. However, without panicking, you can recover your lost data by using a popular data recovery software specially designed for Apple devices. Follow the steps given below:
  1. Before downloading any software, make sure you stop uploading new music or image files into your iPhone. The moment you realize that your data is lost, you should not transfer any file from iPhone to Windows OS, and vice-versa. Chances are that they will end up being corrupted too.
  2. Download a good data recovery software for your iPhone that is capable of searching for the deleted files onto your phone's hard-drive. There are many techniques and software available on the Internet, many of which are free of cost. However, paid software such as iCare Format Recovery, iPhone Data Recovery Software, and DriveSavers are brilliant picks for the recovery of all kinds of data lost from your iPhone.
  3. Make sure you have 50 MB of hard-disk space available on your phone, and approx. 512 MB of memory free. The reason behind this is the fact that the software would not be able to operate properly if there is no adequate space free in the system.
  4. When the software is downloaded, install and run it on your phone. It will take a while to crawl through your iPhone's hard-disk in search for all the lost data.
Tip: After a thorough crawling, the data recovery software will recover all your data back to its original place. Remember, you should go for such software only when you have never backed-up your data on your computer before. However, if you've already made a back-up of all your files on your PC with the help of iTunes, in three simple steps, you can get all your data back to your iPhone. Some more software options are lined up below:
  • iPhone Backup Extractor
  • Paraben's iRecovery Stick
  • MiniTool Power Data Recovery
  • Data Recovery Mac
Take the following method into consideration if you've created a backup of your iPhone's data into your PC/Mac with the help of iTunes.

Recovering Lost Data: iTunes

Just a single sync, and you have all your data backed up in iTunes. If you're convinced you backed up all the data on your iPhone before any data was lost, iTunes can very well help you out in recovering it. Here's how:

1. The first step is to connect your iPhone with your PC in the very normal way you sync both.

2. Look for the back-up of your files on your computer. You'll find it in the C drive of your computer, unless you have saved it manually somewhere else. Here go the paths:

For Windows XP or Vista: C:\Documents and Settings\USERNAME\Application Data\Apple Computer\MobileSync\Backup

For Mac: Library/Application Support/MobileSync/Backup

3. When you're successful in following the path, you will see a filename that has an .mdbackup extension. This is your back-up. Click on it.

4. Select the option that says Restore, and your files will be sent to the phone from your PC. Note that, restoring contacts is difficult in this case, and you have to get them in a file, and manually feed them. However, it's much better than losing 'em all mysteriously.

Method Two is always advisable for the DIY kinds, and is definitely the very first option (cheapest too) for iPhone users. However, for those who know their lost files don't exist in the iTunes backup folder, Method One is highly recommended. Some of them might cost a bomb, but the results are satisfactory. As the last bit of advice, always create a backup of your data in your iTunes folder to avoid all kinds of data loss.

Mar 4, 2015

OpenMediaVault

OpenMediaVault (OMV) is a complete and free open-source software (FOSS) network-attached storage (NAS) operating system (OS). It is developed and designed primarily for home use. Developer Volker Theile began development of OpenMediaVault in 2009 Previously he worked with the FreeNAS project.


OpenMediaVault is based on the Debian Linux distribution. It is licensed through the GNU General Public License v3 as published by the Free Software Foundation. OpenMediaVault uses Debian's official standard for package management, the Advanced Packaging Tool (APT). OpenMediaVault is designed to be configured and administered via the Webinterface, which is written in Ext JS, and is currently compatible with 32 and 64bit hardware

Features

Through an Application programming interface (API),  OpenMediaVault is designed for features to be added to the Webinterface via the Plug-in System. The developer provides a group of core Plug-ins that can be installed via the Webinterface, while others are developed by the community. Many of the community supported Plug-ins are currently hosted in an unofficial plugin repository.

Other features include:
  • Multi Language web based graphical user interface (GUI)
  • Protocols: CIFS (Samba), FTP, NFS (Version 3 and 4), SSH, rsync, iSCSI, AFP and TFTP
  • Software-RAID with the RAID-Level 0, 1, 4, 5, 6 and 10 plus JBOD
  • Monitoring: Syslog, Watchdog, S.M.A.R.T., SNMP (v1/2c/3) (Read-Only)
  • Statistic reports per E-Mail
  • Statistic graphs for the CPU-workload, LAN transferrates, hard disk usage and RAM allocation
  • GPT/EFI partitioning >2 TByte possible, ext4 maximal 16TiB
  • Filesystems: ext2, ext3, ext4, XFS, JFS, NTFS, FAT32
  • Quota
  • User and groupmanagement
  • Access controls via ACL
  • Link Aggreggation Bonding, Wake On LAN
  • Plug-in system
Plug-ins

Core Plug-ins are developed by Volker Theile
  • ClamAV - Antivirus software
  • Digital Audio Access Protocol - provides audio files in a local network (also for iTunes)
  • SAN and iSCSI - blockbased access datastores over the network
  • Lightweight Directory Access Protocol - Information request and changes of an Directory service
  • Logical Volume Manager - enables the possibility to create and administrate dynamic partitions
  • Netatalk - File-, time- and printserver for Apple Macintosh
  • Plug-in to support the use of an Uninterruptible power supply
  • easy changes to the Routing tables
  • Plug-in, which allows (automatic) backups to external USB hard disks
External Plug-ins are available via additional package repositories. The majority of those Plug-ins are developed by a group called OpenMediaVault Plugin Developers. The status of all Plug-ins can be viewed online.

Minimum System requirements
  • IA-32 (i386/i486) or AMD64 platform
  • 1 GiB RAM
  • 2 GiB hard drive, solid-state drive, or USB flash drive with static wear leveling support (NOTE: The entire disk is used as a system disk. This disk can not be used to store user data.)
  • 1 hard drive, solid-state drive, or USB flash drive for storing user data
  • 1 network card

Freenas 9.2.1 with Transmission and Couchpotato

Freenas 9.2.1 with Transmission and Couchpotato/Sickbeard as a DLNA-Server

I’m going to describe how to set up Freenas with the popular plugins couchpotato and transmissions to use them for downloading movies/series and streaming them via DLNA as well as mounting the storage on Linux.

With this setup, I manage my movie collection and my wanted movies with couchpotato, which uses transmission to download them. I also use Sickbeard to download TV series. Then I can stream them with the DLNA-server to my TV.

I’m running Freenas 9.2.1 on a HP ProLiant G7 MicroServer N54L (affiliate link). Freenas itself is running on a micro-USB stick. I’m not going to describe how to download and install Freenas on the stick, as described in detail in the docs.

Table of contents

Configuration

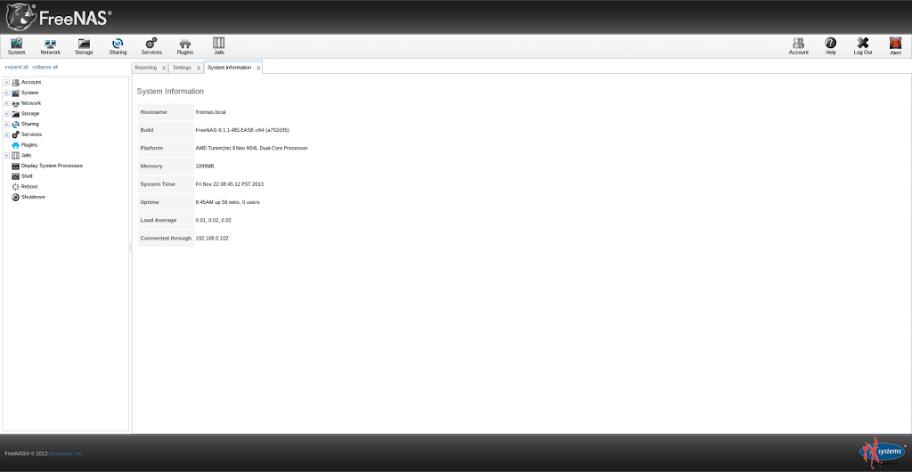
After starting the server and waiting some minutes, Freenas is available under a web-front end. The URL is a local IP-address, which is shown when Freenas has finished starting. After opening it, you’re presented with the System information.

freenas_systeminformation

See the red alert in the upper right corner? Push it. It says that you need to set a password for the admin-account that you’re using.

Since Freenas 9.2.0 the first time you access the FreeNAS administrative interface, a pop-up window will prompt you to set the root password. You should set a hard to guess password as anyone who knows this password can gain access to the FreeNAS administrative GUI.

Network settings

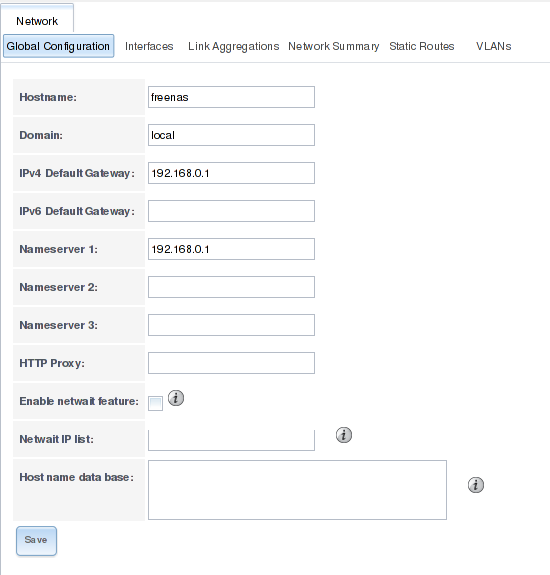
Next on we have to edit the network settings. Go to network > Global configuration. There you can change the name of your Freenas, set the default gateway, name server and so on. Since I use my server at home, I set the gateway and name server to the address of my router. If you want to, you can enable the netwait feature. If enabled, your server will ping the addresses in the IP list when it starts to check if a network connection is possible.

freenas_network_settings

General settings

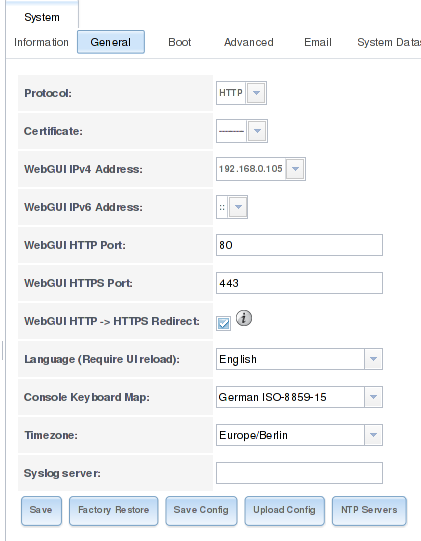
There are some more settings that you should know about and edit. Open the System > Settings tab.
If your network is secure and only authorized people join it, you may let the “Protocol” option set to “HTTP”. Generally it is recommended to set it to “HTTPS“.

The next option defines the address and port your Freenas-installation listens to; set it to the IP-address the Freenas currently listens on. Set the HTTP-port to 80 and the HTTPS port to 443. Next on there are specific settings for your language, keyboard map and timezone. Set it according to your preferences.

If you’re not using a syslog server or directory service, leave the last two options empty.

freenas_network_settings_1

Overview of storages and jails

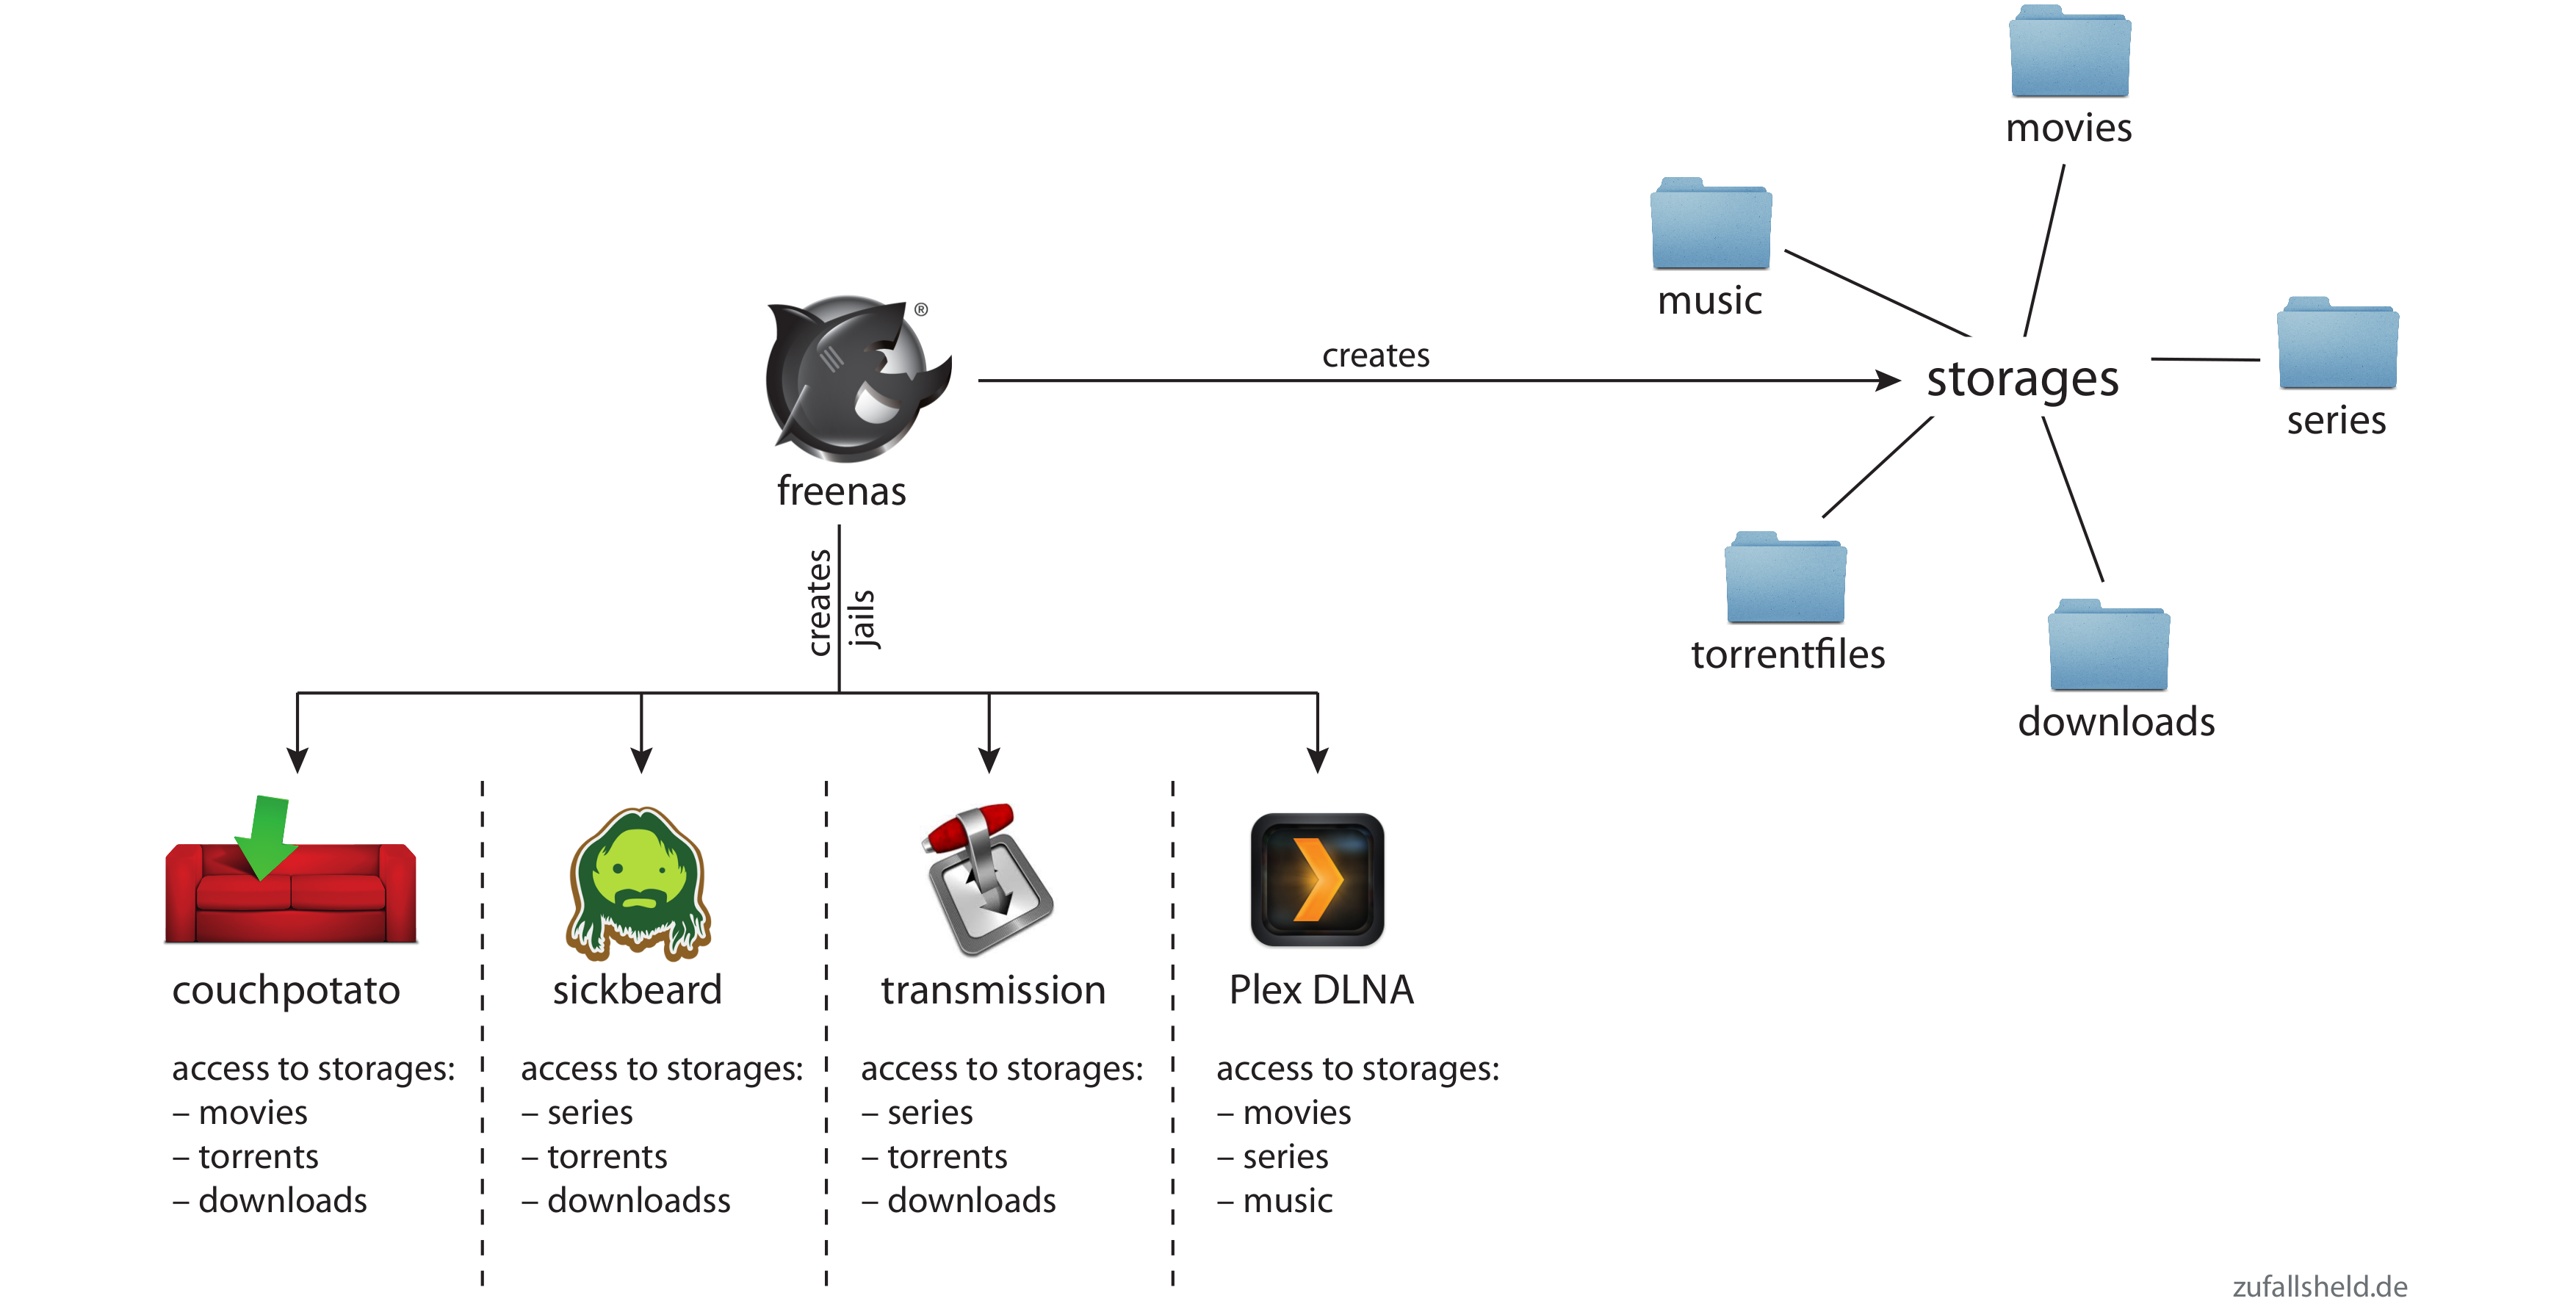
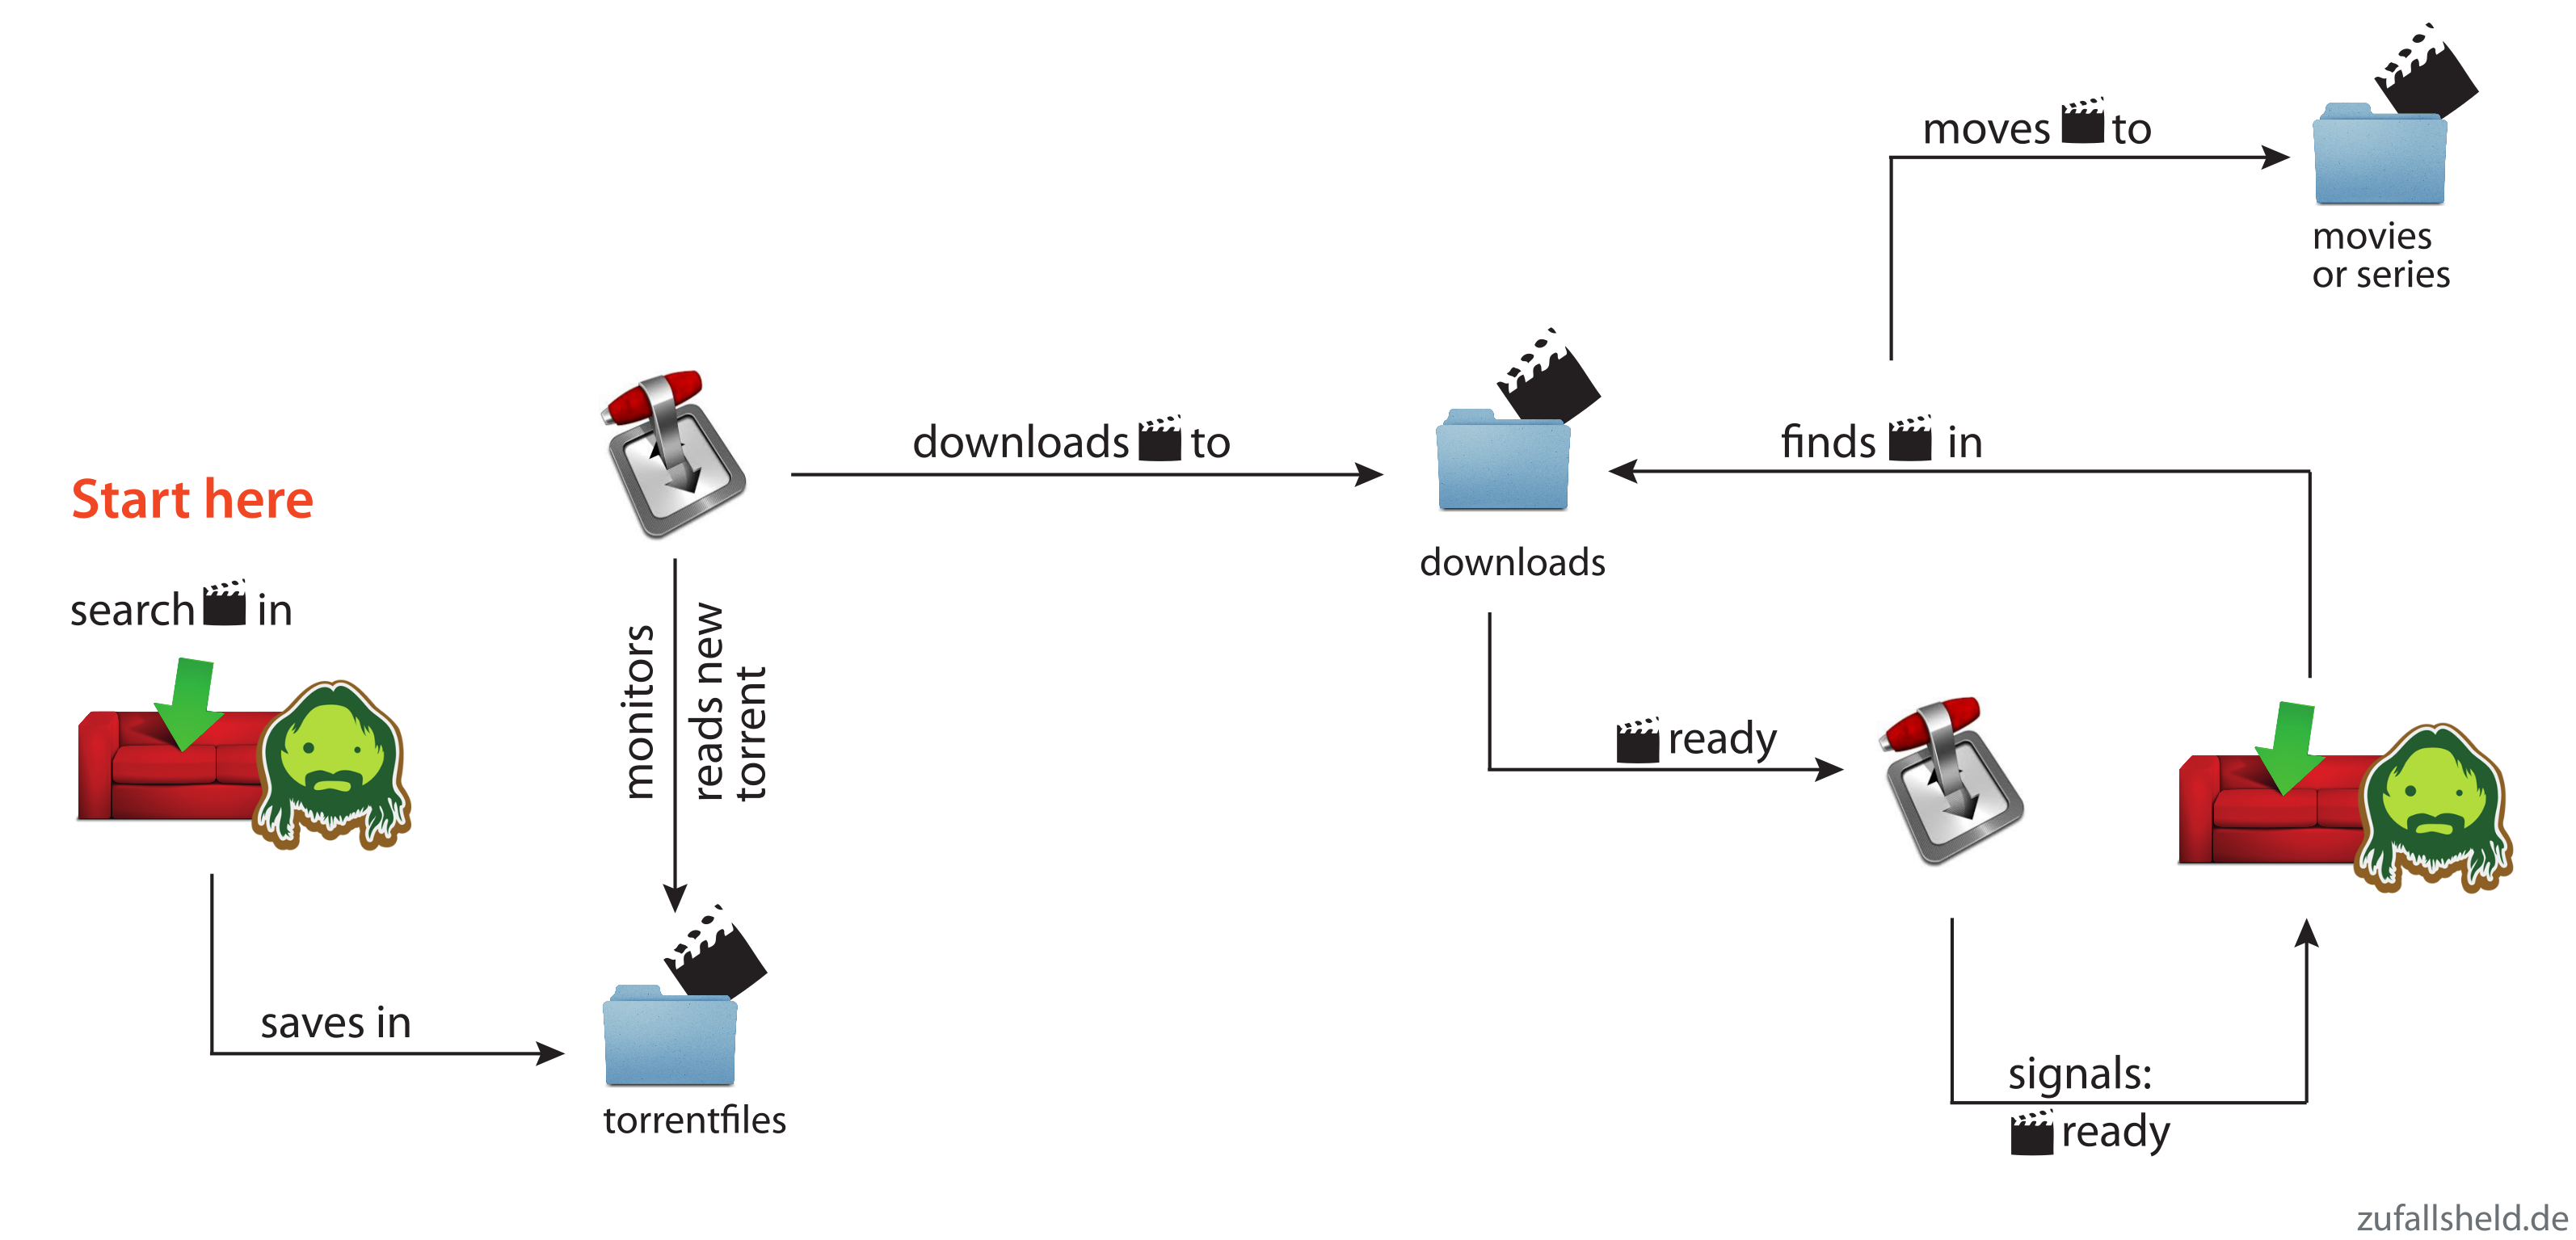
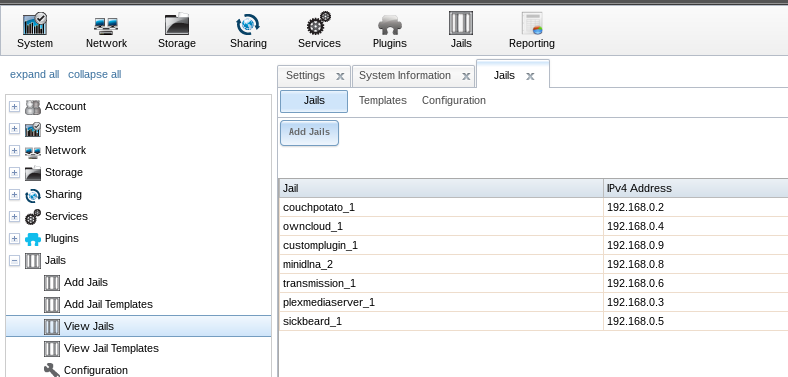
The next steps will include creating storages and jails. To get a better understanding on how these components will work together, my beautiful girlfriend created two diagrams that show how the magic happens.

The first image shows the storages and jails that I created and what jails can access which storages.

freenas_overview


The second image shows the steps that happen, when you want to download a movie or series via couchpotato/sickbeard.

freenas_download_overview

Creating storage devices

Now is the time to add some storage to your server. That is the most important part and you should carefully read the documentation the Freenas community offers. I will not go into detail on what volumes or RAIDs to use. It mainly depends on your needs and what you’ve got hardware-wise.
My use-case is a simple movie- and music-streaming server with no personal or private information saved on it.

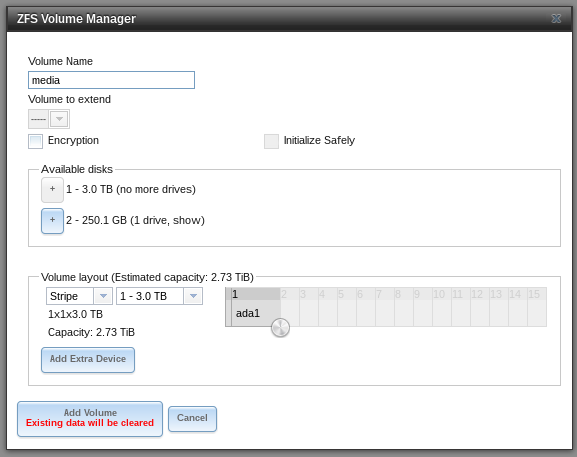
To simply create a new empty volume and attach disks to it, open Storage > Volumes > ZFS Volume Manager, give your new volume a name, add your disks and configure the layout.

freenas_volume_manager

Creating datasets

To logically separate your files, e.g. movies from music, you can create datasets. These datasets can have separate permissions, quotas, etc. allowing you more control over your data.

I created datasets for every kind of data I want to manage: movies, series, music, downloads and torrent-files. To create a dataset click on your created storage, then hit the “Create dataset”-button (the one that looks like an excel-document with a plus). There, set the name for the dataset. You can ignore all other options for now, as they are for advanced users.

Changing permissions of the storage

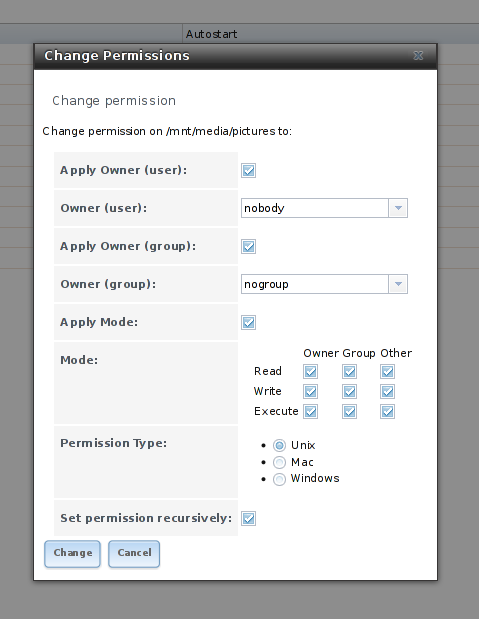
Since there are many plugins and users who want access to your storage, you’ll have to configure the permissions for it. The best way is to set the ownership of the storage to nobody and give read/write/execute permissions to everybody. You should only do this, if you trust the users of your network. To change permissions, click on the “Storage” tab, select the volume you want to edit and click the first button in the bottom line that displays hard disks and a key. There, set the Owner (user) to “nobody”, the Owner (group) to “nogroup” and activate all buttons in the mode. Type of ACL should be set to Unix. Tick the box that says “Set permission recursively” so all other folders and files in the volume will have the same permissions.

freenas_permissions

Adding sharing options

Since I want to access my music and movie collection not only with my TV but also with the computers I’m using, I have to add sharing possibilities. Freenas offers NFS, CIFS and AFP out-of-the-box. I don’t have an Apple-gadget or Windows machine at home, so I’ll only need NFS.

NFS

To add a NFS-share click on Sharing > Unix (NFS) Shares > Add Unix (NFS) Share. There, set the options “Mapall User” and “Mapall Group” to “nobody” and “nogroup” respectively. In the path, add all the storages-directories you want to share. You’ll have to create a separate share for every dataset. When you’re done, you can mount the directories via NFS, the address is the IP-address of your freenas-installation plus the folder you shared, e.g.

192.168.0.102:/mnt/media/movies

Installing the plugins

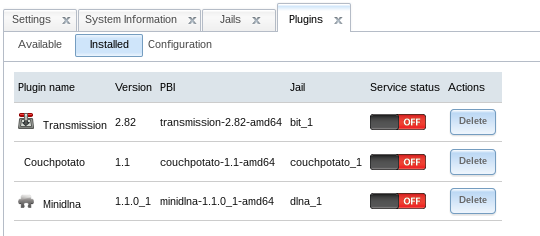
Installing plugins is very easy, as long as you stick to the available ones provided by Freenas. In the Plugins-menu, click on the plugins and then on Install, to install them. Each plugin is installed into a jail, a separate “operating system” in Freenas itself, but we’ll get to that in the next section.
When you’re done, your plugin-page should look like this:

freenas_plugins

Enabling access to the jails

SSH to your Freenas

You’ll likely need command-line access to your Freenas installation and to the jails as well. To enable SSH access to Freenas, go to Services and click on the screwdriver next to SSH. Tick the “Login as root with password” box and save the settings. After that, enable the SSH-Service by clicking the red OFF-button. Now you’re able to connect to your Freenas with SSH by entering the following line into your terminal-emulator of choice:

ssh root@192.168.0.14

(change the address to the address of your Freenas)
Then enter the admin-password and you should be connected to your box.

Using Putty to enter your Freenas

If you’re on Windows and want to connect to your Freenas-installation using Putty, you have to enter the IP-address of Freenas into the “Host Name”-field, then press “open”.

putty

If Putty cannot connect, you probably didn’t use the correct IP-address or you forgot to enable SSH.

Entering the jails

To enter one of the installed jails, type “jls” on the command-line. There you’ll see the available jails. To connect to them, enter “jexec # tcsh” where # is the number of the jail.

[root@freenas] ~# jls
   JID  IP Address      Hostname                      Path
     1  -               bit_1                         /mnt/media/jails/bit_1
     2  -               couchpotato_1                 /mnt/media/jails/couchpotato_1
     4  -               ownbutt_1                    /mnt/media/jails/ownbutt_1
     8  -               dlna_1                        /mnt/media/jails/dlna_1
[root@freenas] ~# jexec 8 tcsh
root@dlna_1:/ #

Adding storage to the jails

Now we’ll have to add the storage to the plugins, so couchpotato, transmission and the DLNA-server can access the same storage and work together. Since jails are separate systems in the server-OS itself, they cannot by default access other parts of your system.

To add the storage, go to Jails, click the plus next to the plugin, open the “Storage” tab and click “Add storage”. You’ll then have to enter the source and destination addresses. 

The source is the storage or dataset you created in the first place. If you did not create datasets before, you either have to do this now or create normal directories as sources with mkdir on the server.
The destinations are directories in the jails that get mapped to the storages outside the jails.
If the destination addresses in the jails do not exist, tick the “Create directory”-box.
To manually create the directories, enter the jail, then you can create directories with the following command:
mkdir -p /media/downloads

Then enter the following command the get the permissions right:
chmod -R 777 /media/downloads

The following part is really tricky as Transmission, Couchpotato and Sick Beard behave very differently with the directories they download data to. I had to edited the following configuration multiple times, so be sure to stay up to date.
  1. Transmission (bit_1): You need the torrent-directory, where Transmission looks for torrents and the download-directory where it downloads the data to.
    - Download-Source: /mnt/media/downloads
    - Download-Destination: /media/downloads
    
    - Torrent-Source: /mnt/media/torrentfiles
    - Torrent-Destination: /media/torrentfiles
    
    - Series-Source: /mnt/media/series
    - Series-Destination: /media/series
    
    - Movie-Source: /mnt/media/movies
    - Movie-Destination: /media/movies
     
  2. Couchpotato: You need the downloads-directory where transmission puts its data into; you’ll also need the movies-directory, where couchpotato moves the downloaded and renamed movies to.
    - Download-Source: /mnt/media/downloads
    - Download-Destination: /media/downloads
    
    - Movie-Source: /mnt/media/movies
    - Movie-Destination: /media/movies
     
  3. Sickbeard: You need the series-directory where Sickbeard puts its data into; you’ll also need the torrents-directory, where Sickbeard puts the torrent file for Transmission to download them.
    - Series-Source: /mnt/media/series
    - Series-Destination: /media/series
    
    - Torrent-Source: /mnt/media/torrentfiles
    - Torrent-Destination: /media/torrentfiles
    
    - Download-Source: /mnt/media/downloads
    - Download-Destination: /media/downloads
     
  4. MiniDLNA/Plex: You’ll need every directory where files are located that you want to play using DLNA, e.g. movies and series.
    - Movie/Series/Music-Source: /mnt/media/{movies|series|music}
    - Movie/Series/Music-Destination: /media/{movies|series|music}
    

Configuring the plugins

Now that you have added the storage to the plugins, you can finally start them. Go to the Plugins-page and click the red OFF-button of all plugins. After that, they should be listed as on, except for miniDLNA, which we’ll have to configure first, but not now.

You can find the IP-adresses of the plugins here:

freenas_ip_addresses

Transmission

The “watch”-directory where Transmission looks for torrent-files is normally:

/usr/pbi/transmission-amd64/etc/transmission/Downloads

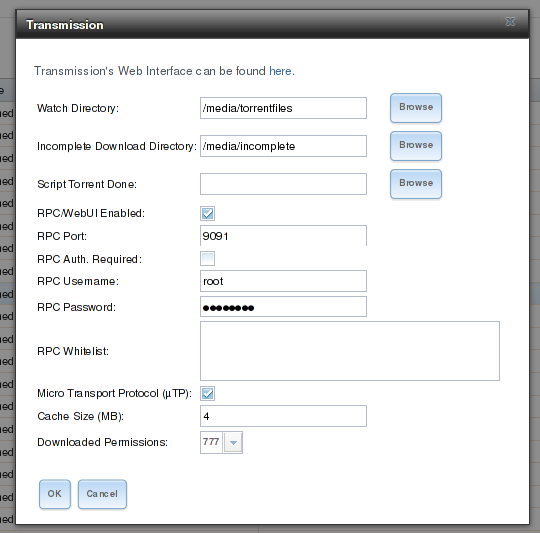
That’s 50 characters and if you add the jail-directory to it, it exceeds Freenas’ directory-length limit of 88 characters, so you have to change this. Open up the Transmission-settings in the Plugins-tab of Freenas and edit the “Watch Directory” to “/media/torrentfiles” and the Download-Directory to “/media/downloads”.

freenas_transmission_settings

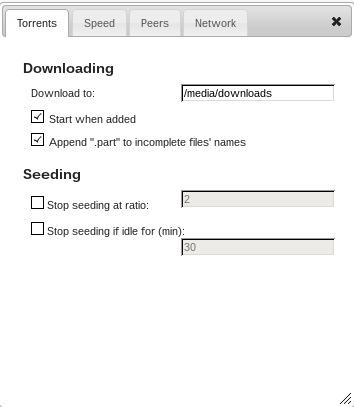
Next open the transmission-address in your browser. You’ll see the main interface of Transmission. Click the screwdriver icon in the down left corner to edit the settings. There you’ll see the “download to” option. There should be “/media/downloads” now, too.

transmission_settings

Now we’ll have to connect to the jail of transmission to manually edit a configuration file. Connect via SSH into your Freenas and connect to the jail as described in the chapter “Entering the jails”. Then you’ll have to edit the file, by entering this on the commandline:

edit /usr/pbi/transmission-amd64/etc/transmission/home/settings.json

But first, stop the plugin or else the settings will be overwritten. In the file, scroll down to the end where you can see the configuration-point called “umask”. Replace the “18” with a “0”. Save the file by pressing “escape”, then “leave the editor” and then “save changes”. After that start the plugin.

UPDATE:


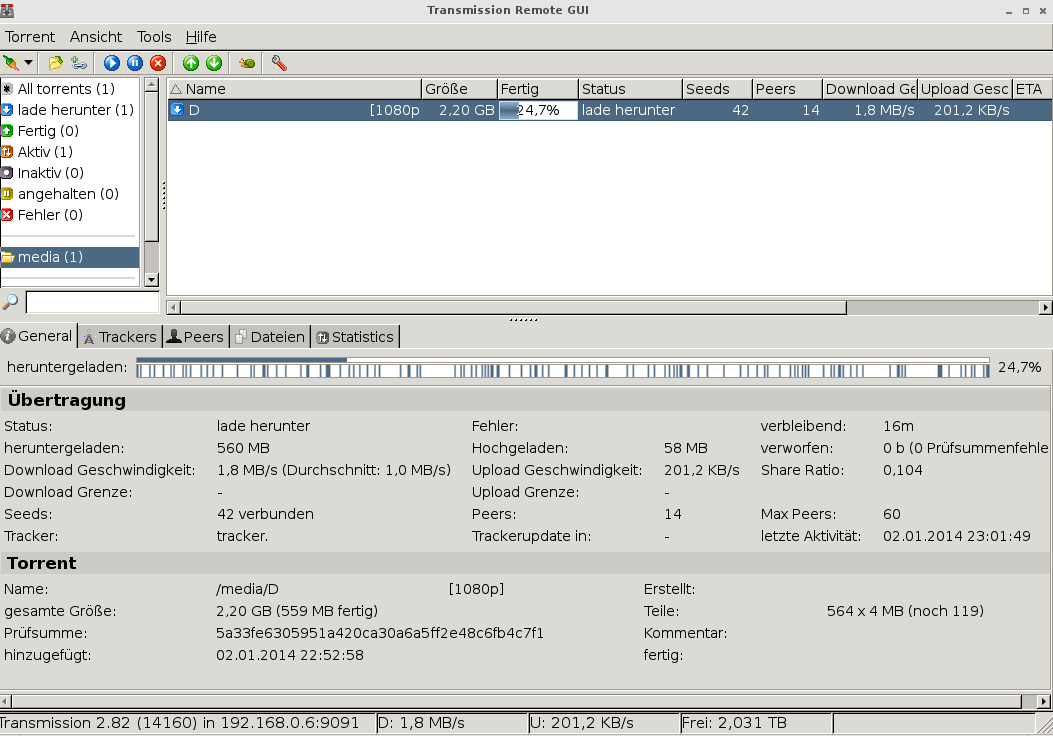
HolyK in the Freenas-forums mentioned a great front end for the remote transmission server, transgui. You can find it here or in your favorite package manager. It’s a nice replacement for the rather featureless web front end of transmission. It’s available for Linux and even Windows.

Transmission GUI

After you installed it, point it to the IP address of your transmission-server and then you can see the movies downloading and even add torrent- or magnet-links so they will be downloaded to you Freenas.

Couchpotato

Open the couchpotato-address in your browser. You’ll be greeted with the install wizard. Scroll down to advance in the wizard. Define a user name and password in the General section if you’d like and leave the port to 5050.

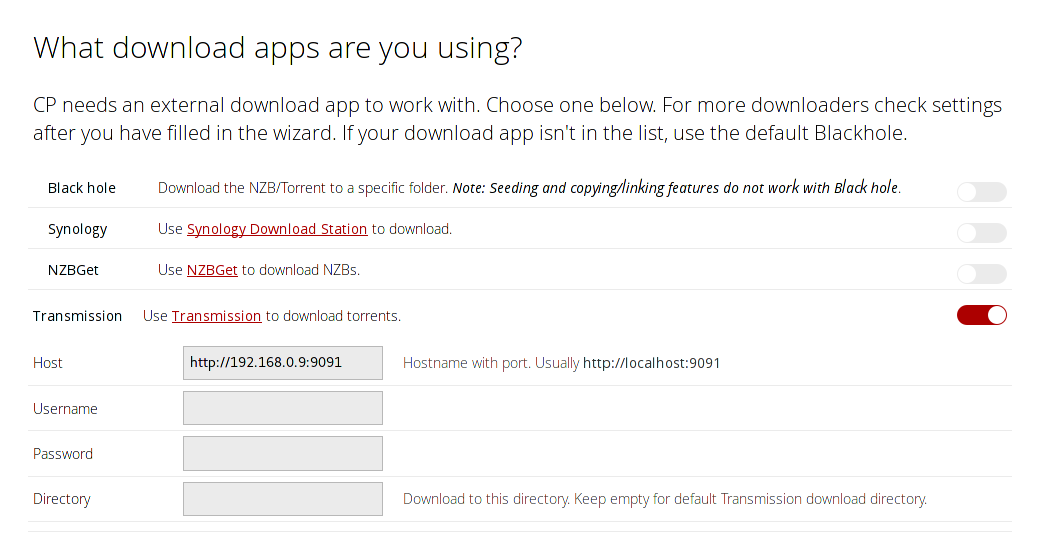
In the downloaders section choose Transmission. As host enter the address of your Transmission jail (you can find the address in the jail-section of Freenas). Set the “Directory” to the “Transmission-Destination” you set earlier.

couchpotato_transmission_settings

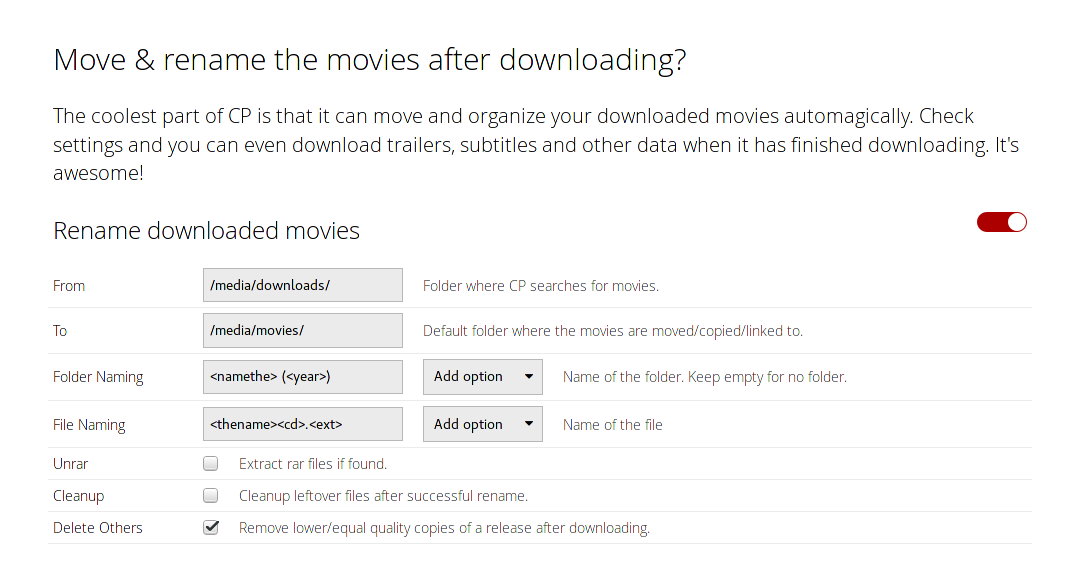
Scroll further down to “Move & rename the movies after downloading?” (skip the “Are you registered at any of these sites?”-part).

In the “from”-folder set the same folder you just used for the Transmission-directory. The “to”-directory is where the renamed movies will be stored. Set it to the “movie-source” configured in the chapter “Adding storage to the jails”. Tick the “Cleanup”-box so leftover files will be removed after renaming the movies.

couchpotato_rename_settings

After that, scroll further down and click the huge green button and you’re done with the wizard.
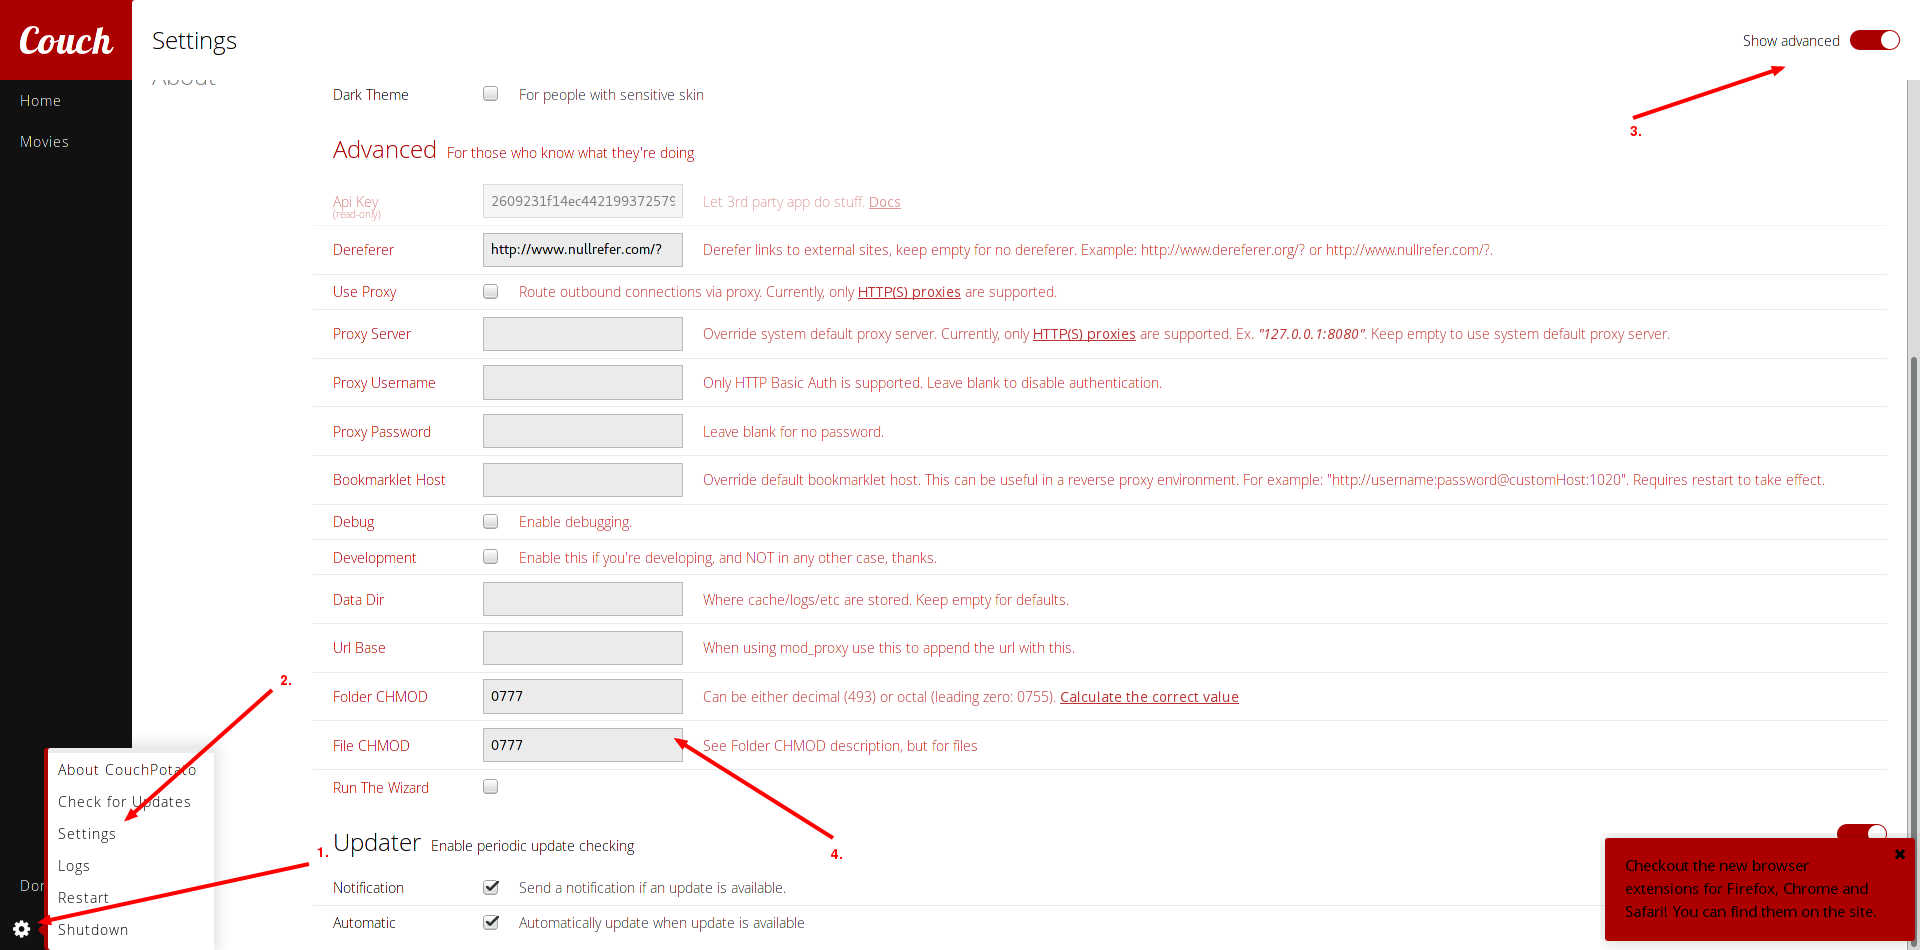
On the main page of couchpotato, click the screw-icon in the upper right to get to the configuration-page. There are many things to tweak here, but I’m not going into detail about them. Right now you have to open the “General” Tab, click on “Show advanced settings” and then enter “0777” in the fields “Folder CHMOD” and “File CHMOD” as shown below.

If you do not do this, you probably will be getting an error-message later in Transmission, when downloading files (the download stops at around 4MB)!

couchpotato_advanced_settings_chmod

Sickbeard

Install Sickbeard as usual and open the web interface. Since I currently only load movies with (free) torrents, there are some settings to make.

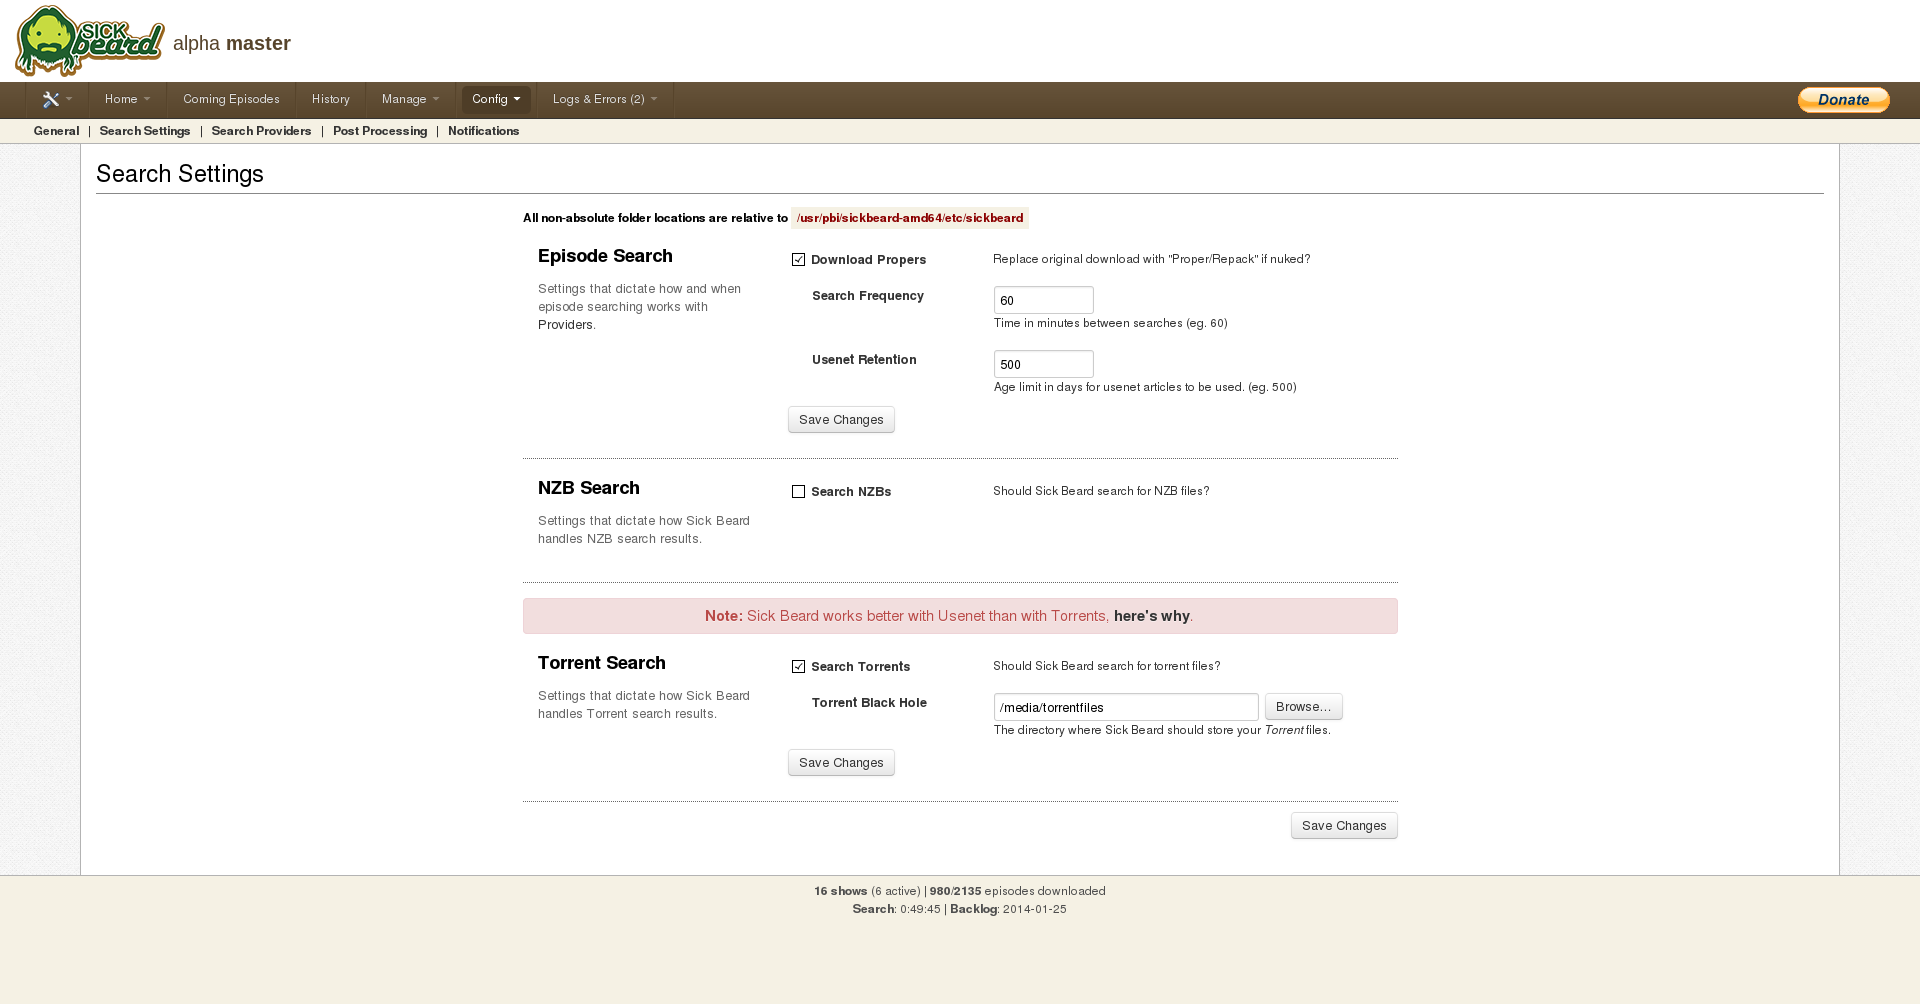
Open up the “Search Settings” tab in the config-tab.

Disable the search for NZBs and enable the search for torrents. In the Torrent Black Hole” enter the Torrent-Destination “/media/torrentfiles” you configured in the jail-storage and save the changes. It should look like this:

sickbeard_search_settings

Then go to the “Search Providers” tab. There, check the box for “EZRSS” as it is the only free torrent search for series. If you are a member of any other torrent sites listed there, check the boxes for them and enter your credentials for this site. Again save the changes.

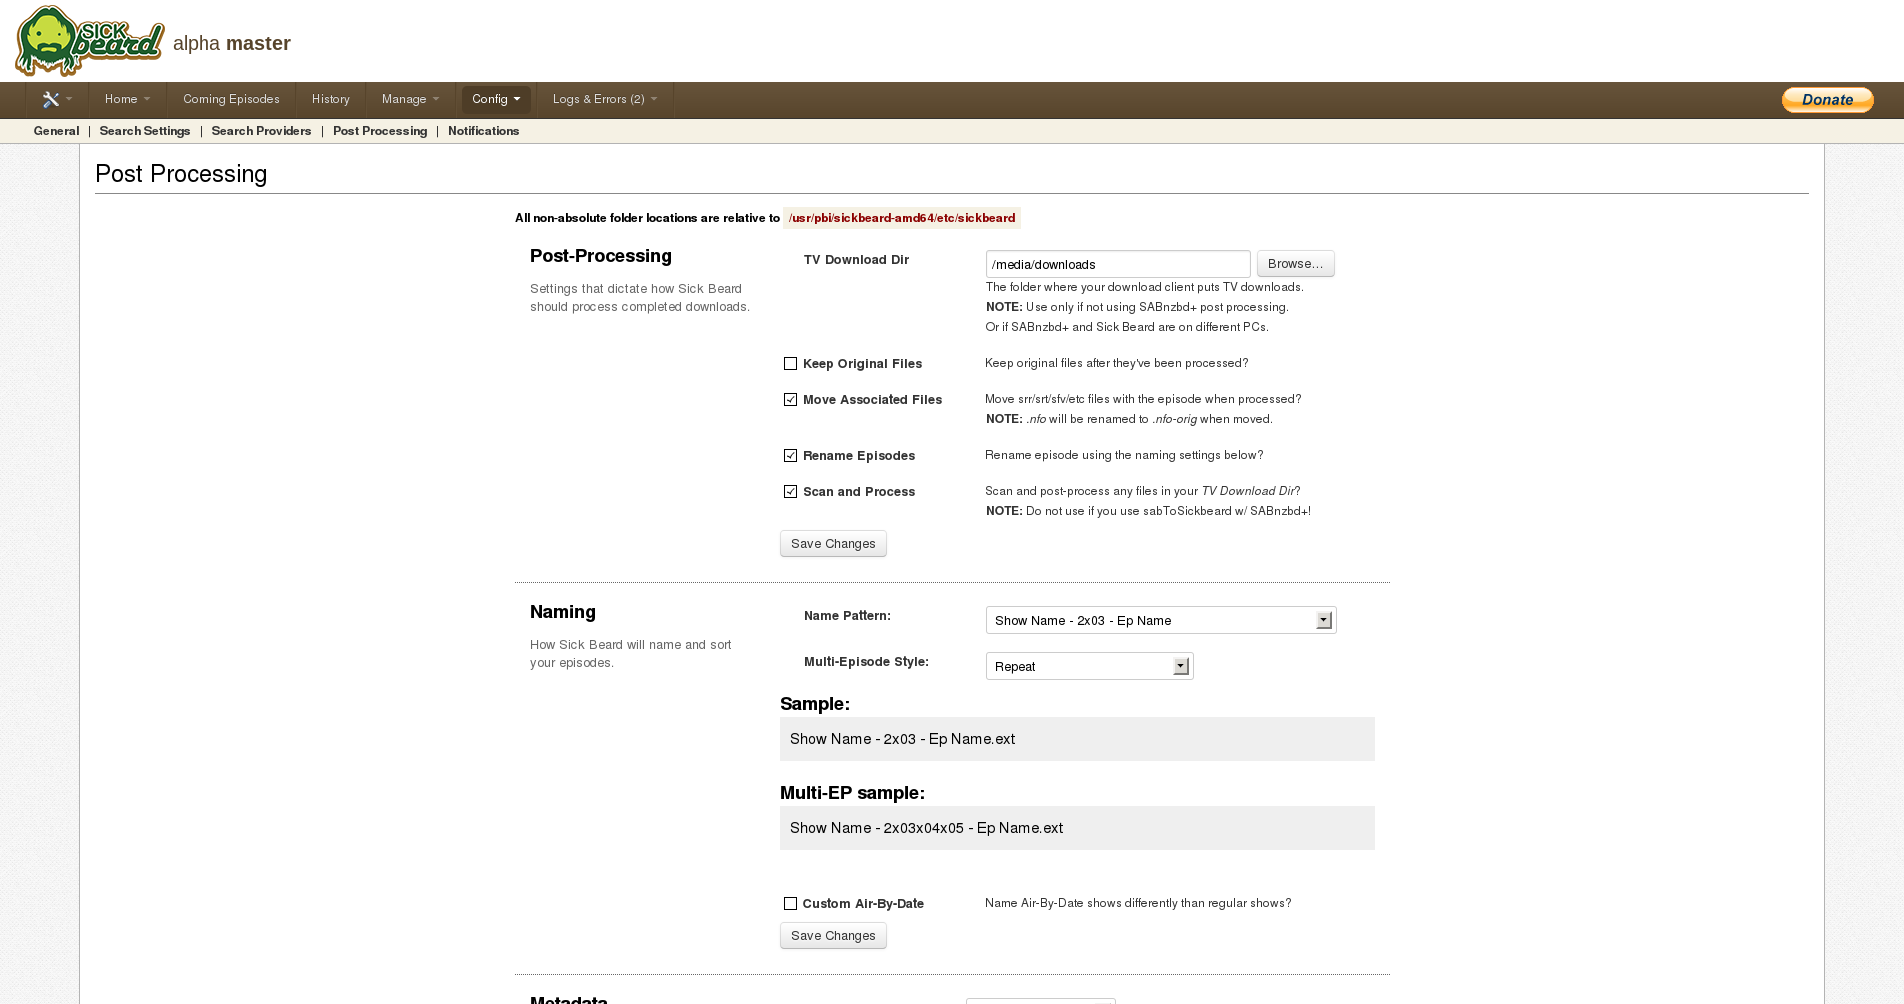
Next, go to the “Post Processing” settings.

In the “TV Download Dir”, enter your Series-Destination “/media/downloads” and check the “Scan and Process”-box. You can also edit additional settings on this page but they are not important right now. In the end your settings should probably look like this:

sickbeard_post_process_settings

If you’re done, you can add new or existing shows and let them download!

DLNA

Now you have the choice to either use MiniDLNA or the Plex MediaServer. If you want a nice interface to manage you music and movies, use Plex. If you only need a DLNA-server, use MiniDLNA as it is easy to configure. I’ll describe the installation and configuration for both.

MiniDLNA

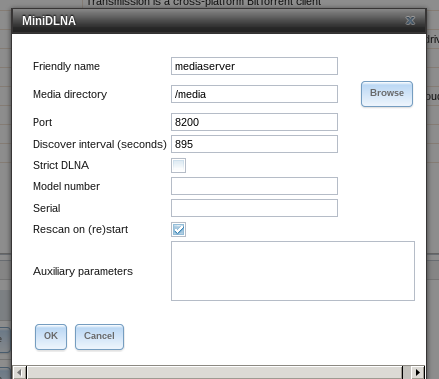
Open the Freenas-front end, go to plugins and open the MiniDLNA-configuration. There, set the name of the MiniDLNA-server to anything you like and the Media-directory to the destination set in chapter “Adding storage to the jails”. Leave the other options as they are.

minidlna_settings

The DLNA-server will only scan for new files in its directory on restart, so if you are adding a movie and do not restart the DLNA-server, it won’t be available for streaming. To work around this issue, use the fix described here. After rebooting the DLNA-server should now scan for new files every 5 minutes.

Plex MediaServer

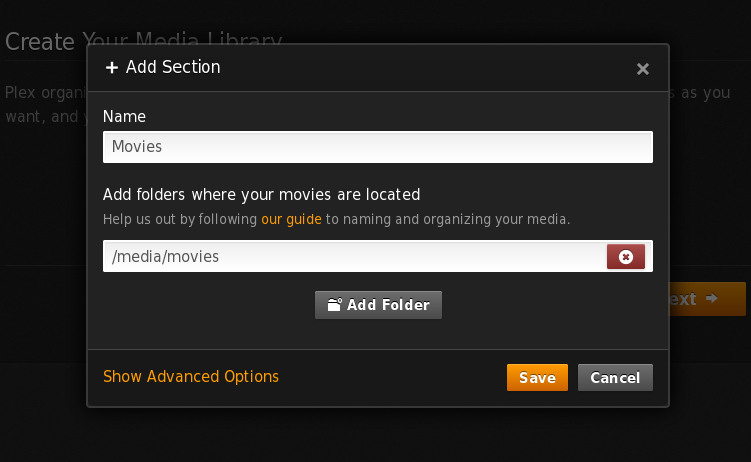
After installing the plugin, open the address of the Plexserver and you’ll be greeted with the End User License Agreement. Agree to it and jump to the “Get Started”-section. You can skip the register as it’s not needed. Leave the settings in “Basic Setup” as they are and go to the next step. There, you can add your music and movie-directories. Click on “add section”, then on “Movies” and insert into the second box your movies-directory. It should look like this:

freenas_plex_add_movies

Do this for your music and series, too.

If you have everything added, jump to the next section. There you can add some channels to use with Plex. I skipped them. Click “Next” and “Done” and your are it..done! Now you should see the dashboard of Plex filling with your movies and music.

DLNA is enabled by default, so you don’t have to do anything in this regard.

Conclusion

Now you are able to download movies with couchpotato and transmission and once they’re downloaded, they are automatically available on you DLNA-server for further streaming.

Mar 3, 2015

How-To Install FreeNAS To USB Drive

FreeNAS is an Open Source Storage Platform based on FreeBSD and supports sharing across Windows, Apple, and UNIX-like systems. It comes with a lot of protocols and services – here are some to mention: CIFS (samba), FTP, NFS, TFTP, AFP, RSYNC, Unison, iSCSI (initiator and target) and UPnP, Software RAID (0,1,5), ZFS, disk encryption, S.M.A.R.T/email monitoring with a WEB configuration interface (from m0n0wall). You can use it to build your own secure network file server to store all your important information on.

FreeNAS can be installed on compact Flash/USB key, hard drive or booted from LiveCD (version 7.x). Personally I like to install it on USB key to keep the software separate from the data on the hard disk. The rest of this article will show you how to do it. At the time of writing the current stable version is 8.0.2. The little graph on the right shown the number of downloads – this is what people download most:


They also have a 32-bit version (FreeNAS-8.0.2-RELEASE-i386.iso) and 64-bit version (FreeNAS-8.0.2-RELEASE-amd64.iso). You should choose 32-bit or 64-bit based on the hardware of the computer you are going to run FreeNAS on:


Download the .iso file from Source Forge and save it to your hard drive, for example in C:\Temp folder.

From here you can do two things:

1. Burn the .iso file to a CD. This will give you a bootable CD from where you can install FreeNAS to a hard drive or USB stick. The older versions (7.x) also had an option to run FreeNAS from the CD without installing it. With version 8.x this option is not available anymore.

2. Extract the embedded version of FreeNAS from the .iso file and write it directly to a USB stick. This is a faster way of getting FreeNAS installed but will not allow you to add additional software later.

In this article we are going to take the second approach. I will provide a separate posting on how to do variant 1 and install Transmission.

Note: As of version 8.0.1-BETA3 the image size increased. The new size requires a 2 GB USB storage device.

Step 1) Extract the FreeNAS image

We need to extract a file from the .iso file. If you already have a tool that can do that go ahead and use it. If not you can install the Daemon Tools Lite which is free for home personal use. Mount the .iso file and extract the FreeNAS_i386_embedded.xz (32-bit version) file. In case you downloaded the 64-bit version the name of the file will be FreeNAS_amd64_embedded.xz. Copy it to your hard disk.

For the rest of the article I will assume we chose the 32-bit version.


The .xz file is a compressed file. Un-compress it and extract FreeNAS_i386_embedded which is the image we have to write to the USB drive.

I use 7-Zip for extracting the files from .xz file. Make sure you use the latest version of 7-Zip. Right-click the FreeNAS_i386_embedded.xz file and choose 7-Zip -> Extract Here. This will extract FreeNAS_i386_embedded file and place it in C:\Temp


Step 2) Prepare the USB key

Plug the USB key in your PC and format the disk as FAT32. Sometimes Windows will not be able to format it (if it was partitioned or formatted with Linux file system for example). In this case you should try a “low-level” format using this tool:

HP USB Disk Storage Format Tool

Step 3) Write the FreeNAS image to USB key

The next step is to download Physdiskwrite from here. It is a ZIP file. Unzip it and copy physdiskwrite.exe and PhysGUI.exe to C:\Temp. Run PhysGUI.exe. It has a graphical interface and will display information about storage devices (hard drives and USB devices:


Remember the Device ID (first column) of your USB stick. Open a command prompt, change the folder to C:\Temp and type:
physdiskwrite -u FreeNAS-i386-embedded
It will list the disks (the same Device ID you got from Physdiskwrite) and will ask you to which of them to write the file. In my case it is drive 1 (type 1 and press)

It will ask you to confirm (press y followed by)


The program will start writing the file and you can see the progress. After it is done you have USB stick with FreeNAS installed on it. To try it reboot your computer and make sure it boots from the USB stick (either change the boot sequence in BIOS or use one of the hot keys during boot to enter the menu where you can select the device to boot from).

Some people are experiencing problems at this step. One suggested solution (thanks Jim) is:
Open a command window as admin (“cmd”)
Type “diskpart” and hit enter.
Type “list disk” and hit enter to find out the number of your drive.
Type “select disk X” (where you replace X with the number of your drive) and hit enter.
Type “clean” and hit enter.
after that go back to your temp folder and then try the process again.

If something goes wrong and you do not get a working FreeNAS on USB stick then try the first method – burn the .ISO file to a CD, boot from the CD and install FreeNAS to USB.

If you decide to go for version 7.x you get bit-torrent client (Transmission). It is missing in 8.0.2 but there are plans to be included in the future versions.

See Roadmap for 8.1

That is all.

Or almost. Probably you could have got the same information elsewhere – in the Google’s age it is hard to be original. Actually some time ago I came across a discussion about whether the blogging was declining. There were several responses in support of this – people were not seeing much sense in re-posting information available in 1000’s other places.

Saying that I would like to thank you for visiting my blog.

Jan 26, 2015

Apple iPhone 6 vs Huawei Honor 6 Plus Camera Review

The Huawei Honor 6 Plus made the headlines a few days back with its variable aperture dual rear camera setup. We have already added a few samples from the phone in our previous article and today, we have some more camera samples which are compared with Apple iPhone 6 camera samples. 


Variable aperture is made possible with the help of the advanced algorithms inside the Honor 6 Plus. Using the feed from both the 8MP rear cameras, the phone lets the user control aperture ranges from f/0.96 to f/16. In the camera menu, there is a slider which changes these aperture levels, even after the image has been captured. The two 8MP symmetrical cameras at the back along with the powerful 3IE algorithm make this all possible. The primary 8MP camera in the setup features auto-focus with f/2.0 aperture and the secondary 8MP has a fixed focus with f/2.4. 

The primary camera focuses on nearby objects and the secondary fixed-focus camera captures a flat image. With a combination of the two sensors, the Honor 6 Plus offers features such as variable aperture, depth of field and faster HDR. This also helps in better low light performance, which you'll clearly see in the pictures given below.

Huawei Honor 6 Plus

Apple iPhone 6

Huawei Honor 6 Plus

Apple iPhone 6

Jan 19, 2015

Pear Linux OS 8

Pear OS 8 was released recently. Pear OS main goal is to be an Ubuntu/Debian based Linux Operating System for Desktop, Notebook, Phones and Tablets. Pear OS 8 is based on GNOME but look and feel is similar and inspired from newly released Apple iOS7. Pear Cloud is the newly included feature in Pear OS 8 to backup and sync data over the internet.


You’ll get 2 GB of space to organize your data on Pear Cloud. This post describes the installation of newly released Pear OS 8 version. Pear OS is freely available to download and use which has a simple and powerful interface. You will experience complete multimedia functions and for those users who prefer Apple iOS like operating system.

Recommended Minimum System Requirements
  • 700 Mhz CPU Processor
  • 512 MB Memory
  • 8 GB Free Disk Space
  • 1024×768 Screen resolution
  • Removable Media drive or USB port
Applications included in Pear OS 8
  • Pear Software Center
  • Shotwell
  • Empathy IM
  • Firefox
  • Pear Cloud
  • Thunderbird Mail
  • Brasero Disc Burner
  • Musique
  • VLC Media Player
  • Pear Contacts
  • PPA Manager
Pear OS 8 Download

Pear OS 8 is available for 32bit and 64bit. I’ve used 32bit version in this installation. You can download Pear Linux OS 8 for 32bit pearos8-i386.iso from here  and 64bit pearos8-64.iso here.

Jan 18, 2015

Western Digital 1TB Live Hub Mixes Set-Top Box

Western Digital announced on Tuesday a new set-top box, the WDTV Live Hub, which combines streaming of Web content like Netflix with a 1 TB hard drive for playing your media on your HDTV.

The competition in the field of set-top TV boxes is heating up faster than ever. Google TV, Apple TV, Roku, Boxee and others all allow users to access content from the Web via services like Netflix, Pandora and YouTube, all on their TV. Western Digital's WDTV Live Plus hasn't received quite the press of those other devices, but it's a good way to stream Web content, and your own music and movie collection, to your TV.


On Tuesday, Western Digital announced a new model in the WDTV line, called the WDTV Live Hub, that takes the capabilities of the WDTV Live Plus, and adds a new interface (in an attempt to improve upon the poor interface of the Live Plus) and a 1-terabyte hard drive for storing local content.

Essentially, the WDTV Live Hub is a combination of a networked hard drive that allows you to access its data from other devices, and a set-top box that streams Web content. The 1TB drive is large enough for most people's media collections, and the Live Hub can be paired with Live Plus devices (which are still going to be sold, for $99) to stream content from the Hub to other screens around your house. It's one box, with all your media (both that you own and from various Web services), that connects to your TV for simple viewing.

The 1.22-pound Live Hub supports 1080p HD playback via an HDMI TV output, can stream from Netflix, Pandora and other services, and gets first-run movies from Blockbuster on Demand. WD claims that the Live Hub has the ability to play "virtually any media file." It supports a huge number of file formats, from images to videos and music files, and doesn't appear to have any of the Apple TV's or Roku's restrictions.

Western Digital has also apparently learned a few lessons from the Live Plus box as well, and a number of improvements havefound their way into the Live Hub. There's support for a wireless keyboard for easier navigation and search, as well as a brand-new interface that WD says is much improved.

DLNA extension enables multi-screen delivery through Set-Top-Box

MSOs and other service providers will soon be able to deliver multi-screen content directly through set-top boxes, in addition to – or instead of – the broadband channel. The enabler will be the DLNA CVP-2 guidelines published today.


Service providers have long been able to securely distribute IP-based content through broadband networks and broadband routers and still maintain security for the content. Previously, secure multi-screen distribution of MPEG-based pay TV content delivered through the set-top was not possible.

While the prospect of creating a home network using a set-top/gateway is no doubt enticing, success will depend entirely on encouraging the participation of enough service providers and consumer electronics (CE) companies.

"DLNA’s new CVP-2 Guidelines provide the industry with a foundation to significantly enhance consumer enjoyment of premium content offerings from their service provider. Content providers' rights are preserved, devices will have greater functionality, and consumers will have greater viewing device options. This is a win for all stakeholders,” said Tom Lookabaugh, chief R&D officer, CableLabs. CableLabs is a contributing member in the DLNA group, contributing to the development of the technology.

As of now, few companies have publicly committed to using DLNA CVP-2 – even among the contributing members. In addition to CableLabs, they include Comcast, Cox Communications, and Time Warner Cable, Broadcom and Samsung.

That said, interest in the technology has begun to percolate. At the recent CES, companies that showed technology or demonstrated support for DLNA CVP-2 included ARM, Broadcom, Access, AwoX, JetHead, SiliconDust, Videon and ViXS Systems.

Joerg Eggink, product director at Access, said, “…we're already seeing very high levels of interest from our broadcast and CE device customers.”

Karthik Ranjan, ARM marketing director, operator relations, said, “The ARM ecosystem has invested heavily in HTML5 technology within the mobile market, which will in turn provide huge commercial gains for the Pay TV sector as it will have access to the constant and rapid innovation.”

David DeAndrade, a fellow in Comcast’s office of the CTO, is a spokesman for DLNA. He said in an interview with CED that there have also been some European satellite and telco service providers who have been involved, though they did not participate at the official “Contributor” level.

He acknowledged that the adoption of DLNA CVP-2 will have a chicken-and-egg element to it. The technology will require a critical mass of both service providers and CE companies. Given that, it’s notable that Apple has not participated in the effort so far.

“Success will invite more service providers in, and more CE companies in. If we get a good launch this could very well become a success,” DeAndrade said.

DLNA CVP-2 is implemented using open source technologies including linux platforms, HTML5, MPEG-DASH, and DTCP-IP, the digital rights management (DRM) software that authorizes and enables sharing within a home network.

Support for DLNA CVP-2 is also built into the RDK software stack, DeAndrade noted.

Products will have to be certified before being marketed. Certification is expected to begin in September. There will be five or six organizations that will perform certification testing around the world. In the U.S., the University of New Hampshire will be one.

DLNA expects certified products to hit the market at the end of this year.

DLNA CVP-2 provides several advantages, but the topline benefit is the ability to deliver video in a home network through a set-top or gateway, as opposed to an Ethernet/Wi-Fi router, no other equipment required.

Display devices can include PCs, Blu-ray players, game consoles, laptops and other mobile devices. Every device that would connect in a DLNA CVP-2 would need to be enabled with the technology. In many cases, that might require a simple app download for CE devices.

It is up to the CE companies to create those apps for their products. The way the technology is set up, the CE device will go out and discover the gateway, and access the remote user interface (RUI).

Because the RUI is HTML5-based, it can be consistent across all devices.

Once connected, the viewer can then go through the menu of content available. If Comcast were to adopt this technology, for instance, that would all go through the X1 platform.

The number of devices that could be supported would depend on the number of tuners in the set-top/gateway; gateways typically have 4 or 6.

It would be up to service providers to provide support pages that explain what the service is, what devices will be supported, and where to download apps for devices that can be used but didn’t come with the necessary software already installed.

Service providers would need to install a DLNA server.

Jan 17, 2015

Macs undetectable virus that "can't be removed"

A security researcher has discovered a way to infect Macs with malware virtually undetectable and that 'can't be removed.'

The attack, which has been called Thunderstrike, installs the malicious code into the Boot ROM of the system via the Thunderbolt port.


Trammell Hudson, who works for hedge fund Two Sigma Investments and is also the creator of the Magic Lantern open-source programming environment for Canon DSLRs, discovered the vulnerability after his employer asked him to look into the security of Apple notebooks.

"A few years ago we were considering deploying MacBooks and I was asked to use my reverse engineering experience to look into the reports of rootkits on the Mac to see if it was possible to patch the firmware to be secure against them," wrote Hudson in a summary of the vulnerability.

After initially discovering that the Boot ROM could be tampered with if the notebook was physically dismantled to give access to the chip soldered onto the motherboard, he then refined this technique so the attack could be carried out via the system's Thunderbolt port.

"It turns out that the Thunderbolt port gives us a way to get code running when the system boots," Wrote Hudson. "Thunderbolt brings the PCIe bus to the outside world and at boot time the EFI firmware asks attached devices if they have any Option ROMs to be run."

Hudson discovered that he could use a modified Apple gigabit Ethernet Thunderbolt adapter to carry out the attack.

"Since it is the first OS X firmware bootkit, there is nothing currently scanning for its presence. It controls the system from the very first instruction, which allows it to log keystrokes, including disk encryption keys, place backdoors into the OS X kernel and bypass firmware passwords," Hudson said.

And once it is on your system, it is incredibly hard to remove.

"It can't be removed by software since it controls the signing keys and update routines. Reinstallation of OS X won't remove it. Replacing the SSD won't remove it since there is nothing stored on the drive."


"The classic 'evil-maid' attacks also are feasible. Given a few minutes alone with your laptop, Thunderstrike allows the boot ROM firmware to be replaced, regardless of firmware passwords or disk encryption," explains Hudson. "So while you are getting breakfast at the hotel during a conference and leave the machine in your room and house-cleaning comes by to make up the bed, install the firmware backdoors, and replace the towels."

According to Hudson, Thunderstrike "is effective against every MacBook Pro/Air/Retina with Thunderbolt."

Fortunately, Hudson reports that Apple is working on an update that will prevent malicious code from being written to the Boot ROM via the Thunderbolt port. However, this update would not protect the system from having the Boot ROM tampered with directly.

One defense against this would be to paint over the case screws with glitter nail polish and take close-up photos of the seal you created. The glitter in the nail polish sets into a random pattern that would be impossible to replicate, and as long as you keep the photos safe, you can make sure they screws haven't been messed with.

via www.zdnet.com

Jan 1, 2015

Apple iPhone 6 and 6 Plus, debuted September 19

At a Glance


Apple recently introduced the 4.7-inch iPhone 6 and the 5.5-inch iPhone 6 Plus. Both devices launched on September 19 in the first wave of countries. The first reviews describe the units as "thin and sexy", "bigger and better", with impressive battery life.
Specs
  • 4.7-inch iPhone 6 features a 1334 x 750 display
  • 5.5-inch iPhone 6 Plus features a 1920 x 1080 display
  • 16 GB, 64 GB, and 128 GB
  • $199, $299, and $399 / $299, $399, and $499
Apple has launched two new iPhones, the 4.7-inch iPhone 6 and the 5.5-inch iPhone 6 Plus. Along with larger screens and a completely new iPad-style design with an ultra thin body and rounded corners, the two new phones offer faster processors, better cameras, and Apple's new Apple Pay payment system.

Apple's new iPhones are available in Gold, Silver, and Space Gray, and are available in 16, 64, and 128 GB capacities. The iPhone 6 pricing starts at $199 on contract, while the iPhone 6 Plus pricing starts at $299.

While both models include the same 64-bit A8 chip and the same general design, there are several differences between the two phones. The iPhone 6 measures in at 6.9mm, while the iPhone 6 Plus is slightly thicker at 7.1mm. Apple's iPhone 6 Plus also has three major differentiating factors: optical image stabilization for the camera, and a longer battery life, and an iPad-style landscape mode that displays more content on the screen.

Though the iPhone 6 Plus has optical image stabilization, both phones got some major camera improvements in form of sensor upgrades, improved tone mapping, better noise reduction, and new "Focus Pixel" technology, which improves the phone's ability to select autofocus points. For videos, there's a new 240fps slo-mo option, along with support for shooting in 1080p at 60fps. The front-facing camera was also upgraded, with an f/2.2 aperture that lets in more light and new burst mode capabilities.


Both phones have an impressive new "Retina HD Display," with the iPhone 6 featuring a resolution of 1334 x 750 (326 ppi) and the iPhone 6 Plus featuring a resolution of 1920 x 1080 (401 ppi).

Design wise, the phones more closely resemble the iPad and the iPod touch than the iPhone 5s. Both models have soft, rounded corners and a curved glass screen that melds smoothly into the thin metal body of the device. The volume buttons on the left side of the device are now pill-shaped, and the power button is located on the right side of the device for easier one-handed use.


How to Buy

The iPhone 6 and the iPhone 6 Plus launched on September 19 in the U.S., U.K., Australia, Canada, France, Germany, Hong Kong, Japan, Puerto Rico, and Singapore, following pre-orders that began on Friday, September 12. On Friday, September 26, Apple expanded iPhone 6 and 6 Plus availability to more than 20 additional countries, including New Zealand, Italy, Denmark, and Taiwan, and on October 17, the two devices became available in China, India and Monaco. Later in the month of October, Apple expanded availability to 33 additional countries.

Apple is selling the iPhone 6 and 6 Plus both online and in its retail stores. Though supplies were initially constrained, stock of the iPhone 6 and 6 Plus appears to be improving in the United States and other countries around the world. In the U.S., new orders of both devices ship in just 1 business day for 16 and 64GB models and 3 to 5 business days for 128GB models.

In store supply of both devices is also improving, with retail stores receiving shipments on a near-daily basis. The iStockNow tracking tool can be used to see which models of the iPhone 6 and 6 Plus are currently in stock at a variety of stores, including Apple's retail stores.>

According to an Apple representative, response to the iPhone 6 and 6 Plus was "incredible," setting a new record for pre-orders, and sales topped 10 million during the phone's launch weekend. While it remains uncertain whether consumers preferred the smaller iPhone 6 or the larger iPhone 6 Plus, early analysis suggests buyers favored the iPhone 6 3:1 over the iPhone 6 Plus.


Apple's iPhone 6 is available in 16, 64, and 128 GB capacities, priced at $199, $299, and $399, respectively, with a two-year contract. The iPhone 6 Plus is available in 16, 64, and 128 GB capacities and will be priced $100 higher at $299, $399, and $499, respectively. Both the iPhone 6 and the 6 Plus are available in Space Gray, Gold, and Silver.

Issues

"Bendgate"

Shortly after the iPhone 6 Plus was released on September 19, reports of the device bending when placed in a pocket began to surface. One user, for example, reported slight bending after the iPhone was in a pocket for approximately 18 hours, and after that, several other reports trickled in.

Inspired by the reports of bending, a YouTuber created a video depicting him bending the iPhone 6 Plus with his hands, causing significant damage to the device. The video went viral, and began people worrying about bending the iPhone 6 Plus in their pockets.


It is important to note when watching the video above that the amount of pressure placed on the device is unlikely to be replicated in daily usage. While images have depicted slight bending, there has been no extreme warpage in the casing due to carrying the device in a pocket.

Affected users have reported that Apple has replaced devices that have bent. As shown in another video, the iPhone 6 Plus is less vulnerable to bending when placed in a rigid case, and users can also avoid bending the iPhone by removing it from a pocket before sitting down.

A followup bending video featuring the iPhone 6 demonstrated that the smaller-screened device is much harder to bend and therefore likely less vulnerable to bending when placed inside of a pocket.

In response to all of the media attention that the iPhone 6 Plus bending issues garnered, Apple released a statement to several different sites saying that with normal use, bending in the iPhone is "extremely rare." The company said that only nine customers had complained about a bent iPhone 6 Plus.

In addition to releasing a statement, Apple also invited several reporters to visit its the facility where the iPhone 6 and 6 Plus are subjected to several different tests to ensure strength and durability. As described in reports, the iPhones go through five different tests, including pressure point cycling, three-point bend tests, torsion testing, sit tests, and real-life testing scenarios where Apple employees use the devices.


According to Apple's head engineer Dan Riccio, the iPhone 6 was "the most tested product" Apple's ever created. The company reportedly conducted 15,000 tests on the iPhone 6 and the iPhone 6 Plus. Apple's head of marketing Phil Schiller said that bending was extremely rare, and that the company had "designed the product to be incredibly reliable throughout all your real world use."

Consumer reports went on to test the iPhone 6 and iPhone 6 Plus after reports of bending, and found that the two devices are not quite as bendable as the media has suggested. In a three-point flexural test, the iPhone 6 Plus withstood 90 pounds of force before bending, while the iPhone 6 withstood 70 pounds of force, which is more force than the two devices are likely to be subjected to during daily use.

According to Consumer Reports, though the iPhone 6 and 6 Plus are not indestructible, they "should stand up to typical use."

Crashing Issues

Some 128GB iPhone 6 and 6 Plus units have reportedly been having crashing and boot loop issues, which could potentially be a hardware issue related to the NAND flash in the devices.

Reviews

Initial impressions on the iPhone 6 and 6 Plus are gathered below to highlight the general release reactions to the two new devices.

Apple's two new devices are essentially identical in design aside from the difference in screen size and the battery life/optical image stabilization in the iPhone 6 Plus. One notable improvement in both devices is the longer battery life afforded by the larger batteries. The iPhone 6 Plus is said to last up to 2 days, while the iPhone 6 may last a day and a half.

Brad Molen, Engadget:
Both iPhones are thinner than their predecessor. Whereas the 5s was 7.6mm thick, the 6 comes in at 6.9mm, with the 6 Plus measuring a hair thicker at 7.1mm. I don't always subscribe to the "thinner is better" mantra, but it's a benefit in this case because larger iPhones wouldn't feel as comfortable if they had the same shape as the 5s. If I had to choose based on in-hand feel alone, I'd pick the 6 over the Plus. I can still wrap my fingers around the 6 just as easily as I could with the 5s (and its curved sides don't cut as sharply as the edges on the 5s), but the large-screened 6 Plus is... well, it's manageable.
David Pierce/Nilay Patel (iPhone 6, iPhone 6 Plus), The Verge:
Huge phones get to have huge batteries, and the iPhone 6 Plus is a huge phone with a huge battery: I consistently got about two days of battery life from the 6 Plus in regular daily use -- slightly more than the day and half we got from the iPhone 6, and basically the same as the Note 3.
Walt Mossberg/Lauren Goode (iPhone 6, iPhone 6 Plus), Re/code:
In my tests, I found the iPhone 6's Wi-Fi speeds -- both downstream and upstream -- were roughly double those of the 5s, and about 25 percent faster than those of the Samsung Galaxy S5. But I saw little difference in LTE speeds, either on Verizon or AT&T.
Jim Dalrymple, The Loop:
The 6 Plus was awkward for me to use at first--it was kind of like using a smaller version of the iPad mini, but it was a phone. I had a hard time wrapping my head around the idea of using it on an ongoing basis, but the larger screen eventually won me over.
In More Detail

Design

Measuring in at 4.7 and 5.5-inches, the iPhone 6 and the iPhone 6 Plus dwarf previous iPhone models, but at the same time, the two phones are Apple's thinnest yet, measuring in at 6.9 and 7.1mm, respectively. For comparison's sake, the iPhone 5s was 7.6mm thick.

According to Apple, the thinner profile was made possible by the company's "thinnest display yet," which is made of slightly curved glass designed to flow seamlessly into the body of the device to highlight the "Retina HD" screen of the iPhone 6 and iPhone 6 Plus.


Both devices include prominent antenna bands on the back enclosure, along with a protruding rear lens. The volume buttons are pill-shaped, much like the buttons on the iPad Air, and the power button has been relocated to the right side of the device.

The iPhone 6 measures in at 5.44 inches long and 2.64 inches wide, and weighs 4.55 ounces. The iPhone 6 measures in at 6.22 inches long and 3.06 wide, weighing 6.07 ounces. In comparison, the iPhone 5s is 4.87 inches long, 2.31 inches wide, and it weighs 3.95 ounces.


Retina HD Display

iPhone 6 rumors largely suggested Apple would use a sapphire display cover in the device, but that turned out to be false. Instead, the iPhone 6 and the iPhone 6 Plus use "ion-strengthened" glass with an improved polarizer (for better outdoor viewing), a photo aligned IPS liquid crystal display, and a fingerprint-resistant oleophobic coating.


The iPhone 6 has a 4.7-inch display with a "2x" resolution of 1334 x 740 (326 ppi) while the iPhone 6 Plus has a 5.5-inch "3x" resolution of 1920 x 1080 (401 ppi). Both phones are said to offer higher contrast, better brightness, and improved white balance.

According to a test conducted by DisplayMate, the iPhone 6 Plus display is the "best smartphone LCD ever tested." The iPhone 6 display also received high marks.

Apple has implemented several "Reachability" features to improve the viewing experience on its larger devices, including Display Zoom and landscape view (iPhone 6 Plus only). Display Zoom lets users zoom in to get a closer view at their apps, while standard zoom displays more content on the screen.


Landscape view on the iPhone 6 Plus is designed to make the most of the 5.5-inch screen and to help users be more productive. When in landscape mode, the device will display apps like Mail, Calendar, and Stocks in a wider view similar to the way they're displayed on the iPad.


The iPhone 6 and the iPhone 6 Plus take advantage of dual domain pixels, which improves viewing angles. AnandTech has given an in-depth overview of dual domain pixels, explaining that the technology alludes to the fact that the electrodes in the pixels are not all aligned. Instead, the pixels are "skewed when viewed from the perspective of the lines defined by the rectangular edges of the display," allowing them to compensate for uneven lighting.

Battery Life

The iPhone 6 and the iPhone 6 Plus both offer improved battery life, but due to the larger size of iPhone 6 Plus, it is able to accommodate a larger battery. The iPhone 6 has an 1,810 mAh battery, while the iPhone 6 Plus has a battery capacity of 2,915 mAh.

Because it has a bigger battery, the iPhone 6 Plus has a longer battery life than the smaller iPhone 6. 3G talk time for the iPhone 6 Plus is at 24 hours, compared to just 14 hours in the iPhone 6, for example, while HD video playback is at 14 hours for the iPhone 6 Plus and 11 hours for the iPhone 6.


Reviews of the iPhone 6 and 6 Plus have suggested that the iPhone 6 can last up to a day and a half on average, while the iPhone 6 Plus can last up to two days on a single charge. A battery life test conducted by AnandTech showed the iPhone 6 and the 6 Plus beat out many competing Android devices, lasting longer than the Samsung Galaxy S5 and the HTC One M8. The iPhone 6 Plus had the second longest battery life of any device tested, coming in behind the Huawei Ascend Mate 2.


Despite shipping with a 1A/5W battery, the iPhone 6 and 6 Plus are capable of drawing up to 2.1A/12W of power, which means that iPhone users can likely obtain a faster charging time using an iPad adapter. According to early testing, charging with a 12W iPad adapter charges the iPhone 6 Plus in approximately two hours.

A8 Chip and M8 Motion Coprocessor

Both the iPhone 6 and the iPhone 6 Plus have a new 64-bit A8 processor built on an advanced 20-nanometer process by TSMC. Not only is the chip smaller than the A7 in the iPhone 5s, it's also able to deliver 25 percent faster CPU performance while being 50 percent more energy efficient.

The A8 takes full advantage of Metal, Apple's gaming technology that lets developers create console-style games on the iPhone. According to Apple, Metal is designed to let the GPU and CPU work together to provide detailed graphics and complex visual effects, which means gaming on the iPhone 6 and 6 Plus is going to be better than ever.

Alongside the A8, there's also a new M8 motion coprocessor, which is the successor to the M7 motion coprocessor introduced in the iPhone 5s. The M8 measures data from the accelerometer, compass, and gyroscope, along with a barometer, which is new to the iPhone 6.

With the addition of the barometer, the M8 motion coprocessor can measure elevation in addition to steps taken and distance traveled.

AnandTech has published an analysis of the A8 processor that points towards significant GPU enhancements and an enhanced Cyclone CPU at 1.4Ghz.

The iPhone 6 and 6 Plus have topped CPU benchmarking tests (compared to competing Android devices and the iPhone 5s), but the iPhone 6 Plus lags slightly in graphics performance due to the device's larger screen.


Camera Improvements

The iPhone 6 and the 6 Plus continue to sport an 8-megapixel f/2.2 rear camera, but the addition of several new features will result in vastly improved picture quality. Continuing to offer improved camera capabilities has always been a priority for Apple, with the company even opting to include a protruding lens design to avoid making image quality sacrifices for the sake of the thin design of the iPhone 6 and 6 Plus.

The first major new feature, "Focus Pixels," are designed to speed up autofocusing by providing the sensor with more information about an image, while improved auto image stabilization will compensate for slight amounts of motion blur and hand shakiness. Focus Pixels will vastly speed up autofocusing times and improve autofocusing in low light situations, as demonstrated in a review of the iPhone 6 and 6 Plus cameras.


Both phones also have improved face detection capabilities and more control over exposure, and the Panorama feature now supports high-resolution panoramic photos of up to 43 megapixels.

Video options have been improved in the two devices, and it's now possible to capture 1080p HD video at 60fps. There's also a new 240fps slo-mo mode, and time-lapse video, which was introduced with iOS 8.


The iPhone 6 Plus has one slight advantage when it comes to the camera, however, as it takes advantage of the M8 motion coprocessor to offer optical image stabilization. Optical image stabilization better compensates for hand shake and slight movements in low light than standard auto image stabilization techniques. As a result, it's likely the iPhone 6 Plus will be able to deliver higher quality low-light photos than the iPhone 6.

Along with rear camera improvements, the iPhone 6 and the iPhone 6 Plus have improved front-facing FaceTime HD cameras with a new sensor and an f/2.2 aperture. With these improvements, Apple says the front-facing camera can capture 81 percent more light, resulting in much better low-light photos. There's also a new burst mode for the front-facing camera, which will let users take burst mode selfies for the first time.

In the DxOMark tests from reputable camera testers DxO Labs, the iPhone 6 and 6 Plus both scored an 82, overtaking the Samsung Galaxy S5 and the Sony Xperia Z2 as the best smartphone cameras in both the photo and video categories.

According to the testing, both the iPhone 6 and 6 Plus performed similarly, with the site noting that both had "very good, generally reliable auto-exposure" in a range of lighting conditions and fast, accurate autofocus.

The optical image stabilization in the iPhone 6 Plus, which is the differentiating factor between the two devices, resulted in better noise performance and less ghosting on HDR images, but it did create a video stabilization artifact that ultimately led to a better score for the iPhone 6 in the video category.

Connectivity Improvements

Apple's iPhone 6 and iPhone 6 Plus both offer faster LTE with support for LTE Advanced networks, reaching speeds of up to 150 Mbps, and they offer 20 LTE bands for better connectivity when traveling. A real world speed test has shown some impressive speed gains between the iPhone 6 and the iPhone 5s when LTE Advanced is available.


The devices also include support for Voice over LTE (VoLTE) which allows users to make higher-quality phone calls over LTE. VoLTE will also allow users on CDMA networks like Verizon to use voice and data simultaneously for the first time. VoLTE requires support from both Apple and carriers, and several carriers have pledged to roll out support for the service.

In addition to cellular improvements, the iPhone 6 and the 6 Plus are the first of Apple's iOS devices to offer support for 802.11ac Wi-Fi. 802.11ac Wi-Fi is able to offer connection speeds that are up to 3 times faster than existing 802.11n networks. The speed improvements possible going from the iPhone 5s to the iPhone 6 Plus can be seen in the video below.


Finally, the iPhone 6 supports calls over Wi-Fi, which can result in higher-quality calls, especially in situations where a cellular connection is low. Calling over Wi-Fi is another feature that requires carrier support, but again, some carriers, like T-Mobile, have already pledged support.

Memory

iPhone 6 and 6 Plus teardowns have revealed that both devices continue to offer the same 1GB of RAM found in the iPhone 5s.

Other Features

Like the iPhone 5s, the iPhone 6 and iPhone 6 Plus continue to offer Touch ID, Apple's fingerprint-based security system. With iOS 8, which ships on the iPhone 6/6 Plus, Touch ID will become even more powerful, thanks to third-party Touch ID integration.


Touch ID is also an integral part of Apple's new Apple Pay mobile payments initiative, as is the Near Field Communication (NFC) antenna built into every iPhone 6. Apple Pay is designed to allow users to pay for purchases at thousands of retail stores with just a fingerprint.

Operating System

The iPhone 6 and the iPhone 6 Plus ship with iOS 8, Apple's newest mobile operating system. iOS 8's main goal is to improve integration between Apple devices, both mobile and desktop, through the use of "Continuity."

This article "Apple iPhone 6 and 6 Plus, debuted September 19" is originally posted at macrumors.com and was posted by guest blogger.