Showing posts sorted by date for query linux. Sort by relevance Show all posts

Dec 11, 2020

Time for PLDT Fiberhome ONU/ONT Replacement

 Today I wanted to share to my reader on how-to retired my PLDT Fiberhome ONU/ONT AN5506-04-FA device, its has been there for couples of years that I wish to get rid of it and replace with SFP module that will work for my project. Googling on the net to find docs and most of all can get the most affordable SFP module that I can substitute for my ONT/ONU.

Not just for the SFP module price is cheaper but also it will works on a budget giga Media Converter, on a giga SC switch, or on the MikroTik Hex but like on a pfSense micro ITX box. After Googling sometime I found ZISA OP151S is the most best that suit for my needs but sadly the SFP module manufacturer is no longer active duplicating the said sfp. ZISA OP151S makes it handy for having a web graphical user interface to interact the device module itself and a command line interface to tune up the settings that you need.

Luckily, after Googling again sometime on the net I found similar SFP module that ZISA OP151S does everything do. The GPON SFP stick is from Usource Technology its DFP-34G-2C2 if you want to try searching on the net. What makes this GPON SFP stick even more better than ZISA OP151S its already a ONT/ONU on a STICK, you can plug it directly to a giga Media Converter, SC Switch with sfp port, to a MikroTik giga Switch or to a running pfSense mini ITX box just add a Chelso PCI card with SFP module port.


The GPON SFP module Stick DFP-34G-2C2 ONT/ONU  is base on a SoC ARM v7 (ZX279125) running at 600Mhz and nearly 1200 bogomips, with 32Mb integrated RAM and a 16Mb of external (SPI?) flash (source) running Linux ZTE flavour 2.6.32 in a SFP form factor. You may like to see the datasheet here.

To be able to configure it there has to be some link in the optical connection, otherwise the SFP interface in your switch/router might not linkup and the SFP internal IP might not be reachable.

The default connection info is as follows:

    IP: 192.168.1.1

    VLAN: 1

    URL: http://192.168.1.1

    User: admin

    Pass: admin

In its web GUI you can configure PON settings and even routing mode. By default, there is no WAN connection (this means there’s no routing mode, only bridge with all vlans through the SFP interface port). You can make the SFP a router to route you house/office traffic by making a WAN connection but I prefer to keep it as bridge.

Once in the web configuration page we can configure LOID, SN and their passwords as per our ISP requirements:


There is also telnet access with the following credentials:

    User: root

    Pass: Pon521

Telnet access is for Linux advanced users and is not recommended to tamper with.

The GPON SFP module stick DFP-34G-2C2 can get purchase online via AliExpress online store.

May 22, 2020

Tenda G103 ONU works on HUAWEI OLT


Today a friend from India an FTTH subscriber of RailWire ISP share the thoughts of his Tenda G103  ONU (Optical Network Unit) as a replacement to Huawei ONT (Optical Network Terminal).


Looking for serial port pin header very easy to guess just like the other wireless router that has Ground TX RX and VCC.


The good news firmware is base on opensource OpenWrt image_name=openwrt-lantiq-falcon-EASY98020

The Tenda ONU G103 is equip with 400MHz Falcon-D Lantiq Chips, with 64MB DDRAM and 8MB Flash.


Another interesting command line interface

Press SPACE to delay and Ctrl-C to abort autoboot in 5 seconds
FALCON => bdinfo
boot_params = 0x83F2FF98
memstart = 0x80000000
memsize = 0x04000000
flashstart = 0xB0000000
flashsize = 0xFFFF0000
flashoffset = 0x00000000
ethaddr = C8:3A:35:B3:E8:50
ip_addr = 192.168.5.1
baudrate = 115200 bps
FALCON => ?
? - alias for 'help'
asc0_fixup- fix asc0 pins (for silent boot)
askenv - get environment variables from stdin
base - print or set address offset
bdinfo - print Board Info structure
boot - boot default, i.e., run 'bootcmd'
bootd - boot default, i.e., run 'bootcmd'
bootm - boot application image from memory
bootp - boot image via network using BOOTP/TFTP protocol
chipinfo- print chip info
cmp - memory compare
cp - memory copy
crc32 - checksum calculation
ddrlp - config DDR LowPower
ddrstatus- show DDR Controller status
dhcp - boot image via network using DHCP/TFTP protocol
echo - echo args to console
editenv - edit environment variable
eeprom - EEPROM sub-system
env - environment handling commands
exit - exit script
extphy - external PHY enable (clock and reset)
false - do nothing, unsuccessfully
go - start application at address 'addr'
gpio - input/set/clear/toggle gpio pins
help - print command description/usage
httpd - start webserver
i2c - I2C sub-system
iminfo - print header information for application image
itest - return true/false on integer compare
loadb - load binary file over serial line (kermit mode)
loads - load S-Record file over serial line
loady - load binary file over serial line (ymodem mode)
loop - infinite loop on address range
md - memory display
mii - MII utility commands
mm - memory modify (auto-incrementing address)
mmd - MMD utility commands
mtest - simple RAM read/write test
mw - memory write (fill)
nm - memory modify (constant address)
ping - send ICMP ECHO_REQUEST to network host
printenv- print environment variables
reset - Perform RESET of the CPU
run - run commands in an environment variable
saveenv - save environment variables to persistent storage
setenv - set environment variables
sf - SPI flash sub-system
sfboot - boot from serial flash device
showvar - print local hushshell variables
sleep - delay execution for some time
sntp - synchronize RTC via network
source - run script from memory
test - minimal test like /bin/sh
tftpboot- boot image via network using TFTP protocol
tlb - setup TLB (virtual memory) mapping
true - do nothing, successfully
version - print monitor, compiler and linker version
wdoff - switch watchdog off
wdtest - watchdog test (endless loop!)
wdtime - set watchdog timeout

On the printenv

FALCON => printenv
act_img_addr=0xBF20003C
addip=setenv bootargs ${bootargs} ip=${ipaddr}:${serverip}:${gatewayip}:${netmask}:${hostname}:${netdev}:off
addmisc=setenv bootargs ${bootargs} ethaddr=${ethaddr} machtype=${machtype} ignore_loglevel vpe1_load_addr=0x83f00000 vpe1_mem=1M mem=63M ${mtdparts}
addmtdparts0=setenv mtdparts mtdparts=sflash:256k(uboot),128k(uboot_env),3712k(linux),3712k(image1),384k(rootfs_data),8192k@0(all)
addmtdparts1=setenv mtdparts mtdparts=sflash:256k(uboot),128k(uboot_env),3712k(image0),3712k(linux),384k(rootfs_data),8192k@0(all)
baudrate=115200
boot_image=run boot_image${c_img};
boot_image0=run kernel0_from_sf flashargs addip addmtdparts0 addmisc && bootm ${ram_addr}
boot_image1=run kernel1_from_sf flashargs addip addmtdparts1 addmisc && bootm ${ram_addr}
boot_image_err=setenv kernel_offs ${kernel0_offs};httpd && setenv image0_is_valid 1
bootcmd=run flash_flash
bootdelay=5
committed_image=1
data_addr=0xB07a0000
data_offs=0x7a0000
data_size=0x60000
env_offs=0x40000
env_offs_redund=0x50000
ethact=GPHY0
ethaddr=C8:3A:35:edited
ethrotate=no
extphy=1
fileaddr=80F00000
filesize=380004
flash_flash=run select_image boot_image
flashargs=setenv bootargs rootfstype=squashfs,jffs2
goi_config=begin-base64 644 goi_config@H4sIAGrcIVMCA+1XS0/bQBDOtfkVW3HICbOzT7tWD6hAhQoSIhE9RMja2Jtg@1c5atmnpv+84KTgPp1woFWq+i62dz/PamZ21reOj2M2n6exo5tJo+dp7WVCE@lnLxRGw+maS8B4wD5VKB0D0KXDHdI7T3CrivalMS0iudq//Ee07+RtFf7jjB@zSeDWeYmJhv037miTt2cfDJZOilN8z5Kc4uZygsyYBTkIVWHACNQH5gY9NeU@lGY+s9XGYm3zwqKm+9JGtZlkDeHRyqi0UzLglHuBTxVlwm9lN8dXJ9EkiRYU@yTwutJKKyQ1GFZtsyaEeUH/DeBIncWSKZNMn9LTK07q25Q5JVLgfW8LczdPa@la0Hl+jASqaiz4ssYkQt5QR9o9HVBSUDCAKPrktgKWFaiVUR6n2ol6JD6mkp@FOZHK6VbynnuElTw+3vpgZaKYw4Dta0GUA142pdoRigO0KUGScA9wQPFGJdS@boeADCZUVwiNJFC8KwS2sE3B577GCLptI0l7PhqVPAAssm3brLEAXbYbiWRs@TYQ10aYdv/M7pLBD6qbTyj4mH/gOvRix2qm2Q/iktdkLpnZoxVh8Lndo7RA+@aW2yzBe+rhesNRX2XW7n9UrTrbaMZFIGjCktYaVor4fD8whEQBNTfnuk4nnt@A/cpoz5HdLBXFTMRYL1iNQGwDmphSjNxWRov+eD5WJeSYuU1fqwF4fL7jZWJ@q8xKPHg6RWeZmaGadvXCueLSJRZ3eOPraVylLe/zzRDdfYCJll1nR+xK27We@JM3h8KbPf4vzv0lCvBj/Zmb/go1n5j8CmvkvtBBCaobzn2lN9/P/NUB7e/zP@WO//xdUsykxly+ZI9uLq+wv1P945dvY/KNne/ynyQAFT+/5/DRzg/YHMXU3i@u+beTuo7S0Y/C0vSBO8L6TS15fswDPvN2seL4+HpdXR9etasHODMxd+B8Zfb@8Ly+I+P8+DYcnpLx/dej5hVHCRlXt32814faE74OgUpPST+k/X3b7bHHHnv8@c/wCI53hZAAUAAA=@====@
gphy0_phyaddr=0
gphy1_phyaddr=1
image0_addr=0xB0060000
image0_is_valid=1
image0_version=G10xla_v1.0.0.2_cn
image1_addr=0xB0400000
image1_is_valid=1
image1_version=G10xla_v1.0.0.2_cn
image_name=openwrt-lantiq-falcon-EASY98020
ipaddr=192.168.5.1
kernel0_from_sf=sf probe 0;sf read ${ram_addr} ${kernel0_offs} ${max_kernel_size}
kernel0_offs=0x60000
kernel1_from_sf=sf probe 0;sf read ${ram_addr} ${kernel1_offs} ${max_kernel_size}
kernel1_offs=0x400000
lang=en
load_kernel=tftpboot ${ram_addr} ${tftppath}${image_name}-uImage
load_uboot=tftpboot ${ram_addr} ${tftppath}u-boot.img
machtype=EASY98020
magic_addr=0xBF200038
magic_val=0xDEADBEEF
max_kernel_size=0x180000
net_nfs=run load_kernel nfsargs addip addmtdparts0 addmisc;bootm ${ram_addr}
nfsargs=setenv bootargs root=/dev/nfs rw nfsroot=${serverip}:${rootpath},${nfsoptions}
nfsoptions=rsize=1024,wsize=1024
omci_loid=GPONONU15
ponmac=00:A1:B2:edited
preboot=echo;echo Type "run flash_nfs" to mount root filesystem over NFS;echo
ram_addr=0x80F00000
reset_uboot_env=sf probe 0;sf erase 0x40000 0x20000
restore_sta=0
rgmii0_phyaddr=4
rgmii1_phyaddr=5
save_uboot=sf probe 0;sf erase 0 0x40000;sf write ${ram_addr} 0 ${filesize}
select_image=setenv activate_image -1;if itest *${magic_addr} == ${magic_val} ; then if itest *${act_img_addr} == 0 ; then setenv activate_image 0;fi;if itest *${act_img_addr} == 1 ; then setenv activate_image 1;fi;mw ${magic_addr} 0x0;mw ${act_img_addr} 0x0;fi;if test $activate_image = -1 ; then setenv c_img $committed_image;else setenv c_img $activate_image;setenv activate_image -1;fi;if test $c_img = 0 && test $image0_is_valid = 0 ; then setenv c_img 1;fi;if test $c_img = 1 && test $image1_is_valid = 0 ; then setenv c_img 0;fi;if test $image0_is_valid = 0 && test $image1_is_valid = 0 ; then setenv c_img _err;fi;exit 0
serial_number=5444544335edited
serverip=192.168.1.2
sgmii_inv=1
sgmii_phyaddr=6
stderr=serial
stdin=serial
stdout=serial
sw_release_time=Apr 20 2015
sw_ver=V1.0.0.2
uboot_env_svn=144
update_image0=tftpboot ${ram_addr} ${tftppath}${image_name}-squashfs.image;sf probe 0;sf erase ${kernel0_offs} +${filesize};sf write ${ram_addr} ${kernel0_offs} ${filesize}
update_image1=tftpboot ${ram_addr} ${tftppath}${image_name}-squashfs.image;sf probe 0;sf erase ${kernel1_offs} +${filesize};sf write ${ram_addr} ${kernel1_offs} ${filesize}
update_openwrt=run update_image0 && setenv committed_image 0 && setenv image0_is_valid 1 && saveenv && run update_rootfs_data
update_rootfs_data=sf probe 0;sf erase ${data_offs} +${data_size}
update_uboot=run load_uboot && run save_uboot
us_vlan_id=145
us_vlan_mode=0
us_vlan_priority=1
ver=U-Boot 2011.12-lantiq-gpon-1.2.20.1 (Sep 18 2014 - 15:38:45),uboot_svn_id=144
vlan_mode=0
vlan_mode_option=0
Environment size: 5203/65531 bytes
FALCON =>
To be continue will see the command line interface of this Tenda G103, this is absolutely applicable on PLDTHOMEFIBR, we can now replace our HUAWEI ONU/ONT with this device.

May 14, 2020

TP-Link WR886N Chinese Third Party Firmware

Here we go after we done moding the FLASH and RAM its time for us to Brush it with the third party firmware. This device WR886N version 3.0 is supported by OpenWrt, SuperWrt, DD-Wrt and Gargoyle Linux opensource firmware. What we need is a USB cheap 25Q FLASH programmer and USB to TTL for the serial console. Next is decide to which boot loader you want to be accustom with.


The first boot loader utility is BREED aka  Boot and Recovery Environment for Embedded Devices is a close source boot loader by hackpascal, its in Simplified Chinese language just use Google translate to let you understand their script. You can download it on Google filename breed-tp9343.bin.

The second boot loader is also a BREED but modified version of the Simplified Chinese language its in English version. Download on the Giant Search engine filename u-boot_tp9343.bin.


The third boot loader is from TP-Link WR940N version 3.0 stock firmware stripped u-boot, filename is u-boot_tp-link_wr940nv3.bin.


The first brushing I did is with the TP-Link stock firmware WR940N version 3.x is also identical to WR941ND version 6.x such SoC. RAM and FLASH. Likewise WR940N version 4.x and 5.x too.


This is TP-Link stock firmware version 4.x if you want to know more about the internal web graphical user interface just visit tp-link.com for the respective wireless router emulator.


Brushing with third party firmware such as OpenWrt is straight forward since you can just upload via web interface if the wireless router is in the TP-Link stock firmware, TFTP is another method on brushing the firmware its usually use for device recovery from bricked devices.


I have more favor on OpenWrt third party firmware because of its plenty packages for the wireless router. Successfully also tested on LEDE both WR940N and WR941ND. On the Chinese forum someone mention that the WR886N ver3.0 can be flashed with TP-Link WR940N version 5.x, ow true is it?


This is TP-Link new web graphical user interface that added some features like Access Point only, Repeater or Range Extender, and WISP unlike the old version this addition function is not supported except for WDS and Wireless router only. The said added features were only exclusive for the TP-Link WA series device not on WR and WDR. The firmware option brushing may depends on the users, what I like on OpenWrt firmware is SoC TP9343 can be fully enhanced to 26dBm or 398mW of power.

If you know other third party Linux firmware that I did not mention let me know I want to brush it with your firmware that you have tried.

Jul 22, 2019

Getting the PPP Username and Password for CenturyLink Zyxel C1000Z Modem

My first DSL modem in 1999 required Telnetting in via serial port to USB. I had to call a network technician at Qwest, and followed by typing in what seemed like arcane commands. I had no idea what I was doing. Things have changed for the better, but most DSL modems still have the ability to log into them directly through command line interfaces. The C1000Z runs BusyBox Linux which comes loaded with your usual base Linux utilities, so if you can wield Bash, you can hack your modem.

Grabbing your PPP username

I was looking to enabled the Transparent Bridge mode for my new Netgear R6050 after a friend managed to break the internal antenna on my Zyxel C1000Z, I wasn’t home so I don’t know the physics involved. Rather than pay $99 to CenturyLink for a new modem/router I decided to buy a new WAP/Router.

Having a little network administration under my belt, I figured I could grab the PPP Password.

The following guide was indispensable and got me 95% of the way there so I suggest checking it out first and/or following it along with my more “For Dummies” guide:

How to Find Your CenturyLink PPP Password on a Zyxel C1000Z Modem

You’ll want a basic understanding of SSH and/or Telnet. OS X regardless of version come with SSH and Telnet as does (almost) every flavor of Linux. Windows users will need Putty.

You’ll want a basic understanding of SSH and/or Telnet. OS X regardless of version come with SSH and Telnet as does (almost) every flavor of Linux. Windows users will need Putty.

Step 1:

First you’ll need to enable telnet in your Router, and you’ll need PPPoe enabled (Under WAN settings), these can easily be done through the Modem’s GUI


Step 2:

Fire up your terminal (Windows users will have to use Putty, and translate the instruction) and type:

telnet YOUR-IP-ADRRESS

In this example, my router’s IP address is 192.168.0.1, this is the default address so I would type:
telnet 192.168.0.1
It make take a moment for the router to respond, once it does, respond something like “BCM963268 Broadband Router” and it should ask for your username, type in the username you entered hit return and it should then ask for your password, enter the password you typed in, hit return.

Step 3:

Using the terminal we can call all the active tasks running on the modem, to do so type:
ps
Geek stuff: Users can use sh to access the BusyBox linux Bash shell and run task monitoring software like top. If you’re feeling adventurous, type sh and poke around using commands like ls and top. You can grab the process ID using top just like we do in step 4.

Step 4:

You should see a long list of responses, that read:
PID USER       VSZ STAT COMMAND  
1 admin     1556 S    init  
2 admin        0 SW<  [kthreadd]    3
 admin        0 SW<  [migration/0]  
4 admin        0 SW   [sirq-high/0]
and so on... We’re only interested in one entry, the one that’s running the pppd (or ppp*) command. it’ll probably be at the bottom. It should read something like:
3494 admin     1808 S    pppd -c ppp0.1 -i ptm0.1 -u myusername@qwest.net -p **
The myusername@qwest.net is your username.

Step 5:
cat proc/3494/cmdline 

Next you’ll need to analyze the process ID further, take special note of the preceding number, in this example its 3494. Type in the console:
pppd-cppp0.1-iptm0.1-umyusername@qwest.net-pjlFrVNtRMtU=-f0-D0-n1-L0-X120 >
The password portion of this is encoded, the tricky part here is identifying it. We know the that this is a concatenated line by gauging from the previous line. The password portion should be between -p  and -.  In this example, the encoded password is:
jlFrVNtRMtU=
Step 6:

This password is encoded in base64, thanks to the leg work Make a new tab or new terminal window, and type:
echo "jlFrVNtRMtU=" | base64 --decode
It should spit back something like:

ac7gkDnUmac-pro:~ user$

The ac7gkDnU will be your PPP password. Congrats! You’re now ready to enable transparent bridge mode on your router.

Article posted by blog@greggant.com

Sep 21, 2018

PLDT HOME Fibr Multi-WAN

In February 2007 it was my very first time going out the country to work abroad for operation and maintenance in one of the International Airport in the  Kingdom of Saudi Arabia, I left my previous work in one of the famous University in my hometown. During that time the only fastest Internet broadband connection that you can get for residential was the twin copper wire that carries two carrier in a single physical line,  one for voice such as home phone and the other is data for the Internet. In contrast to my beloved Philippines the Digital Subscriber Loop (DSL) at that time is very expensive, I remember I have three (3)  Internet Cafe whom I work for part time job in 2001 till 2005 and one of the NetCafe only afford a dial-up Internet connection, but during those period of time Netscape is the fave browser and mIrc is the best messenger among all who we used to hang on the net everyday from morning until midnight.


So I experimented my company dial-up internet account whenever I am on the NetCafe during night time to see how it works, so there it goes, it works that credentials. From that moment in time every night time  I hang on my NetCafe I have a free dial-up internet connection. I did the same thing in Saudi Telecom but this time its a Asynchronous Digital Subscriber Line during my three years work period contract and it works because the technology infrastructure used by DSL is same as the dial-up connection the Plain Old Telephone Service (POTS), whereas DSL uses Public Telephone Switch Network (PTSN) is just an upgrade version of POTS using same carrier twin copper wire single physical line.

In the mid of 2009 I got an offered to pursue my MS degree in Electronic and Communications Engineering in Kuala Lumpur to one of the well known International University of that Asia Tiger States, so I did grabbed the opportunity and started new series of being a university student again. The mud city just started their Fiber Optic roll out over the busy town, and my Kondominium were I reside don't offer the Fiber Optic service because its a high rise building and we are on the 11th floor. That's how they pronounce it Kondominium not Condominium, this tall building is equip with xDSL communication infra own by the government the Telekom Malaysia. The good things about Very High Speed Digital Subscriber Line (VDSL) it offers a triple play, you have the voice internet and the video just like the Fiber To The Home (FTTH) the physical connection is twin copper wire of the PTSN whereas FTTH a Passive Optical Network (PON).


I am really eager on experimenting such things like this and I proved that it works as what I have done and mention on my previous case study. In this experiment on Telekom Malaysia xDSL its not only a single connection but multiple logical internet connections. I have a TP-Link WR-TL740N v1.2 reflashed it with OpenWRT firmware Attitude Adjustment 12.09 loaded it with Multi-WAN package and it works I tested up to twelve (12) WANs.

If it works on Saudi Telecom and Telekom Malaysia I thing it would be impossible if it will not work on PLDT or neither to GLOBE Telecom Infrastructure. But this time we are on the PON infra, whether or not the Philippines Giant Telco will of course not right away garbage their vintage SmartBro Canopy equipment  that they still keep on using the authentication technique for P1 wireless CPE an upgrade of SmartBro family brand whom we all know the long term MacDo free internet connection that GLOBE Telco also rival it.

On this case study I am still using my legacy Wireless Access Point (WAP) router WR-TL740N v1.2 it has one WAN port and four LAN ports no modem built but with WiFi BNG 150N Lite. The Processor is 350Mhz MIPS with 4MBit flash and 32MBit of RAM, reflashed with the third party Linux embedded firmware OpenWRT Attitude Adjustment 12.09 and of course the Multi-WAN package.


My final test proves that there is no difference whether the Telecommunication Infrastructure between POTS, PTSN and PON are same regardless to whatever the authentication technique are being implemented they will behave in the same passion, this is just on my observation. I was very unfortunate my dear Professor in that university is a Shifu in Fiberless Optical Communication which is opposite to my field of interest during that time of my study. This case study still unknown issue to the academe, perhaps already known but not yet been publish, not a threat but widely vulnerable.

Aug 5, 2018

How To Backup Fiberhome AN5506-04-FA MTD

First and foremost before doing the backup of the ONU/ONT Fiberhome AN5506-04-FA make sure you are the owner of the device, secondly you responsible for the damage you have done, doing this is a risky and you might be able to brick the equipment if mishandled incorrectly. As a precaution, preferably you have a spare ONU/ONT on your hand in the case of disaster you might not disrupt your internet connection.

How do we backup the ONU/ONT Fiberhome AN5506-04-FA mtd aka firmware?


There are two available terminal that we can gain access on AN5506-04-FA one is via Telnet terminal and the other is via Serial communication port. These two accessible console is also applicable to the other Fiberhome ONU/ONT AN5506-XX-XXX series if you want to explore your own device to prevent your Internet Fiber ONU device being remotely updated upon updated its firmware for you not to have the vast features configuration and all the other setting being hidden by your greedy ISP. To begin with, lets check if the port of Telnet is open we can use NMAP to verify it or other similar port scanner that may give us same result. If the Telnet port is close then we do not have other choice but to open the top cover of the ONU/ONT AN5506-04-FA because Serial Console header is residing on the surface of the board.


What we need for serial communication for us to be able to communicate with AN5506-04-FA Serial Console is a serial com port, or any USB-to-Serial converter device. Then a HyperTerminal, you can also use Putty,you might want to be comfy Hercules will do or any other application alike will serve for data communication between two digital devices. Once you are plugged in then the console terminal is ready. Communication baud rate is 115200 8n1, if everything is properly hooked up, once we fire up the power ON you should see the U-Boot message just started like this.

U-Boot 2010.03-svn671412 (May 27 2017 - 09:37:39)

DRAM:  128 MB
Boot From NAND Flash
CHIP ID = 51152100
NAND:  Special Nand id table Version 1.23
Nand ID: 0xC2 0xF1 0x80 0x95 0x02 0x00 0x00 0x00
Nand(Hardware): Block:128KB Page:2KB Chip:128MB*1 OOB:64B ECC:4Bytes
128 MiB
env0 ok ~~~~~~~~~~~
In:    serial
Out:   serial
Err:   serial
hi_lsw_init
hi_lsw_init_t
MEM_MODE = MEM!
tmp_cmd a =kk=112 mem=240M console=ttyAMA1,115200 root=/dev/mtdblock5 rootfstype=jffs2 mtdparts=hinand:128k(startcode),1M(u-bootA),1M(u-bootB),1M(envA),1M(envB),18M(kernel_rootfsA),18M(app_binA),20M(app_exA),18M(kernel_rootfsB),18M(app_binB),20M(app_exB),12160k(cfg)
kernel_rootfs_mtd_offset = 0x420000
Hit enter to stop autoboot:  2

This is just the first boot, let the system to goes on to the second boot until you see the message like this and then it will tell you to Press Ctrl+C to stop auto setup in 3 seconds, from 2sec to 0sec you must be quick.

CFE adapter module install successfully ...!

CFE hw_adpter_l3 module install successfully ...!

CFE module install successfully ...!
dapter multicast module install successfully, version: Jul 12 2017 10:28:18

 CFE_FH_MARK module install successfully ...!
initialize.sh...

Press Ctrl + C to stop auto setup 0

You are now in the root directory

~ #
Once you type the following Linux command like this cat /proc/mtd then you will see now the list of all MTDs.

~ # cat /proc/mtd
dev:    size   erasesize  name
mtd0: 00020000 00020000 "startcode"
mtd1: 00100000 00020000 "u-bootA"
mtd2: 00100000 00020000 "u-bootB"
mtd3: 00100000 00020000 "envA"
mtd4: 00100000 00020000 "envB"
mtd5: 01200000 00020000 "kernel_rootfsA"
mtd6: 01200000 00020000 "app_binA"
mtd7: 01400000 00020000 "app_exA"
mtd8: 01200000 00020000 "kernel_rootfsB"
mtd9: 01200000 00020000 "app_binB"
mtd10: 01400000 00020000 "app_exB"
mtd11: 00be0000 00020000 "cfg"

Your USB pen drive or Flash drive must be formatted in FAT32 by default in any Microsoft Windows OS. After formatting it eject then plugged it onto the USB port of the AN5506-04-FA device. It will then pop you a message like this.


usb 1-2: new high speed USB device using hiusb-ehci and address 3
scsi1 : usb-storage 1-2:1.0
scsi 1:0:0:0: Direct-Access     TOSHIBA  TransMemory      1.00 PQ: 0 ANSI: 4
sd 1:0:0:0: [sda] 7574304 512-byte logical blocks: (3.87 GB/3.61 GiB)
sd 1:0:0:0: Attached scsi generic sg0 type 0
sd 1:0:0:0: [sda] Write Protect is off
sd 1:0:0:0: [sda] Assuming drive cache: write through
 sda: sda1
sd 1:0:0:0: [sda] Assuming drive cache: write through
sd 1:0:0:0: [sda] Attached SCSI removable disk
fat
open /dev/console successed.
usb led 0  off
usb led 1  on

Verify with the df  Linux command. It will show you the list of all devices in the system.

~ # df
Filesystem           1K-blocks      Used Available Use% Mounted on
/dev/root                18432      9864      8568  54% /
tmpfs                   119696         4    119692   0% /dev
none                    524288         0    524288   0% /tmp
none                    524288         4    524284   0% /var
/dev/mtdblock11          12160       856     11304   7% /fhcfg
/dev/mtdblock6           18432      5796     12636  31% /fh/bin
/dev/mtdblock7           20480     16564      3916  81% /fh/extend
/dev/sda1              3777936    215868   3562068   6% /dev/shm/usb/media/sda1

The USB flash drive is detected as sda1 device (/dev/sda1) and the mount point is located at (/dev/shm/usb/media/sda1), now we have to unmount the USB pen drive device first by not unplugging from the USB port of the AN5506-04-FA. Then mount again the USB flash drive with this following Linux command.


umount /dev/sda1

mount /dev/sda1 /dev/shm/usb/media/sda1

We are ready now for backing up all the MTDs of Fiberhome ONU/ONT AN5506-04-FA, we'll make first folder on the USB drive with this command.


mkdir /dev/shm/usb/media/sda1/backup


Now use these following Linux commands for back up the list of all the AN5506-04-FA MTDs.


~ # dd if=/dev/mtd0 of=/dev/shm/usb/media/sda1/backup/startcode.bin

256+0 records in
256+0 records out
131072 bytes (128.0KB) copied, 0.018642 seconds, 6.7MB/s


~ # dd if=/dev/mtd1 of=/dev/shm/usb/media/sda1/backup/u-bootA.bin

2048+0 records in
2048+0 records out
1048576 bytes (1.0MB) copied, 0.147251 seconds, 6.8MB/s

~ # dd if=/dev/mtd2 of=/dev/shm/usb/media/sda1/backup/u-bootB.bin

2048+0 records in
2048+0 records out
1048576 bytes (1.0MB) copied, 0.146912 seconds, 6.8MB/s

~ # dd if=/dev/mtd3 of=/dev/shm/usb/media/sda1/backup/envA.bin

2048+0 records in
2048+0 records out
1048576 bytes (1.0MB) copied, 0.147150 seconds, 6.8MB/s

~ # dd if=/dev/mtd4 of=/dev/shm/usb/media/sda1/backup/envB.bin

2048+0 records in
2048+0 records out
1048576 bytes (1.0MB) copied, 0.146535 seconds, 6.8MB/s

~ # dd if=/dev/mtd5 of=/dev/shm/usb/media/sda1/backup/kernel_rootfsA.bin

36864+0 records in
36864+0 records out
18874368 bytes (18.0MB) copied, 2.636288 seconds, 6.8MB/s

~ # dd if=/dev/mtd6 of=/dev/shm/usb/media/sda1/backup/app_binA.bin

36864+0 records in
36864+0 records out
18874368 bytes (18.0MB) copied, 3.495190 seconds, 5.1MB/s

~ # dd if=/dev/mtd7 of=/dev/shm/usb/media/sda1/backup/app_exA.bin

40960+0 records in
40960+0 records out
20971520 bytes (20.0MB) copied, 2.980738 seconds, 6.7MB/s

~ # dd if=/dev/mtd8 of=/dev/shm/usb/media/sda1/backup/kernel_rootfsB.bin

36864+0 records in
36864+0 records out
18874368 bytes (18.0MB) copied, 5.694926 seconds, 3.2MB/s

~ # dd if=/dev/mtd9 of=/dev/shm/usb/media/sda1/backup/app_binB.bin

36864+0 records in
36864+0 records out
18874368 bytes (18.0MB) copied, 2.767045 seconds, 6.5MB/s

~ # dd if=/dev/mtd10 of=/dev/shm/usb/media/sda1/backup/app_exB.bin

40960+0 records in
40960+0 records out
20971520 bytes (20.0MB) copied, 2.995862 seconds, 6.7MB/s

~ # dd if=/dev/mtd11 of=/dev/shm/usb/media/sda1/backup/cfg.bin

24320+0 records in
24320+0 records out
12451840 bytes (11.9MB) copied, 1.870105 seconds, 6.3MB/s

Now we are done, we able to backup all the MTDs of Fiberhome ONU An5506-04-FA. Soonest I post an article on How-To upload the MTD int the device incase you bricked you equipment you can repair it by you own.

Aug 1, 2018

How To Change MAC Address on Embeded System

I have just purchased an ONU/ONT Fiberhome AN5506-01-A at AliExpress a well known online store in Asia region. I decided to buy it because of my Fiber Internet Service Provider is locking down all their Optical Network Unit aka Optical Network Terminal which only allow their subscriber to a limited privileges to the CPE device settings and configurations. My ISP are updating their device remotely via OMCI and not through TR069, the updates or the ONU firmware upgrade is done without your knowing to whether it is online or offline it can be done. Exactly the updates upon updates is done prior without noticed the so called firmware!


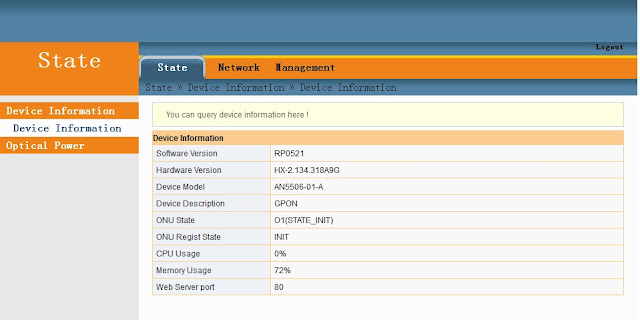
My problem is that the ONU AN5506-01-A came in to me is with the Software Version RP0521 and the Hardware Version is HX-2.134.318A9G, this stock firmware also has a limited basic configuration settings. Meaning some of the Menus and sub-menus are being omitted, you can not set the WAN to Bridge Mode on the web Graphical User Interface (GUI) its explicitly as Router mode only. Another thing is that the LAN menu or the setting is missing from the GUI, you can not modify your desired IP configuration, enabling and disabling DHCP server and relay are out of the context. Most of all its NOT a plug and play electronics equipment.

Why do I need to change the MAC Addresses?

Unlike xDSL internet connection, your ISP will just ask you what username and password you wish or they just provide you the username and the password for you such as yourname@isp and your password, most often you can even choose your desired password as you wish for it. Then choosing and buying your own personal wireless modem router from low to mid or high class residential gateway is just on your finger nail because the device is a plug and play after you input the given username and password given by your ISP its now connected to the internet.

Now here we go, I took the fiber patch cord from my ONU/ONT ISP and then plug it to my new Fiberhome AN5506-01-A the LOS LED turns off from blinking Red, and the PON LED now don't stop from blinking Yellow. Obviously the PON LED means that the ONU is not connected to the network or to the OLT it needs an authentication, once the ONU is connected the PON LED lit will be steady in yellow color.

To get the AN5506-01-A to be connected to the OLT of my ISP we need to copy first the PON MAC address of the ONU/ONT and Serial Number of it that was provided by the ISP and replicate to the new ONU/ONT AN5506-01-A.

How do we change the PON MAC Address of the Fiberhome AN5506-01-A?

The ONU/ONT Fiberhome An5506-01-A is a ARM Linux Embeded system, going to the web GUI there is no way of changing the PON MAC Address. The chances of spoofing the Passive Optical Network MAC address is in the Linux environment, we can log in via Telnet and we can get access to its Command Line Interface (CLI), after reviewing the commands it is very reluctant to clone the MAC address. Another option is thru Serial communication port, this is a terminal also a CLI were we can get help from Busybox.

To change the PON MAC Address of AN5506-01-A heres the command.

First find the physical MAC address of your ONU/ONT device by running this following command :

# ifconfig -a | grep HWaddr
pie0  Link encap:Ethernet HWaddr 00:1A:2B:3C:4D:5E

The hexadecimal numbers in blue denote my AN5506-01-A ONU/ONT PON MAC address.

Next, type this following commands.

# ifconfig pie0 down
# ifconfig pie0 hw ether 00:A1:B2:C3:D4:E5
# ifconfig pie0 up
# ifconfig pie0 |grep HWaddr

To check again if the PON MAC Address have been change already just repeat this following command.

# ifconfig -a | grep HWaddr
pie0  Link encap:Ethernet HWaddr 00:A1:B2:C3:D4:E5

This is just a temporary solution, once the machine is being rebooting it will just go back to its original MAC address.

The final option we can do is still via Serial port but now it would be thru U-Boot Linux environment. Power ON the ONU/ONT
then you will see U-Boot started you must be quick in 3 seconds it will continue to boot to the second level of booting. You have to hit any key in 3 seconds.


U-Boot 2010.03-svn462977 (Mar 09 2016 - 17:03:30)

DRAM:  16 MB
Boot From SPI Flash
CHIP ID = 51161110
NAND:  SFC ID: 0x0
SFC : cs0 unrecognized JEDEC id 00000000, extended id 00000000
SFC ID: 0xef4018
SFC: cs1 W25Q128BV (16384 Kbytes)
SFC: Detected W25Q128BV with page size 65536, total 16777216 bytes
SFC: sfc_read flash offset 0x40000, len 0x20000, memory buf 0x81560008
In:    serial
Out:   serial
Err:   serial
Hit any key to stop autoboot:  2

Here's the following command in U-boot.

# setenv ponmac 00:A1:B2:C3:D4:E5

# saveenv

saveenv command means saving the environment variables. This will save permanently to the SPI FLASH storage.

Saving Environment to SPI Flash...
Erasing SPI flash...SFC: erase offset 0x40000, len 0x20000
erase cs 1
Writing to SPI flash...SFC: sfc_write flash to 0x40000, len 0x20000, memory buf 0x81560008
Erasing SPI flash...SFC: erase offset 0x60000, len 0x20000
erase cs 1
Writing to SPI flash...SFC: sfc_write flash to 0x60000, len 0x20000, memory buf 0x81560008
done

You must see something like this log messages.

Finally you can now use your ONU/ONT AN5506-01-A, just input the Serial Number of your device the OLT of your ISP provider will now give the authority to be connected to the system.

Oct 31, 2017

For TP Routing: Modify firmware size, unlock U-boot partitions, add Fullflash partitions

TP-Link TL-WR703N factory default has only 4MB of flash and 32MB RAM, if you want to play with the OP is simply powerless, so I changed the 8M Flash and 64M RAM.

First, modify the firmware size

OpenWrt in the compile time will be based on each model profile to generate the firmware, if the generated firmware integrated too much software and more than 4MB it will be error, you will find that the firmware can not be generated.

Specific symptoms See my last Post start compiling and compiling openwrt.

Compilation passed, but did not find the firmware in ./openwrt/bin/ , turned up the compile output prompt, and found a similar

  1. [mktplinkfw] kernel length aligned to 914864
  2. [mktplinkfw] *** error: images are too big
  3. make[3]: [install] Error 255 (ignored)
Here's how to modify the default firmware size of the TP series router


Actually very simple, find the target/linux/ar71xx/image/Makefile, search for the model you want to modify, such as 703N, find the relevant 703N parameters

Then change the tplink-4mlzma to tplink-8mlzma on the line, and then

  1. define Device/tl-wr703n-v1
  2. $(Device/tplink-8mlzma)
  3. BOARDNAME := TL-WR703N
  4. DEVICE_PROFILE := TLWR703
  5. TPLINK_HWID := 0x07030101
  6. CONSOLE := ttyATH0,115200
  7. endef

After you save the exit, you can compile the 8M firmware for tl-wr703n.

Note: Some outdated tutorials on the web say that you also need to modify tools/firmware-utils/src/mktplinkfw.c after I test, the latest source code inside this file is not about 703N and other router parameters, you do not need to modify.


II. Unlocking u-boot Partitions

The horse has the hoof, the person has the slip, does not have to die u-boot how dares the confidence to play the OP? Here we will talk about U-boot, U-boot is the embedded Linux system boot, equivalent to the computer BIOS. The traditional u-boot is only responsible for booting the firmware, once the firmware does not start, then the entire router is brick, there is a TTL is also easy, no one can only on the programmer. But there is not dead u-boot, in fact, with the Web Brush Machine interface U-boot, MA Ma no longer have to worry about my machine into bricks, completely without the demolition machine can save bricks. Want to know their own Google, recommended Enshan hackpascal breed, and brush into U-boot tutorial , I do not discuss how to use u-boot, mainly brush into the u-boot will encounter

  1. could not open mtd device u-boot ,can't open device for writing

This is because OpenWrt is locked by default, unless it is unlocked when the firmware is compiled. U-boot

Locate /target/linux/ar71xx/files/drivers/mtd/tplinkpart.c, search for U-boot, find

  1. parts[0].name = "u-boot";
  2. parts[0].offset = 0;
  3. parts[0].size = offset;
  4. parts[0].mask_flags = MTD_WRITEABLE;
Then remove parts[0].mask_flags = MTD_WRITEABLE; This line will be recompiled.

WARM hint: TP series Brush finished breed must change the MAC address for a valid value, otherwise wireless will hang!

III. Add Fullflash partitions

Now the bricks can be saved, but save back the data are all gone, but also start the configuration, want to think all big ah, the good habit of nurturance is to fall roar! Add Fulllash partitions so that you can back up the entire programmer firmware with the DD command, and there is no such thing as an art loss.
Same as /target/linux/ar71xx/files/drivers/mtd/tplinkpart.c to add the following code

  1. parts[5].name = "fullflash";
  2. parts[5].offset = 0;
  3. parts[5].size = master->size;

As shown in the figure


After recompiling and brushing, you can see the Fullflash partition.

View partitions with cat /proc/mtd

Effect as shown


You can then simply back up the programmer firmware through the dd if=/dev/mtd6 of=/tmp/fullflash.bin !

5aimiku

Sep 7, 2015

The Huawei B593 LTE Family

The Huawei B593 4G LTE CPE Router. There are many sub models such as the HUAWEI B593U-12, B593s-82, B593s-42, B593u-501, B593u-513, B593u-91. They are designed to meet the 4G LTE Band requirements for different markets. They incorporate similar configuration and even have the same functions.


Source: http://www.3g-solution.com/sdp/95544...ay_router.html

Confirmed sub-model listing *updated 29 April 2014*:

HUAWEI B593u-12: FDD DD800/900/1800/2100/2600MHz (Cat3)
HUAWEI B593s-22: FDD DD800/900/1800/2100/2600MHz & TDD 2600MHz (Cat4)
HUAWEI B593s-82: FDD DD800/1800/2600MHz & TDD 2300/2600MHz (Cat3)*
HUAWEI B593u-91: TDD 2300/2600MHz (Cat4?)
HUAWEI B593s-601: FDD 1800/2600MHz & TDD 2300MHz (Cat4?)

*This model does not support 3g

And maybe these models also exist:

HUAWEI B593s-58: TDD 1900/2300/2600MHz (End of Life Announcement)
HUAWEI B593s-58b: TDD 1900/2300MHz
HUAWEI B593s-42: TDD 3500MHz (End of Life Announcement)
HUAWEI B593s-850

EDIT: This document seems to list all/most possible B593 models:
B593u-12
B593s-12
B593s-22
B593s-31A
B593s-42 (End of Life Announcement)
B593s-82
B593u-91
B593u-501
B593u-513
B593s-516
B593s-601
B593s-931

Marketing blurb:

The HUAWEI B593 Router is the first LTE TDD wireless broadband router in the world, supporting LTE TDD/FDD 800/1800/2300/2600MHz up to 100Mbps download speed. Access for up to 32 WIFI devices marks as an ideal home entertainment and information exchange hub. It supports multiple devices and provides simultaneous high speed access, perfect for SOHO's and small businesses with its connectivity options.

FEATURES:

Ports:
* 4 x LAN
* 2 x USB

Transmission speed 4G (MAX)
* Download 100 Mbit/s
* upload 50 Mbit/s

Transmission Speed 3G (MAX)
* download 42.2 Mbit/s
* upload 5.76 Mbit/s

WI-FI: 802.11 b/g/n

Additional antenna location: two antenna ports

SIZE: 190 mm x 35 mm x 176 mm
WEIGHT: 500g

Operating systems it's compatible with:

* Windows 2000/ Windows XP/ Windows Vista/ Windows 7
* Mac OS 10.5/ Mac OS 10.6/ Mac OS 10.7
* Linux


The unit is a breeze to setup with all vital info provided on a large label on the port side of the unit. WiFi security and SSID are predefined and okay to use. For the sake of amusing your neighbours, might I suggest:  http://www.reddit.com/r/AskReddit/co...me_youve_seen/

While WPS is supported, it is turned off by default so a quick visit to the router's config page is required. Both WLAN and WPS have dedicated buttons on the one side of the unit - very handy indeed. The WLAN button activates/deactivates the wireless broadcast while the WPS button controls the WPS broadcast for devices that support it.

On that note, wireless on the unit is not particularly strong. I found in the config that the output power is set by default to 90%. Upping this to 100% hardly improved matters so I personally resorted to a repeating strategy. Hello WPS!

An absolute brilliant range of little devices are the Huawei WS3xx line-up. While other functions are supported, I picked up a few WS322 with the sole intention of repeating my wireless signal.

Key to a good repeating strategy is the central location of the base unit ie. the B593 LTE CPE. The repeaters are then placed at the peripheral of the WiFi range and configured to repeat the WiFi signal. This is quite a simple thing to do, of anyone needs help, just shout.

Since I have quite a large residence, I opted to deploy 3 * WS322 in Repeater Mode. This worked brilliantly but I did notice a few quirks I'm still unsure of. For instance, occasionally I'll get no traffic on the network. Through trial and error I found that by unplugging one or two repeaters, and later plugging them back in, solved the problem. It seems to me that too many WS322 units screws up routing in the network but this is only a hunch. I had an idea that my B593 LTE CPE may be faulty so it has actually been returned and I've got a new one now. I'll report back if this phenomenon persists.

Another oddity I've discovered is that speeds are bets when right up close, or directly connected, to the B593. For instance, my gaming PC is only 1.5 metres away and, while still on wireless, obtains much much better speeds than my phone or tablet. Speedtest have always maintained *not* to test speeds over wireless and I guess this is one of the reasons why.

One major gripe, and Huawei are not alone in this, is that there is no app for controlling the B593. Configuring the unit over a phone is a chore in microfiche efficiency.

Sep 2, 2015

Maxis-Fibre-Internet OpenWrt Custom Router TL-WR740N IPTV

First thing to do is need to reflash the TP-Link TL-WR740N with the third party OpenWrt firwmare, in my case I have downloaded the Attitude Adjustment 12.09, after the reflashing, it will automatically prompted you the Login page and you are ask and required make your password for Linux OpenWrt the wireless router.

Second thing to take note is that TP-LINK TL-WR740N physical ports or WAN/LAN ports will varies the name assignment ports on the OpenWrt logical (internal) ports.


As we can see from the screenshot below from left the WAN port is blue, then LAN ports 1-4 is yellow  respectively.


On the other hand, inside the OpenWrt Switch it would be labeled in different way as to that physical ports that we seen above picture.


The WR740N Switch once it is already brushed with the OpenWrt firmware its logical or  internal Switch, the WAN port now is equivalent to CPU ports as the above shows, then LAN port1 is Switch port2, LAN port2 is Switch port3, LAN port3 is Switch port4 and finally the LAN port4 is Switch port1.

Next thing to do is will configure the Switch ports to the desired VLAN tagging, we will assign VLAN621 and VLAN823 for the Internet and for the IPTV. You can add another VLAN later on if you wish to configure for the ATA VoIP the VLAN822 or VLAN821.


We set the VLAN1 to state "OFF" all the Switch ports from CPU to ports 1-4, then create VLAN621 for the Internet, CPU and Port1 to state "TAGGED" and the rest will be "OFF". Followed by creating  VLAN823 for the IPTV, Switch port CPU and Port1 to state "TAGGED" then "UNTAGGED" on Port2 the rest of the Ports will be remain in "OFF" state.

You can copy and paste my /etc/config/network below just edit it with your desired config settings.
root@OpenWrt:~# cat /etc/config/network

config interface 'loopback'
option ifname 'lo'
option proto 'static'
option ipaddr '127.0.0.1'
option netmask '255.0.0.0'

config interface 'lan'
option type 'bridge'
option proto 'static'
option ipaddr '192.168.254.1'
option _orig_ifname 'eth0 radio0.network1'
option _orig_bridge 'true'
option ifname 'eth0 eth1'
option netmask '255.255.255.240'
option macaddr 'E8:94:F6:01:02:03'

config interface 'wan'
option _orig_ifname 'eth1'
option _orig_bridge 'false'
option proto 'pppoe'
option username '123456@home.maxis.com.my'
option password '1234561'
option ifname 'eth0.621'

config switch
option name 'eth0'
option reset '1'
option enable_vlan '1'

config switch_vlan
option device 'eth0'
option vlan '1'
option vid '1'

config switch_vlan
option device 'eth0'
option vlan '3'
option vid '621'
option ports '0t 1t'

config switch_vlan
option device 'eth0'
option vlan '4'
option vid '823'
option ports '0t 1t 2'

config interface 'IPTV'
option ifname 'eth0.823'
option _orig_ifname 'eth0.823'
option _orig_bridge 'false'
option proto 'static'
option ipaddr '192.168.200.1'
option netmask '255.255.255.0'
As you have notice to my config setting, I have switch or interchange my physical WAN port to LAN port1 while my LAN port1 now is my WAN port. So internally, my logical Switch port now will be CPU=LAN, Port1=WAN, Port2=IPTV.


We need to make DHCP server for the IPTV.


My Firewall settings.


Finally, here's  the status screenshot of my TP-Link TL-WR740N brushed with OpenWrt third party firmware. I have replaced already my MAXIS Technicolor TG784n v3 and now using the TP-Link wireless router.


Enjoy! hope this article will help those fellow Maxis-Fiber-Internet users who are having trouble in setting up their TP-Link TL-WR740N OpenWrt firmware in configuring the VLAN tagging to make work their IPTV and likewise the additional ATA VoIP.

Mar 4, 2015

OpenMediaVault

OpenMediaVault (OMV) is a complete and free open-source software (FOSS) network-attached storage (NAS) operating system (OS). It is developed and designed primarily for home use. Developer Volker Theile began development of OpenMediaVault in 2009 Previously he worked with the FreeNAS project.


OpenMediaVault is based on the Debian Linux distribution. It is licensed through the GNU General Public License v3 as published by the Free Software Foundation. OpenMediaVault uses Debian's official standard for package management, the Advanced Packaging Tool (APT). OpenMediaVault is designed to be configured and administered via the Webinterface, which is written in Ext JS, and is currently compatible with 32 and 64bit hardware

Features

Through an Application programming interface (API),  OpenMediaVault is designed for features to be added to the Webinterface via the Plug-in System. The developer provides a group of core Plug-ins that can be installed via the Webinterface, while others are developed by the community. Many of the community supported Plug-ins are currently hosted in an unofficial plugin repository.

Other features include:
  • Multi Language web based graphical user interface (GUI)
  • Protocols: CIFS (Samba), FTP, NFS (Version 3 and 4), SSH, rsync, iSCSI, AFP and TFTP
  • Software-RAID with the RAID-Level 0, 1, 4, 5, 6 and 10 plus JBOD
  • Monitoring: Syslog, Watchdog, S.M.A.R.T., SNMP (v1/2c/3) (Read-Only)
  • Statistic reports per E-Mail
  • Statistic graphs for the CPU-workload, LAN transferrates, hard disk usage and RAM allocation
  • GPT/EFI partitioning >2 TByte possible, ext4 maximal 16TiB
  • Filesystems: ext2, ext3, ext4, XFS, JFS, NTFS, FAT32
  • Quota
  • User and groupmanagement
  • Access controls via ACL
  • Link Aggreggation Bonding, Wake On LAN
  • Plug-in system
Plug-ins

Core Plug-ins are developed by Volker Theile
  • ClamAV - Antivirus software
  • Digital Audio Access Protocol - provides audio files in a local network (also for iTunes)
  • SAN and iSCSI - blockbased access datastores over the network
  • Lightweight Directory Access Protocol - Information request and changes of an Directory service
  • Logical Volume Manager - enables the possibility to create and administrate dynamic partitions
  • Netatalk - File-, time- and printserver for Apple Macintosh
  • Plug-in to support the use of an Uninterruptible power supply
  • easy changes to the Routing tables
  • Plug-in, which allows (automatic) backups to external USB hard disks
External Plug-ins are available via additional package repositories. The majority of those Plug-ins are developed by a group called OpenMediaVault Plugin Developers. The status of all Plug-ins can be viewed online.

Minimum System requirements
  • IA-32 (i386/i486) or AMD64 platform
  • 1 GiB RAM
  • 2 GiB hard drive, solid-state drive, or USB flash drive with static wear leveling support (NOTE: The entire disk is used as a system disk. This disk can not be used to store user data.)
  • 1 hard drive, solid-state drive, or USB flash drive for storing user data
  • 1 network card

Freenas 9.2.1 with Transmission and Couchpotato

Freenas 9.2.1 with Transmission and Couchpotato/Sickbeard as a DLNA-Server

I’m going to describe how to set up Freenas with the popular plugins couchpotato and transmissions to use them for downloading movies/series and streaming them via DLNA as well as mounting the storage on Linux.

With this setup, I manage my movie collection and my wanted movies with couchpotato, which uses transmission to download them. I also use Sickbeard to download TV series. Then I can stream them with the DLNA-server to my TV.

I’m running Freenas 9.2.1 on a HP ProLiant G7 MicroServer N54L (affiliate link). Freenas itself is running on a micro-USB stick. I’m not going to describe how to download and install Freenas on the stick, as described in detail in the docs.

Table of contents

Configuration

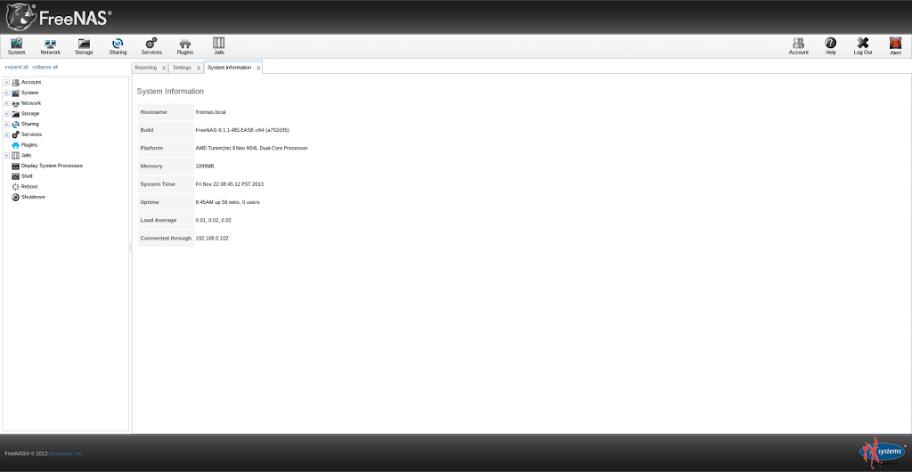
After starting the server and waiting some minutes, Freenas is available under a web-front end. The URL is a local IP-address, which is shown when Freenas has finished starting. After opening it, you’re presented with the System information.

freenas_systeminformation

See the red alert in the upper right corner? Push it. It says that you need to set a password for the admin-account that you’re using.

Since Freenas 9.2.0 the first time you access the FreeNAS administrative interface, a pop-up window will prompt you to set the root password. You should set a hard to guess password as anyone who knows this password can gain access to the FreeNAS administrative GUI.

Network settings

Next on we have to edit the network settings. Go to network > Global configuration. There you can change the name of your Freenas, set the default gateway, name server and so on. Since I use my server at home, I set the gateway and name server to the address of my router. If you want to, you can enable the netwait feature. If enabled, your server will ping the addresses in the IP list when it starts to check if a network connection is possible.
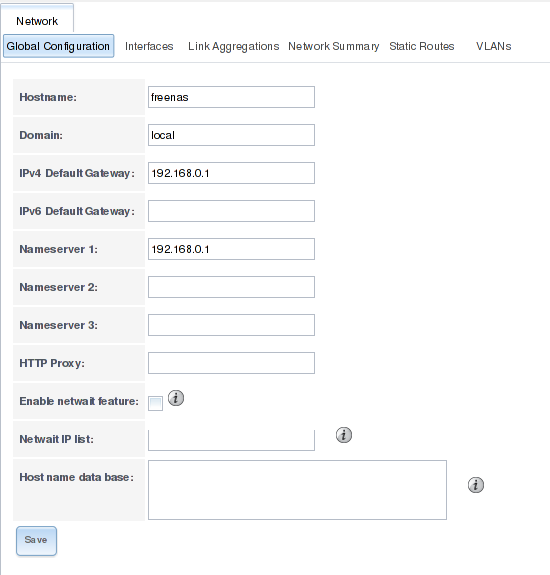
freenas_network_settings

General settings

There are some more settings that you should know about and edit. Open the System > Settings tab.
If your network is secure and only authorized people join it, you may let the “Protocol” option set to “HTTP”. Generally it is recommended to set it to “HTTPS“.

The next option defines the address and port your Freenas-installation listens to; set it to the IP-address the Freenas currently listens on. Set the HTTP-port to 80 and the HTTPS port to 443. Next on there are specific settings for your language, keyboard map and timezone. Set it according to your preferences.

If you’re not using a syslog server or directory service, leave the last two options empty.
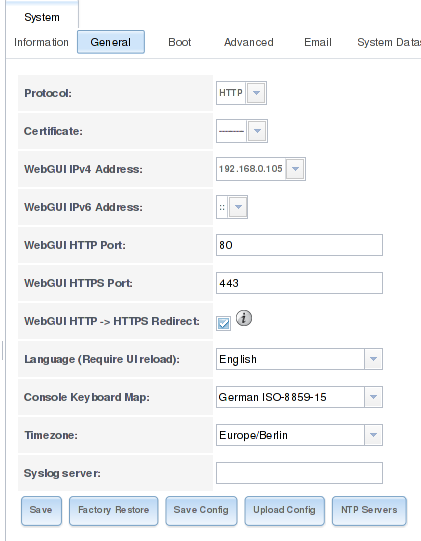
freenas_network_settings_1

Overview of storages and jails

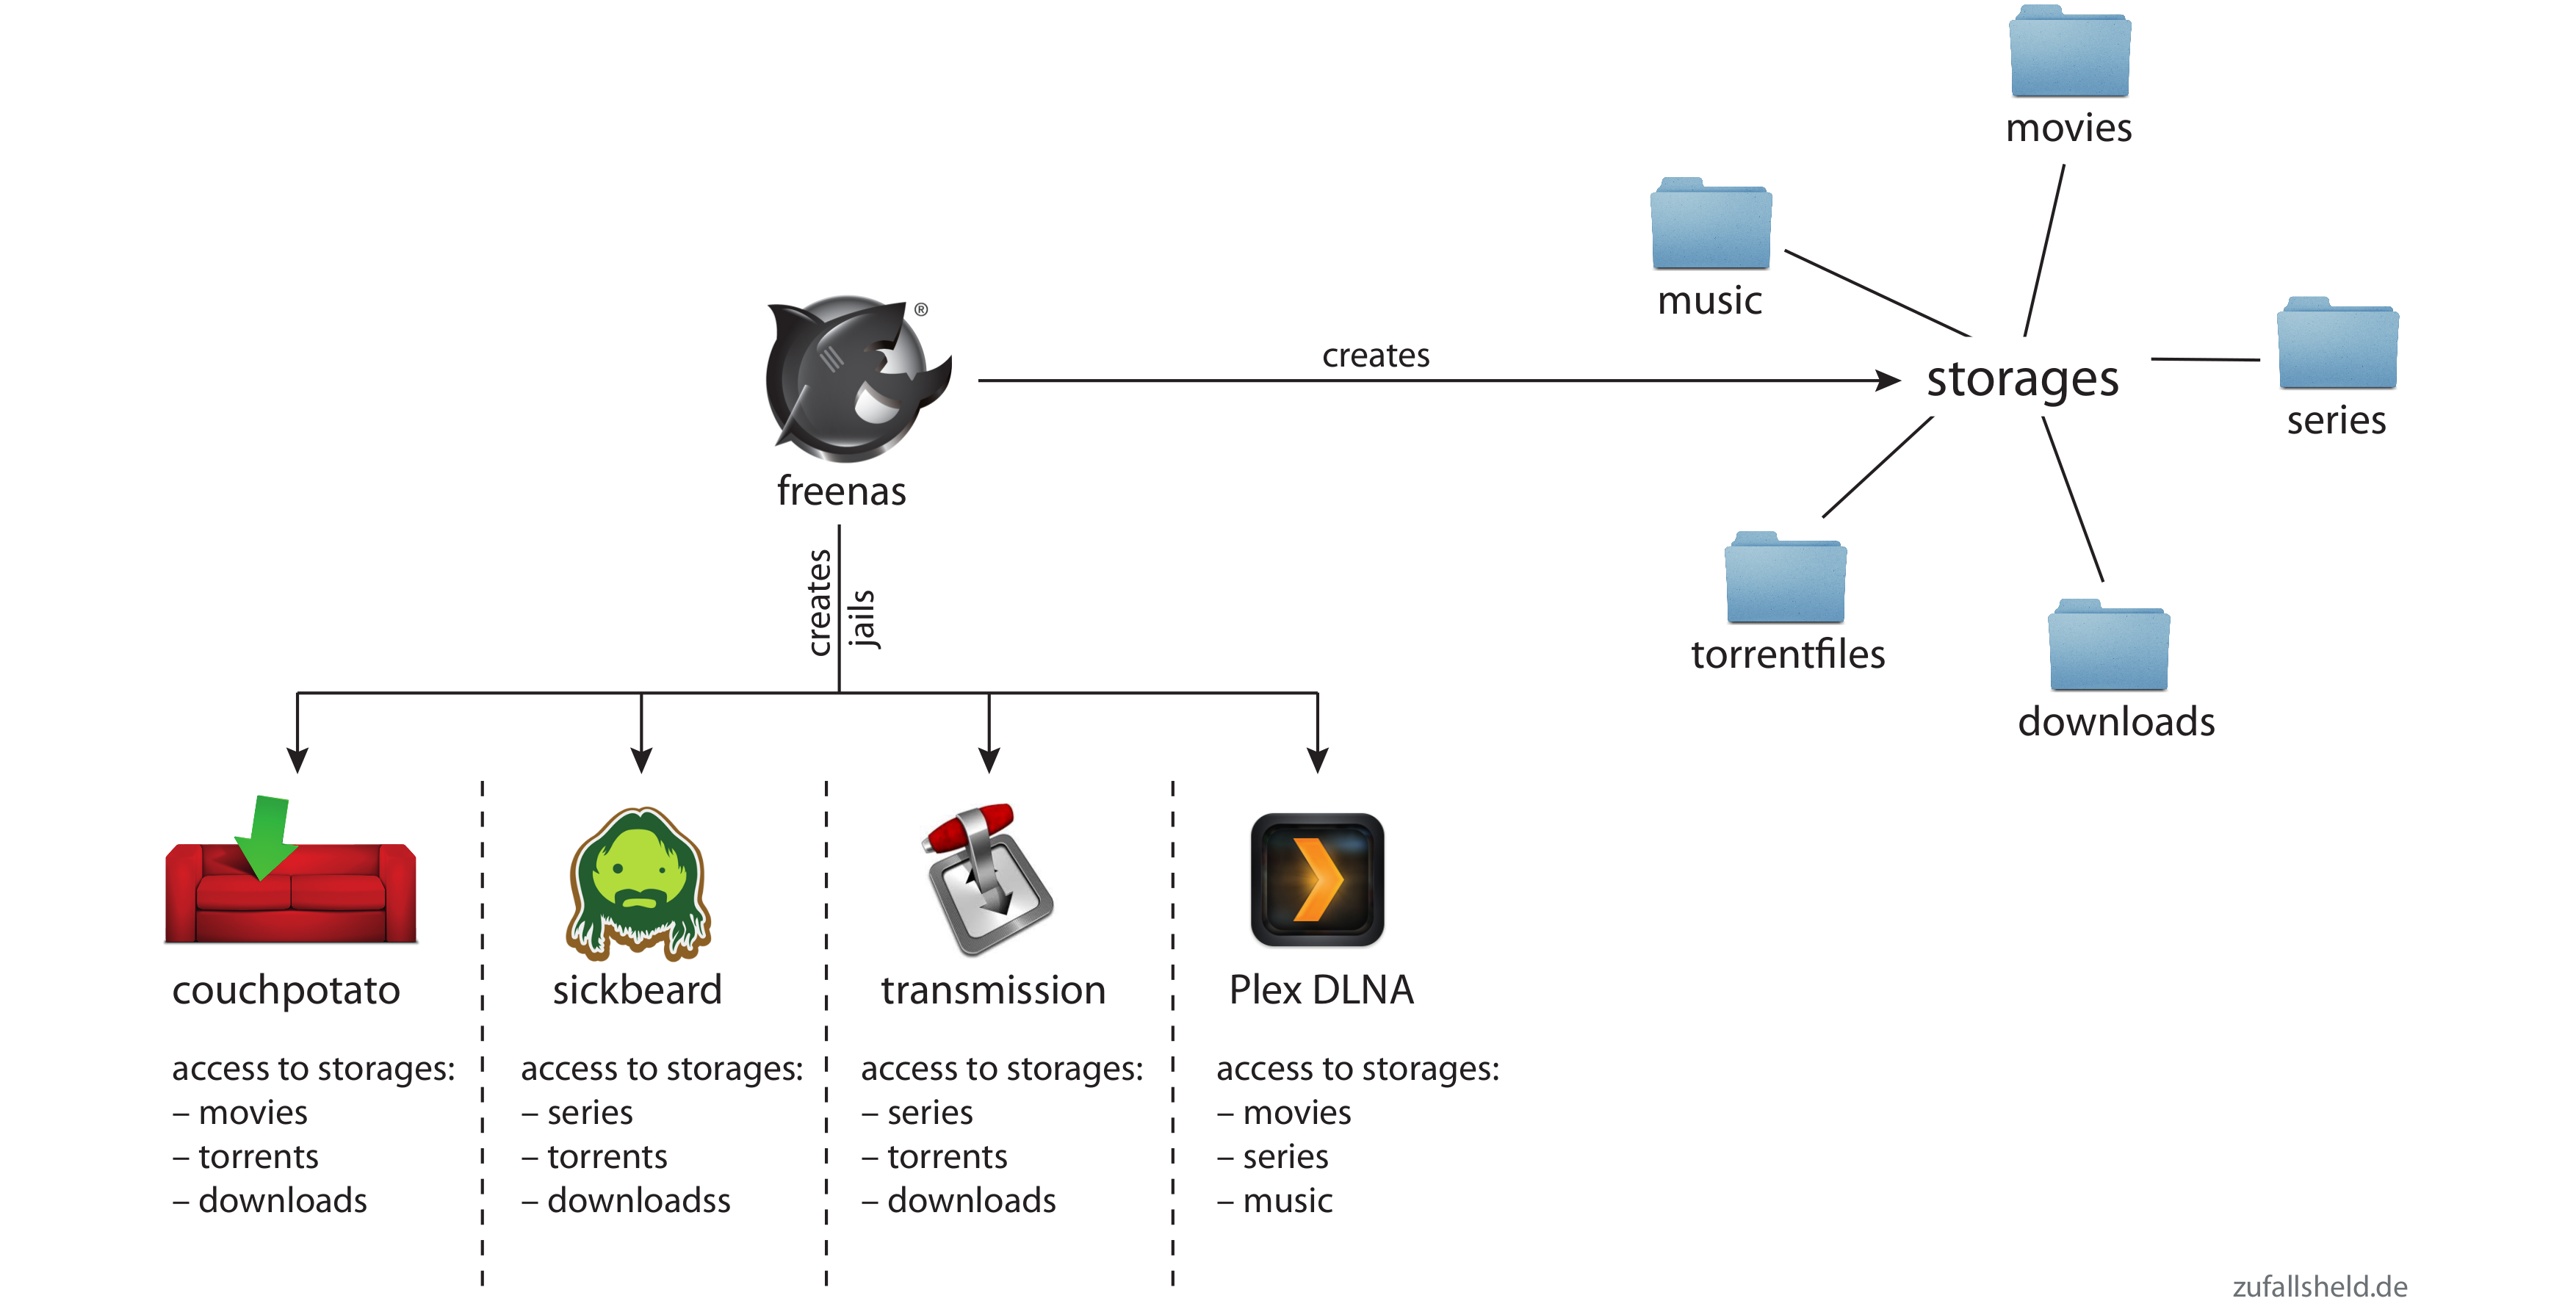
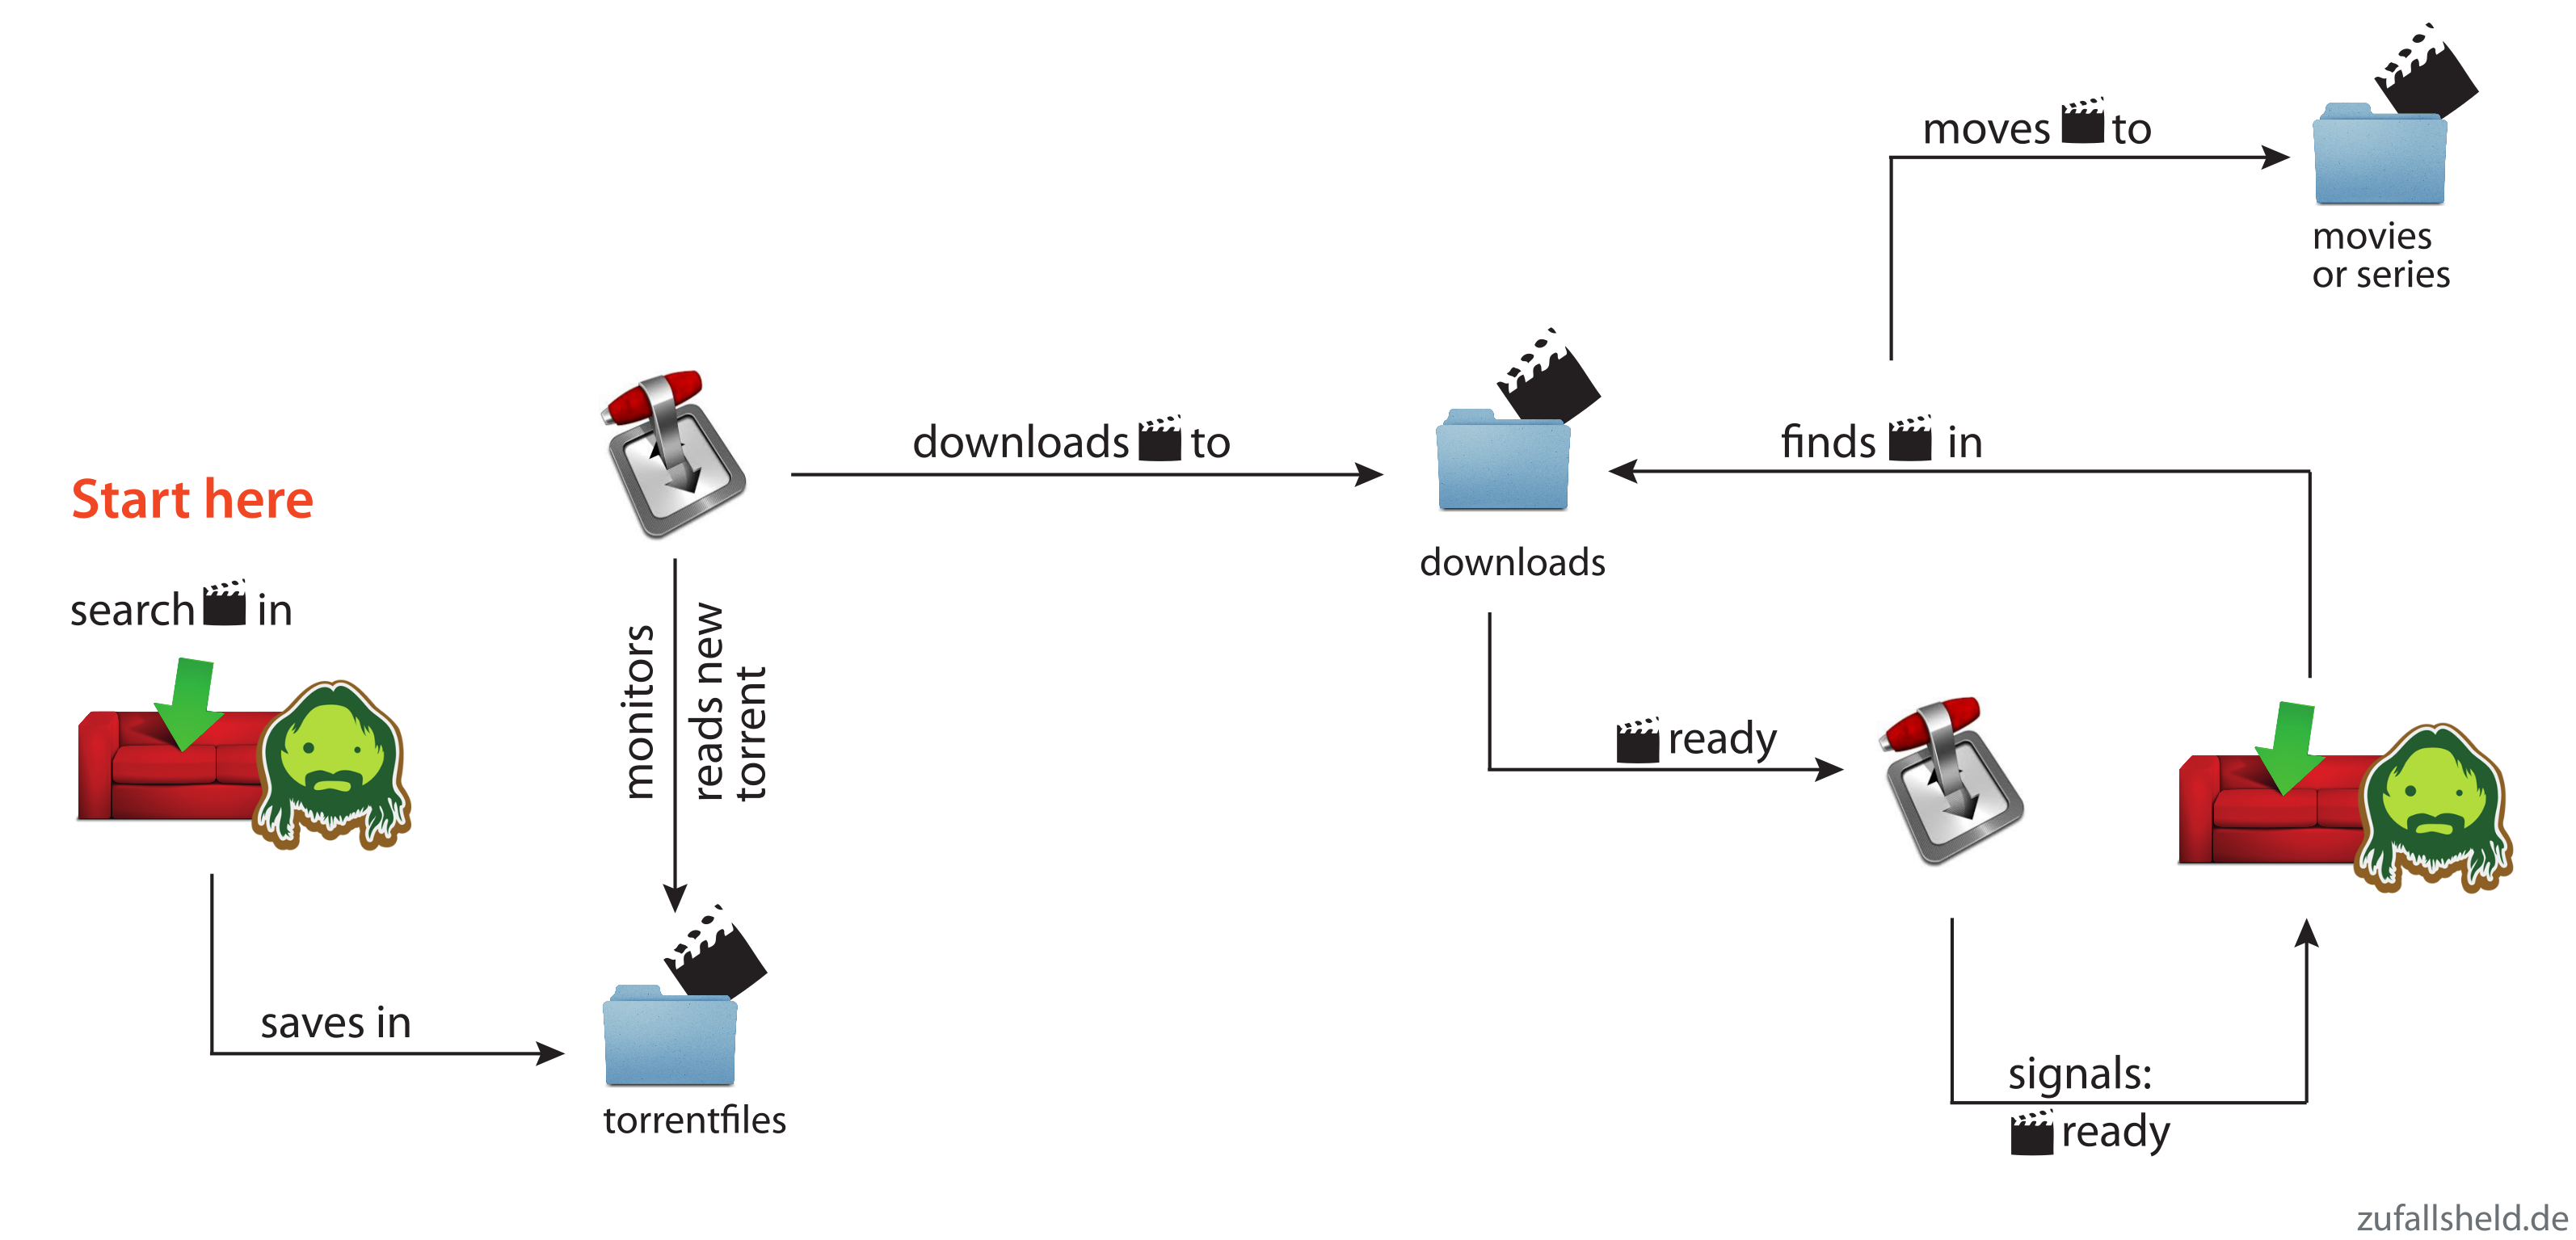
The next steps will include creating storages and jails. To get a better understanding on how these components will work together, my beautiful girlfriend created two diagrams that show how the magic happens.

The first image shows the storages and jails that I created and what jails can access which storages.
freenas_overview


The second image shows the steps that happen, when you want to download a movie or series via couchpotato/sickbeard.
freenas_download_overview

Creating storage devices

Now is the time to add some storage to your server. That is the most important part and you should carefully read the documentation the Freenas community offers. I will not go into detail on what volumes or RAIDs to use. It mainly depends on your needs and what you’ve got hardware-wise.
My use-case is a simple movie- and music-streaming server with no personal or private information saved on it.

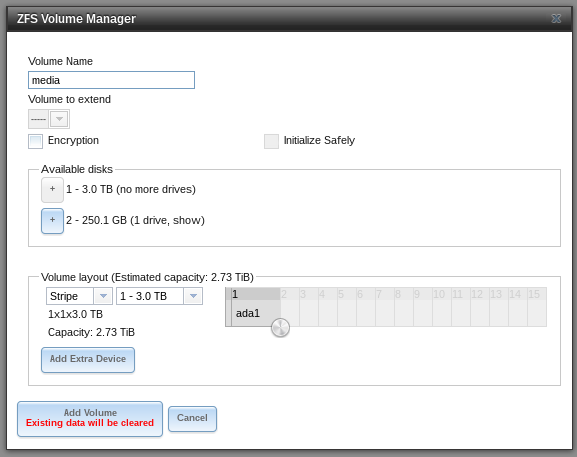
To simply create a new empty volume and attach disks to it, open Storage > Volumes > ZFS Volume Manager, give your new volume a name, add your disks and configure the layout.
freenas_volume_manager

Creating datasets

To logically separate your files, e.g. movies from music, you can create datasets. These datasets can have separate permissions, quotas, etc. allowing you more control over your data.

I created datasets for every kind of data I want to manage: movies, series, music, downloads and torrent-files. To create a dataset click on your created storage, then hit the “Create dataset”-button (the one that looks like an excel-document with a plus). There, set the name for the dataset. You can ignore all other options for now, as they are for advanced users.

Changing permissions of the storage

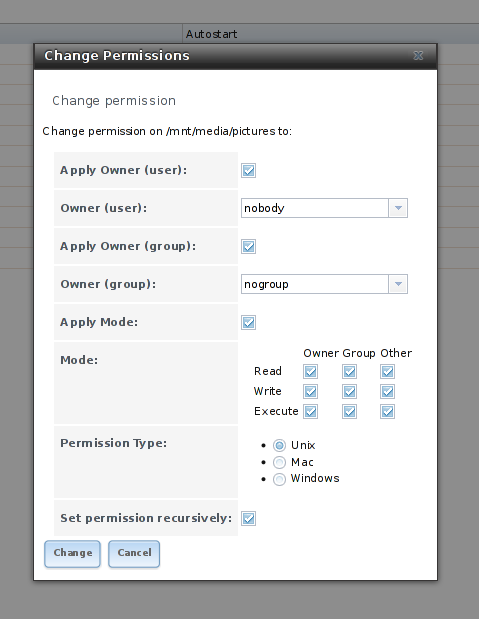
Since there are many plugins and users who want access to your storage, you’ll have to configure the permissions for it. The best way is to set the ownership of the storage to nobody and give read/write/execute permissions to everybody. You should only do this, if you trust the users of your network. To change permissions, click on the “Storage” tab, select the volume you want to edit and click the first button in the bottom line that displays hard disks and a key. There, set the Owner (user) to “nobody”, the Owner (group) to “nogroup” and activate all buttons in the mode. Type of ACL should be set to Unix. Tick the box that says “Set permission recursively” so all other folders and files in the volume will have the same permissions.
freenas_permissions

Adding sharing options

Since I want to access my music and movie collection not only with my TV but also with the computers I’m using, I have to add sharing possibilities. Freenas offers NFS, CIFS and AFP out-of-the-box. I don’t have an Apple-gadget or Windows machine at home, so I’ll only need NFS.

NFS

To add a NFS-share click on Sharing > Unix (NFS) Shares > Add Unix (NFS) Share. There, set the options “Mapall User” and “Mapall Group” to “nobody” and “nogroup” respectively. In the path, add all the storages-directories you want to share. You’ll have to create a separate share for every dataset. When you’re done, you can mount the directories via NFS, the address is the IP-address of your freenas-installation plus the folder you shared, e.g.

192.168.0.102:/mnt/media/movies

Installing the plugins

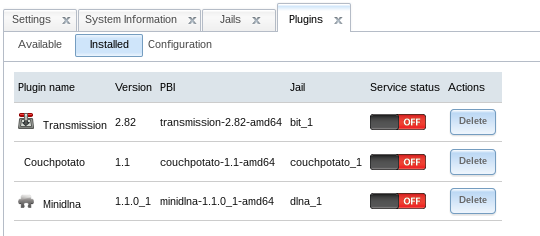
Installing plugins is very easy, as long as you stick to the available ones provided by Freenas. In the Plugins-menu, click on the plugins and then on Install, to install them. Each plugin is installed into a jail, a separate “operating system” in Freenas itself, but we’ll get to that in the next section.
When you’re done, your plugin-page should look like this:
freenas_plugins

Enabling access to the jails

SSH to your Freenas

You’ll likely need command-line access to your Freenas installation and to the jails as well. To enable SSH access to Freenas, go to Services and click on the screwdriver next to SSH. Tick the “Login as root with password” box and save the settings. After that, enable the SSH-Service by clicking the red OFF-button. Now you’re able to connect to your Freenas with SSH by entering the following line into your terminal-emulator of choice:

ssh root@192.168.0.14

(change the address to the address of your Freenas)
Then enter the admin-password and you should be connected to your box.

Using Putty to enter your Freenas

If you’re on Windows and want to connect to your Freenas-installation using Putty, you have to enter the IP-address of Freenas into the “Host Name”-field, then press “open”.

putty

If Putty cannot connect, you probably didn’t use the correct IP-address or you forgot to enable SSH.

Entering the jails

To enter one of the installed jails, type “jls” on the command-line. There you’ll see the available jails. To connect to them, enter “jexec # tcsh” where # is the number of the jail.

[root@freenas] ~# jls
   JID  IP Address      Hostname                      Path
     1  -               bit_1                         /mnt/media/jails/bit_1
     2  -               couchpotato_1                 /mnt/media/jails/couchpotato_1
     4  -               ownbutt_1                    /mnt/media/jails/ownbutt_1
     8  -               dlna_1                        /mnt/media/jails/dlna_1
[root@freenas] ~# jexec 8 tcsh
root@dlna_1:/ #

Adding storage to the jails

Now we’ll have to add the storage to the plugins, so couchpotato, transmission and the DLNA-server can access the same storage and work together. Since jails are separate systems in the server-OS itself, they cannot by default access other parts of your system.

To add the storage, go to Jails, click the plus next to the plugin, open the “Storage” tab and click “Add storage”. You’ll then have to enter the source and destination addresses. 

The source is the storage or dataset you created in the first place. If you did not create datasets before, you either have to do this now or create normal directories as sources with mkdir on the server.
The destinations are directories in the jails that get mapped to the storages outside the jails.
If the destination addresses in the jails do not exist, tick the “Create directory”-box.
To manually create the directories, enter the jail, then you can create directories with the following command:
mkdir -p /media/downloads

Then enter the following command the get the permissions right:
chmod -R 777 /media/downloads

The following part is really tricky as Transmission, Couchpotato and Sick Beard behave very differently with the directories they download data to. I had to edited the following configuration multiple times, so be sure to stay up to date.
  1. Transmission (bit_1): You need the torrent-directory, where Transmission looks for torrents and the download-directory where it downloads the data to.
    - Download-Source: /mnt/media/downloads
    - Download-Destination: /media/downloads
    
    - Torrent-Source: /mnt/media/torrentfiles
    - Torrent-Destination: /media/torrentfiles
    
    - Series-Source: /mnt/media/series
    - Series-Destination: /media/series
    
    - Movie-Source: /mnt/media/movies
    - Movie-Destination: /media/movies
     
  2. Couchpotato: You need the downloads-directory where transmission puts its data into; you’ll also need the movies-directory, where couchpotato moves the downloaded and renamed movies to.
    - Download-Source: /mnt/media/downloads
    - Download-Destination: /media/downloads
    
    - Movie-Source: /mnt/media/movies
    - Movie-Destination: /media/movies
     
  3. Sickbeard: You need the series-directory where Sickbeard puts its data into; you’ll also need the torrents-directory, where Sickbeard puts the torrent file for Transmission to download them.
    - Series-Source: /mnt/media/series
    - Series-Destination: /media/series
    
    - Torrent-Source: /mnt/media/torrentfiles
    - Torrent-Destination: /media/torrentfiles
    
    - Download-Source: /mnt/media/downloads
    - Download-Destination: /media/downloads
     
  4. MiniDLNA/Plex: You’ll need every directory where files are located that you want to play using DLNA, e.g. movies and series.
    - Movie/Series/Music-Source: /mnt/media/{movies|series|music}
    - Movie/Series/Music-Destination: /media/{movies|series|music}
    

Configuring the plugins

Now that you have added the storage to the plugins, you can finally start them. Go to the Plugins-page and click the red OFF-button of all plugins. After that, they should be listed as on, except for miniDLNA, which we’ll have to configure first, but not now.

You can find the IP-adresses of the plugins here:
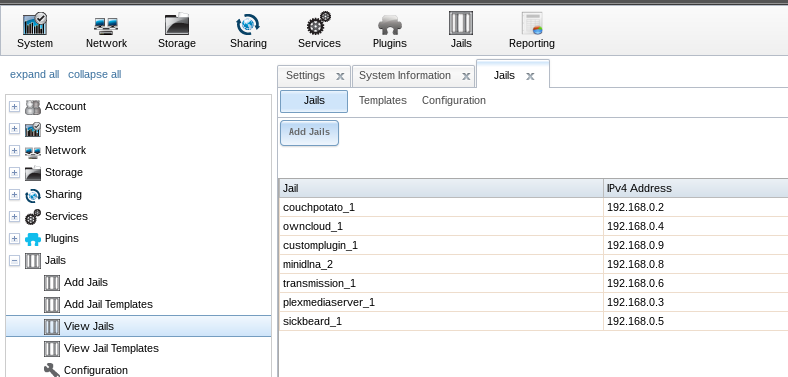
freenas_ip_addresses

Transmission

The “watch”-directory where Transmission looks for torrent-files is normally:

/usr/pbi/transmission-amd64/etc/transmission/Downloads

That’s 50 characters and if you add the jail-directory to it, it exceeds Freenas’ directory-length limit of 88 characters, so you have to change this. Open up the Transmission-settings in the Plugins-tab of Freenas and edit the “Watch Directory” to “/media/torrentfiles” and the Download-Directory to “/media/downloads”.
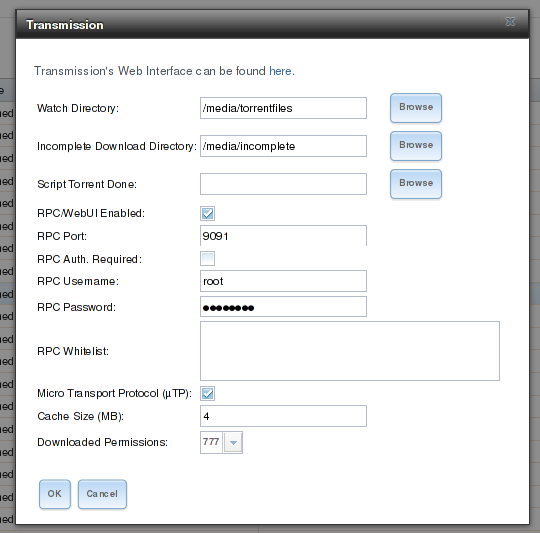
freenas_transmission_settings

Next open the transmission-address in your browser. You’ll see the main interface of Transmission. Click the screwdriver icon in the down left corner to edit the settings. There you’ll see the “download to” option. There should be “/media/downloads” now, too.
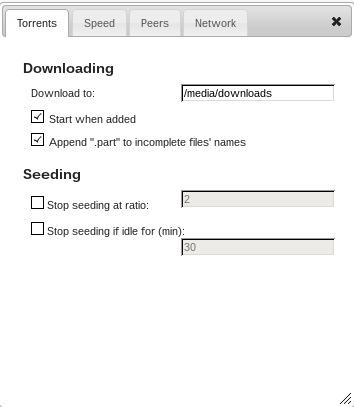
transmission_settings

Now we’ll have to connect to the jail of transmission to manually edit a configuration file. Connect via SSH into your Freenas and connect to the jail as described in the chapter “Entering the jails”. Then you’ll have to edit the file, by entering this on the commandline:

edit /usr/pbi/transmission-amd64/etc/transmission/home/settings.json

But first, stop the plugin or else the settings will be overwritten. In the file, scroll down to the end where you can see the configuration-point called “umask”. Replace the “18” with a “0”. Save the file by pressing “escape”, then “leave the editor” and then “save changes”. After that start the plugin.

UPDATE:


HolyK in the Freenas-forums mentioned a great front end for the remote transmission server, transgui. You can find it here or in your favorite package manager. It’s a nice replacement for the rather featureless web front end of transmission. It’s available for Linux and even Windows.
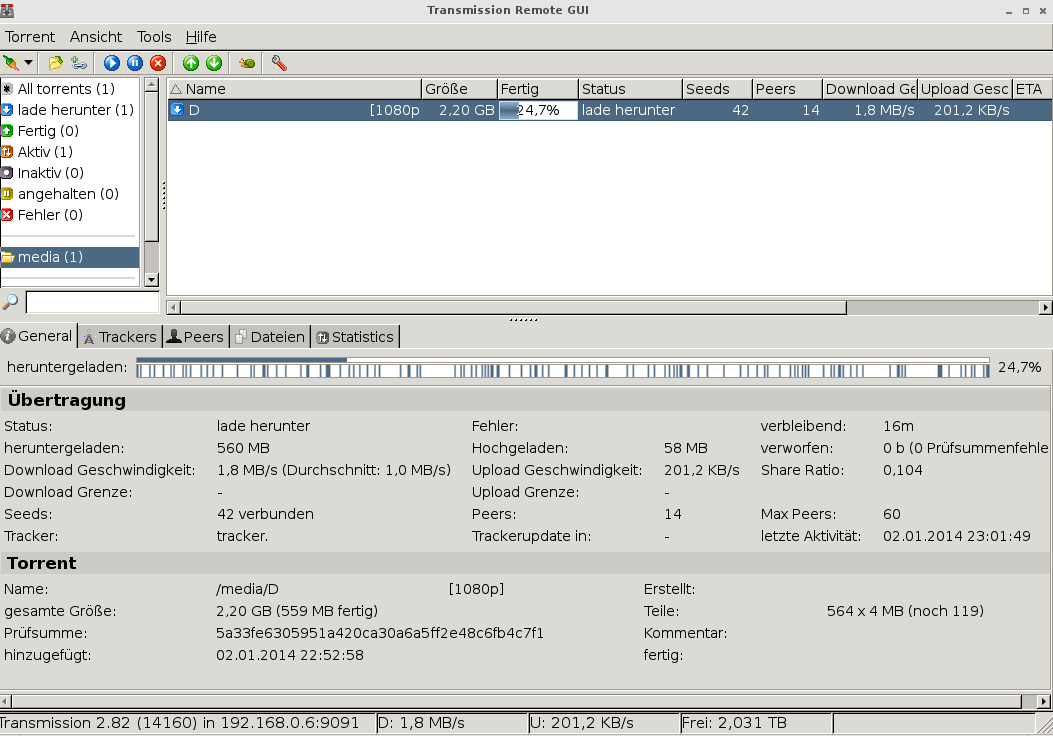
Transmission GUI

After you installed it, point it to the IP address of your transmission-server and then you can see the movies downloading and even add torrent- or magnet-links so they will be downloaded to you Freenas.

Couchpotato

Open the couchpotato-address in your browser. You’ll be greeted with the install wizard. Scroll down to advance in the wizard. Define a user name and password in the General section if you’d like and leave the port to 5050.

In the downloaders section choose Transmission. As host enter the address of your Transmission jail (you can find the address in the jail-section of Freenas). Set the “Directory” to the “Transmission-Destination” you set earlier.
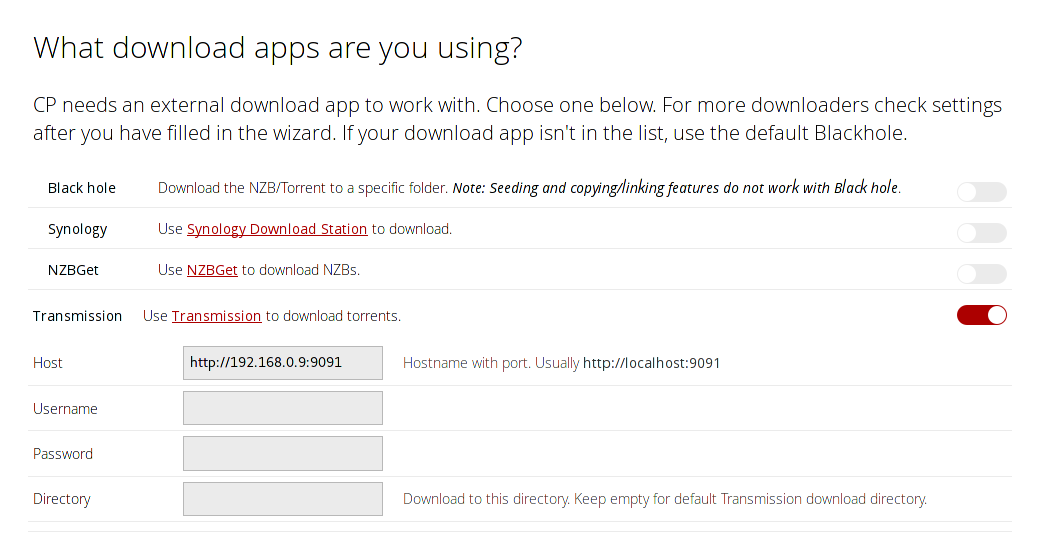
couchpotato_transmission_settings

Scroll further down to “Move & rename the movies after downloading?” (skip the “Are you registered at any of these sites?”-part).

In the “from”-folder set the same folder you just used for the Transmission-directory. The “to”-directory is where the renamed movies will be stored. Set it to the “movie-source” configured in the chapter “Adding storage to the jails”. Tick the “Cleanup”-box so leftover files will be removed after renaming the movies.
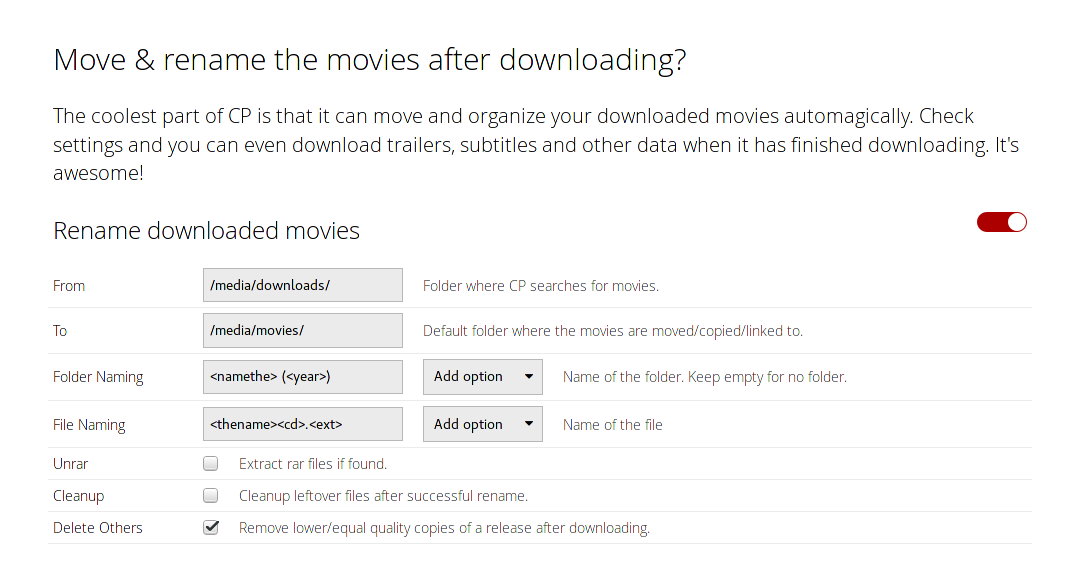
couchpotato_rename_settings

After that, scroll further down and click the huge green button and you’re done with the wizard.
On the main page of couchpotato, click the screw-icon in the upper right to get to the configuration-page. There are many things to tweak here, but I’m not going into detail about them. Right now you have to open the “General” Tab, click on “Show advanced settings” and then enter “0777” in the fields “Folder CHMOD” and “File CHMOD” as shown below.

If you do not do this, you probably will be getting an error-message later in Transmission, when downloading files (the download stops at around 4MB)!
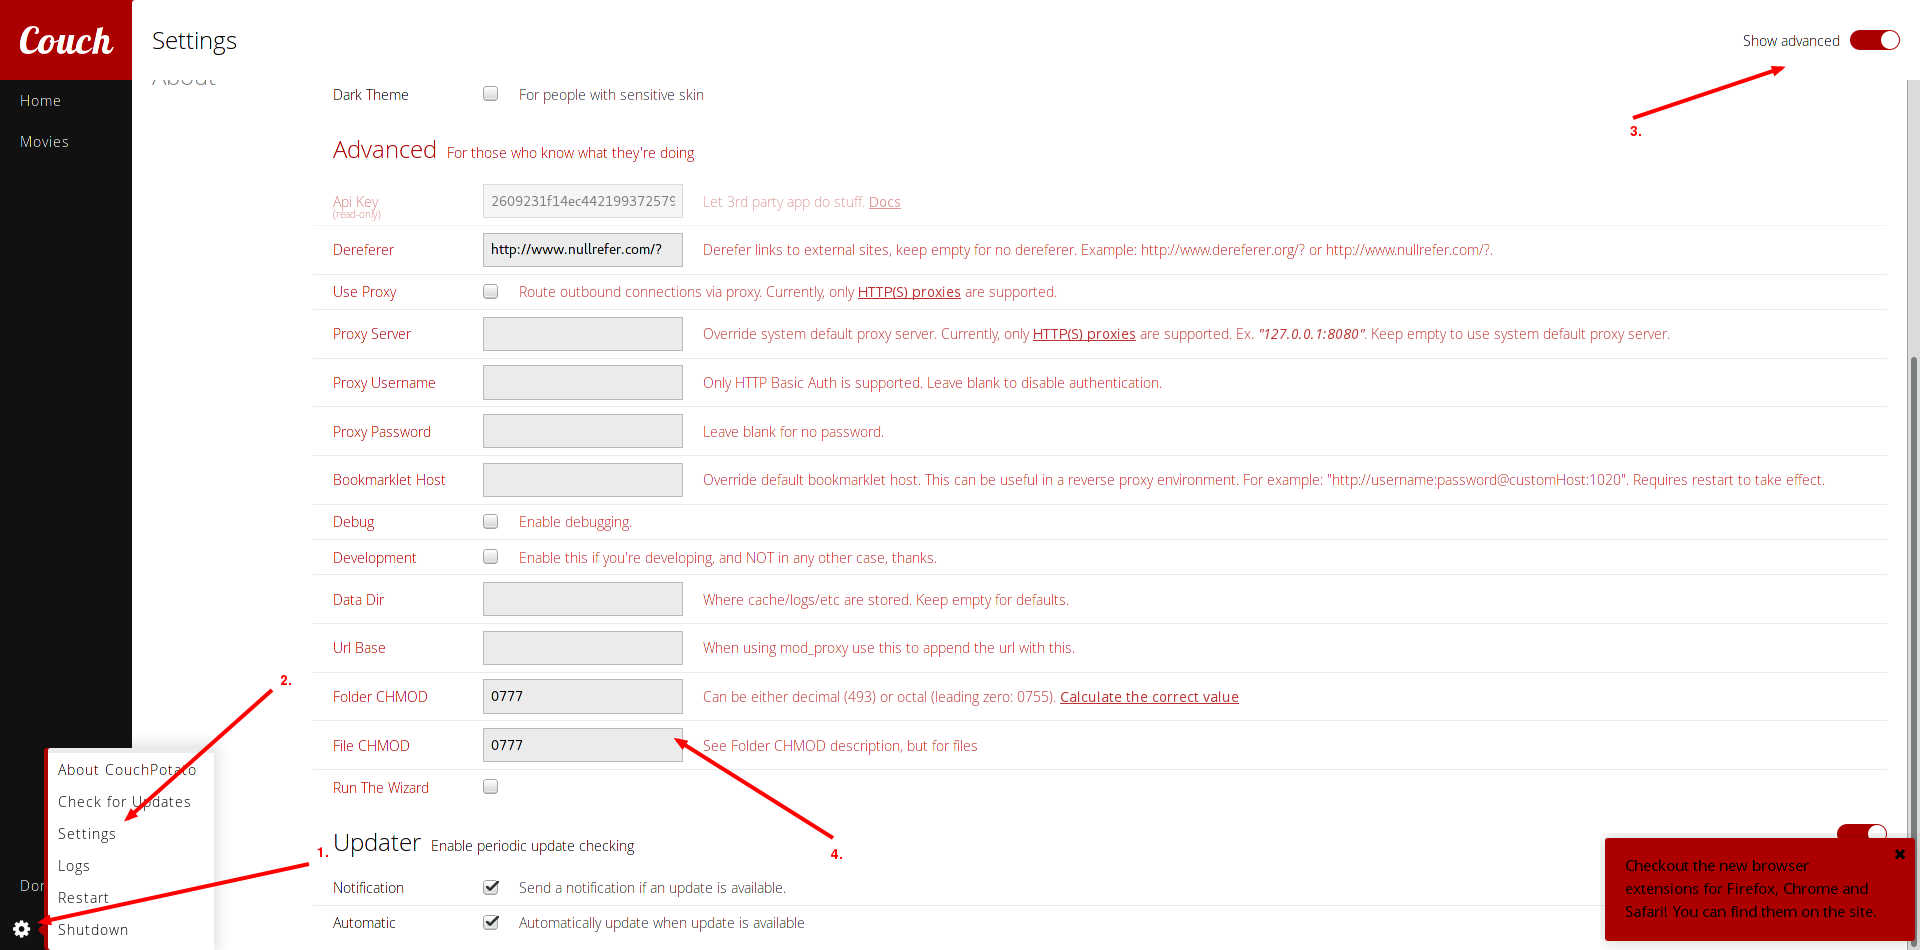
couchpotato_advanced_settings_chmod

Sickbeard

Install Sickbeard as usual and open the web interface. Since I currently only load movies with (free) torrents, there are some settings to make.

Open up the “Search Settings” tab in the config-tab.

Disable the search for NZBs and enable the search for torrents. In the Torrent Black Hole” enter the Torrent-Destination “/media/torrentfiles” you configured in the jail-storage and save the changes. It should look like this:
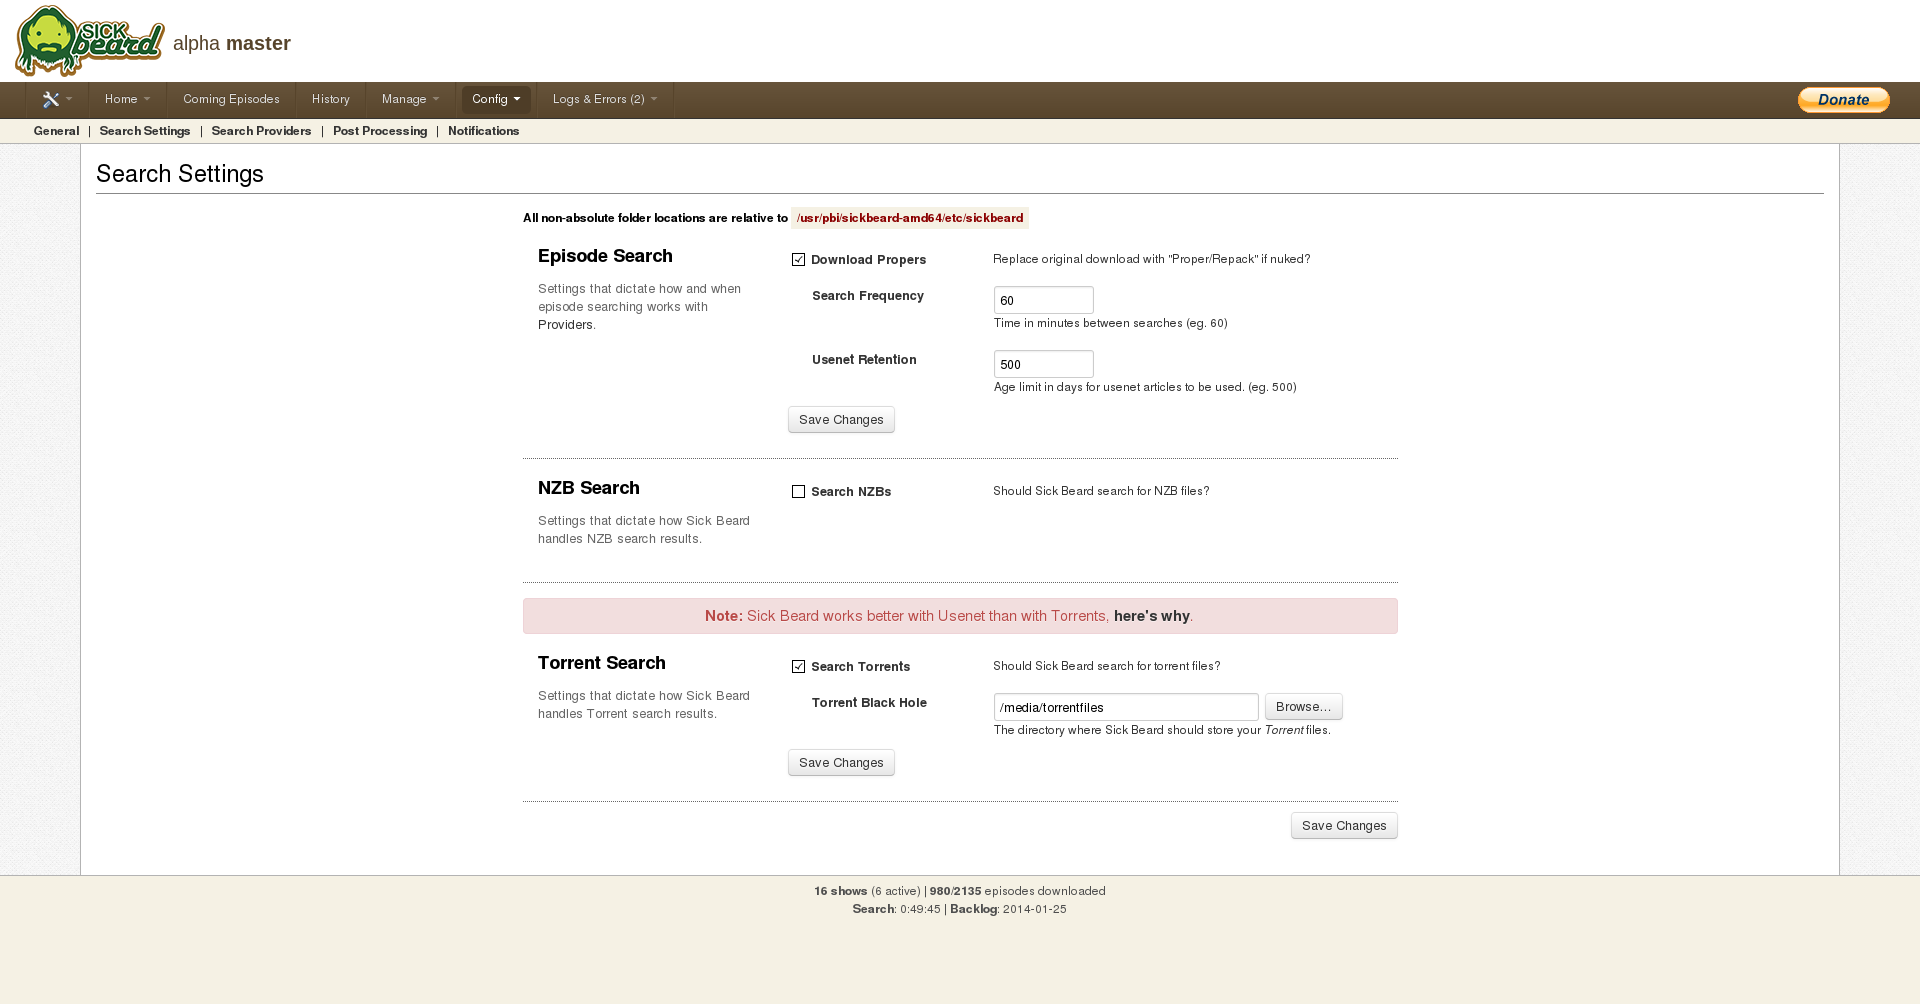
sickbeard_search_settings

Then go to the “Search Providers” tab. There, check the box for “EZRSS” as it is the only free torrent search for series. If you are a member of any other torrent sites listed there, check the boxes for them and enter your credentials for this site. Again save the changes.

Next, go to the “Post Processing” settings.

In the “TV Download Dir”, enter your Series-Destination “/media/downloads” and check the “Scan and Process”-box. You can also edit additional settings on this page but they are not important right now. In the end your settings should probably look like this:
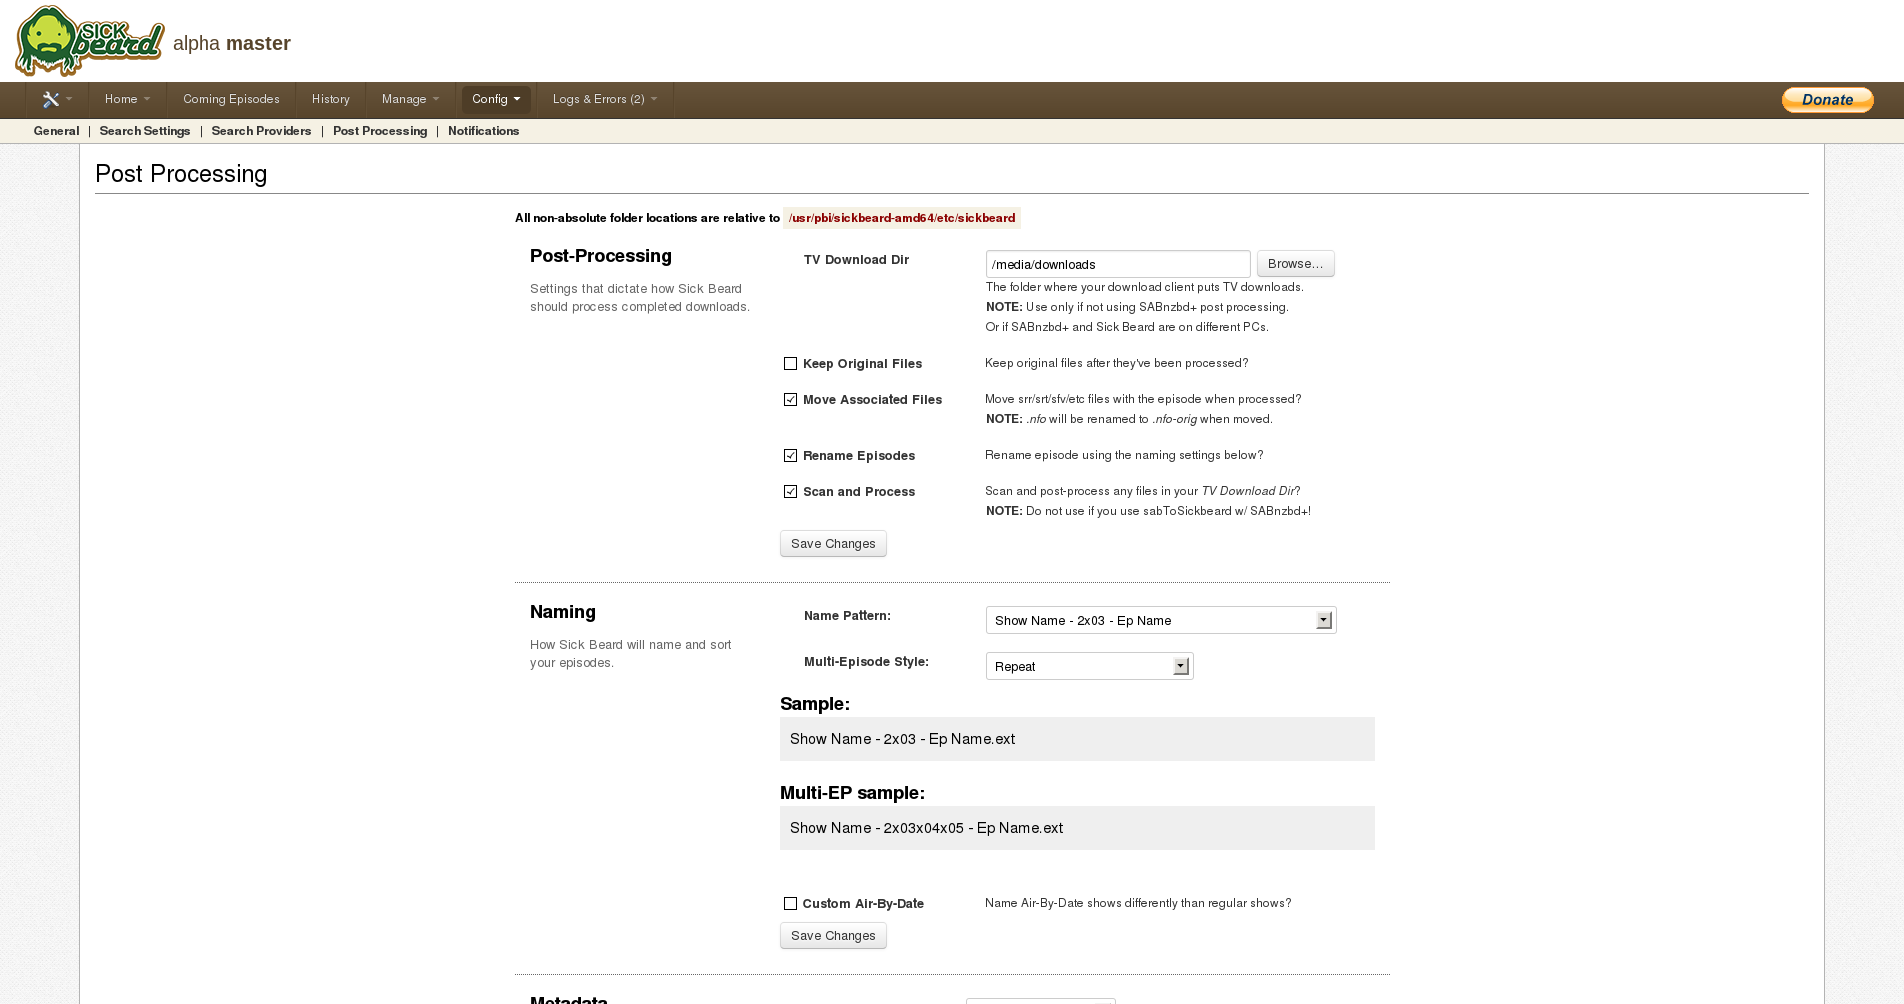
sickbeard_post_process_settings

If you’re done, you can add new or existing shows and let them download!

DLNA

Now you have the choice to either use MiniDLNA or the Plex MediaServer. If you want a nice interface to manage you music and movies, use Plex. If you only need a DLNA-server, use MiniDLNA as it is easy to configure. I’ll describe the installation and configuration for both.

MiniDLNA

Open the Freenas-front end, go to plugins and open the MiniDLNA-configuration. There, set the name of the MiniDLNA-server to anything you like and the Media-directory to the destination set in chapter “Adding storage to the jails”. Leave the other options as they are.
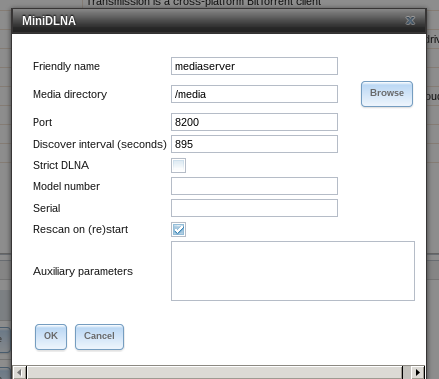
minidlna_settings

The DLNA-server will only scan for new files in its directory on restart, so if you are adding a movie and do not restart the DLNA-server, it won’t be available for streaming. To work around this issue, use the fix described here. After rebooting the DLNA-server should now scan for new files every 5 minutes.

Plex MediaServer

After installing the plugin, open the address of the Plexserver and you’ll be greeted with the End User License Agreement. Agree to it and jump to the “Get Started”-section. You can skip the register as it’s not needed. Leave the settings in “Basic Setup” as they are and go to the next step. There, you can add your music and movie-directories. Click on “add section”, then on “Movies” and insert into the second box your movies-directory. It should look like this:
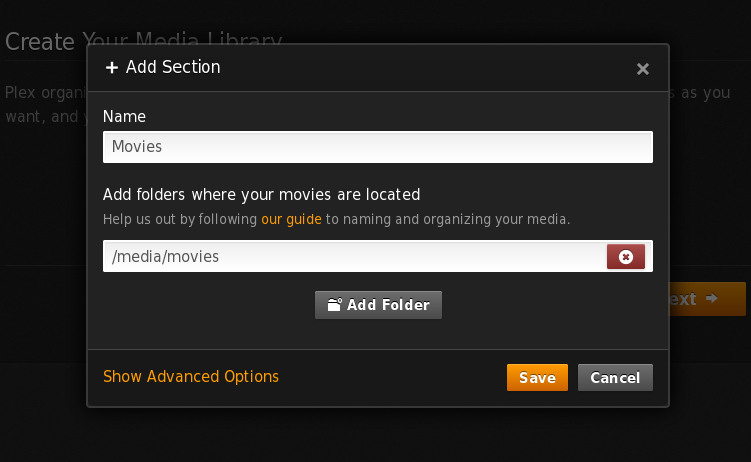
freenas_plex_add_movies

Do this for your music and series, too.

If you have everything added, jump to the next section. There you can add some channels to use with Plex. I skipped them. Click “Next” and “Done” and your are it..done! Now you should see the dashboard of Plex filling with your movies and music.

DLNA is enabled by default, so you don’t have to do anything in this regard.

Conclusion

Now you are able to download movies with couchpotato and transmission and once they’re downloaded, they are automatically available on you DLNA-server for further streaming.