Mar 4, 2015

Freenas 9.2.1 with Transmission and Couchpotato

Freenas 9.2.1 with Transmission and Couchpotato/Sickbeard as a DLNA-Server

I’m going to describe how to set up Freenas with the popular plugins couchpotato and transmissions to use them for downloading movies/series and streaming them via DLNA as well as mounting the storage on Linux.

With this setup, I manage my movie collection and my wanted movies with couchpotato, which uses transmission to download them. I also use Sickbeard to download TV series. Then I can stream them with the DLNA-server to my TV.

I’m running Freenas 9.2.1 on a HP ProLiant G7 MicroServer N54L (affiliate link). Freenas itself is running on a micro-USB stick. I’m not going to describe how to download and install Freenas on the stick, as described in detail in the docs.

Table of contents

Configuration

After starting the server and waiting some minutes, Freenas is available under a web-front end. The URL is a local IP-address, which is shown when Freenas has finished starting. After opening it, you’re presented with the System information.
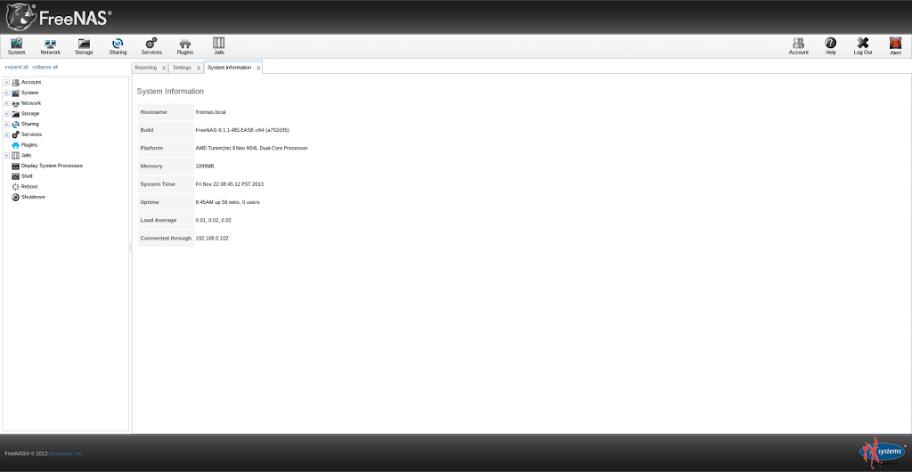
freenas_systeminformation

See the red alert in the upper right corner? Push it. It says that you need to set a password for the admin-account that you’re using.

Since Freenas 9.2.0 the first time you access the FreeNAS administrative interface, a pop-up window will prompt you to set the root password. You should set a hard to guess password as anyone who knows this password can gain access to the FreeNAS administrative GUI.

Network settings

Next on we have to edit the network settings. Go to network > Global configuration. There you can change the name of your Freenas, set the default gateway, name server and so on. Since I use my server at home, I set the gateway and name server to the address of my router. If you want to, you can enable the netwait feature. If enabled, your server will ping the addresses in the IP list when it starts to check if a network connection is possible.
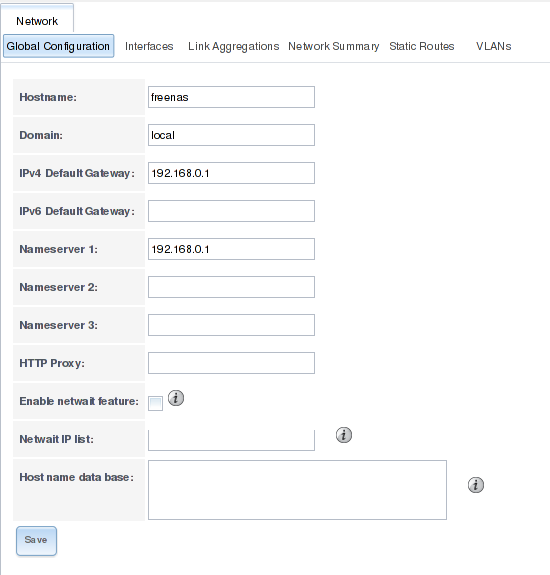
freenas_network_settings

General settings

There are some more settings that you should know about and edit. Open the System > Settings tab.
If your network is secure and only authorized people join it, you may let the “Protocol” option set to “HTTP”. Generally it is recommended to set it to “HTTPS“.

The next option defines the address and port your Freenas-installation listens to; set it to the IP-address the Freenas currently listens on. Set the HTTP-port to 80 and the HTTPS port to 443. Next on there are specific settings for your language, keyboard map and timezone. Set it according to your preferences.

If you’re not using a syslog server or directory service, leave the last two options empty.
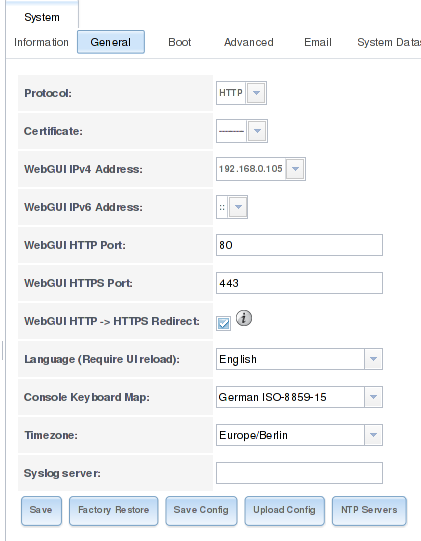
freenas_network_settings_1

Overview of storages and jails

The next steps will include creating storages and jails. To get a better understanding on how these components will work together, my beautiful girlfriend created two diagrams that show how the magic happens.

The first image shows the storages and jails that I created and what jails can access which storages.
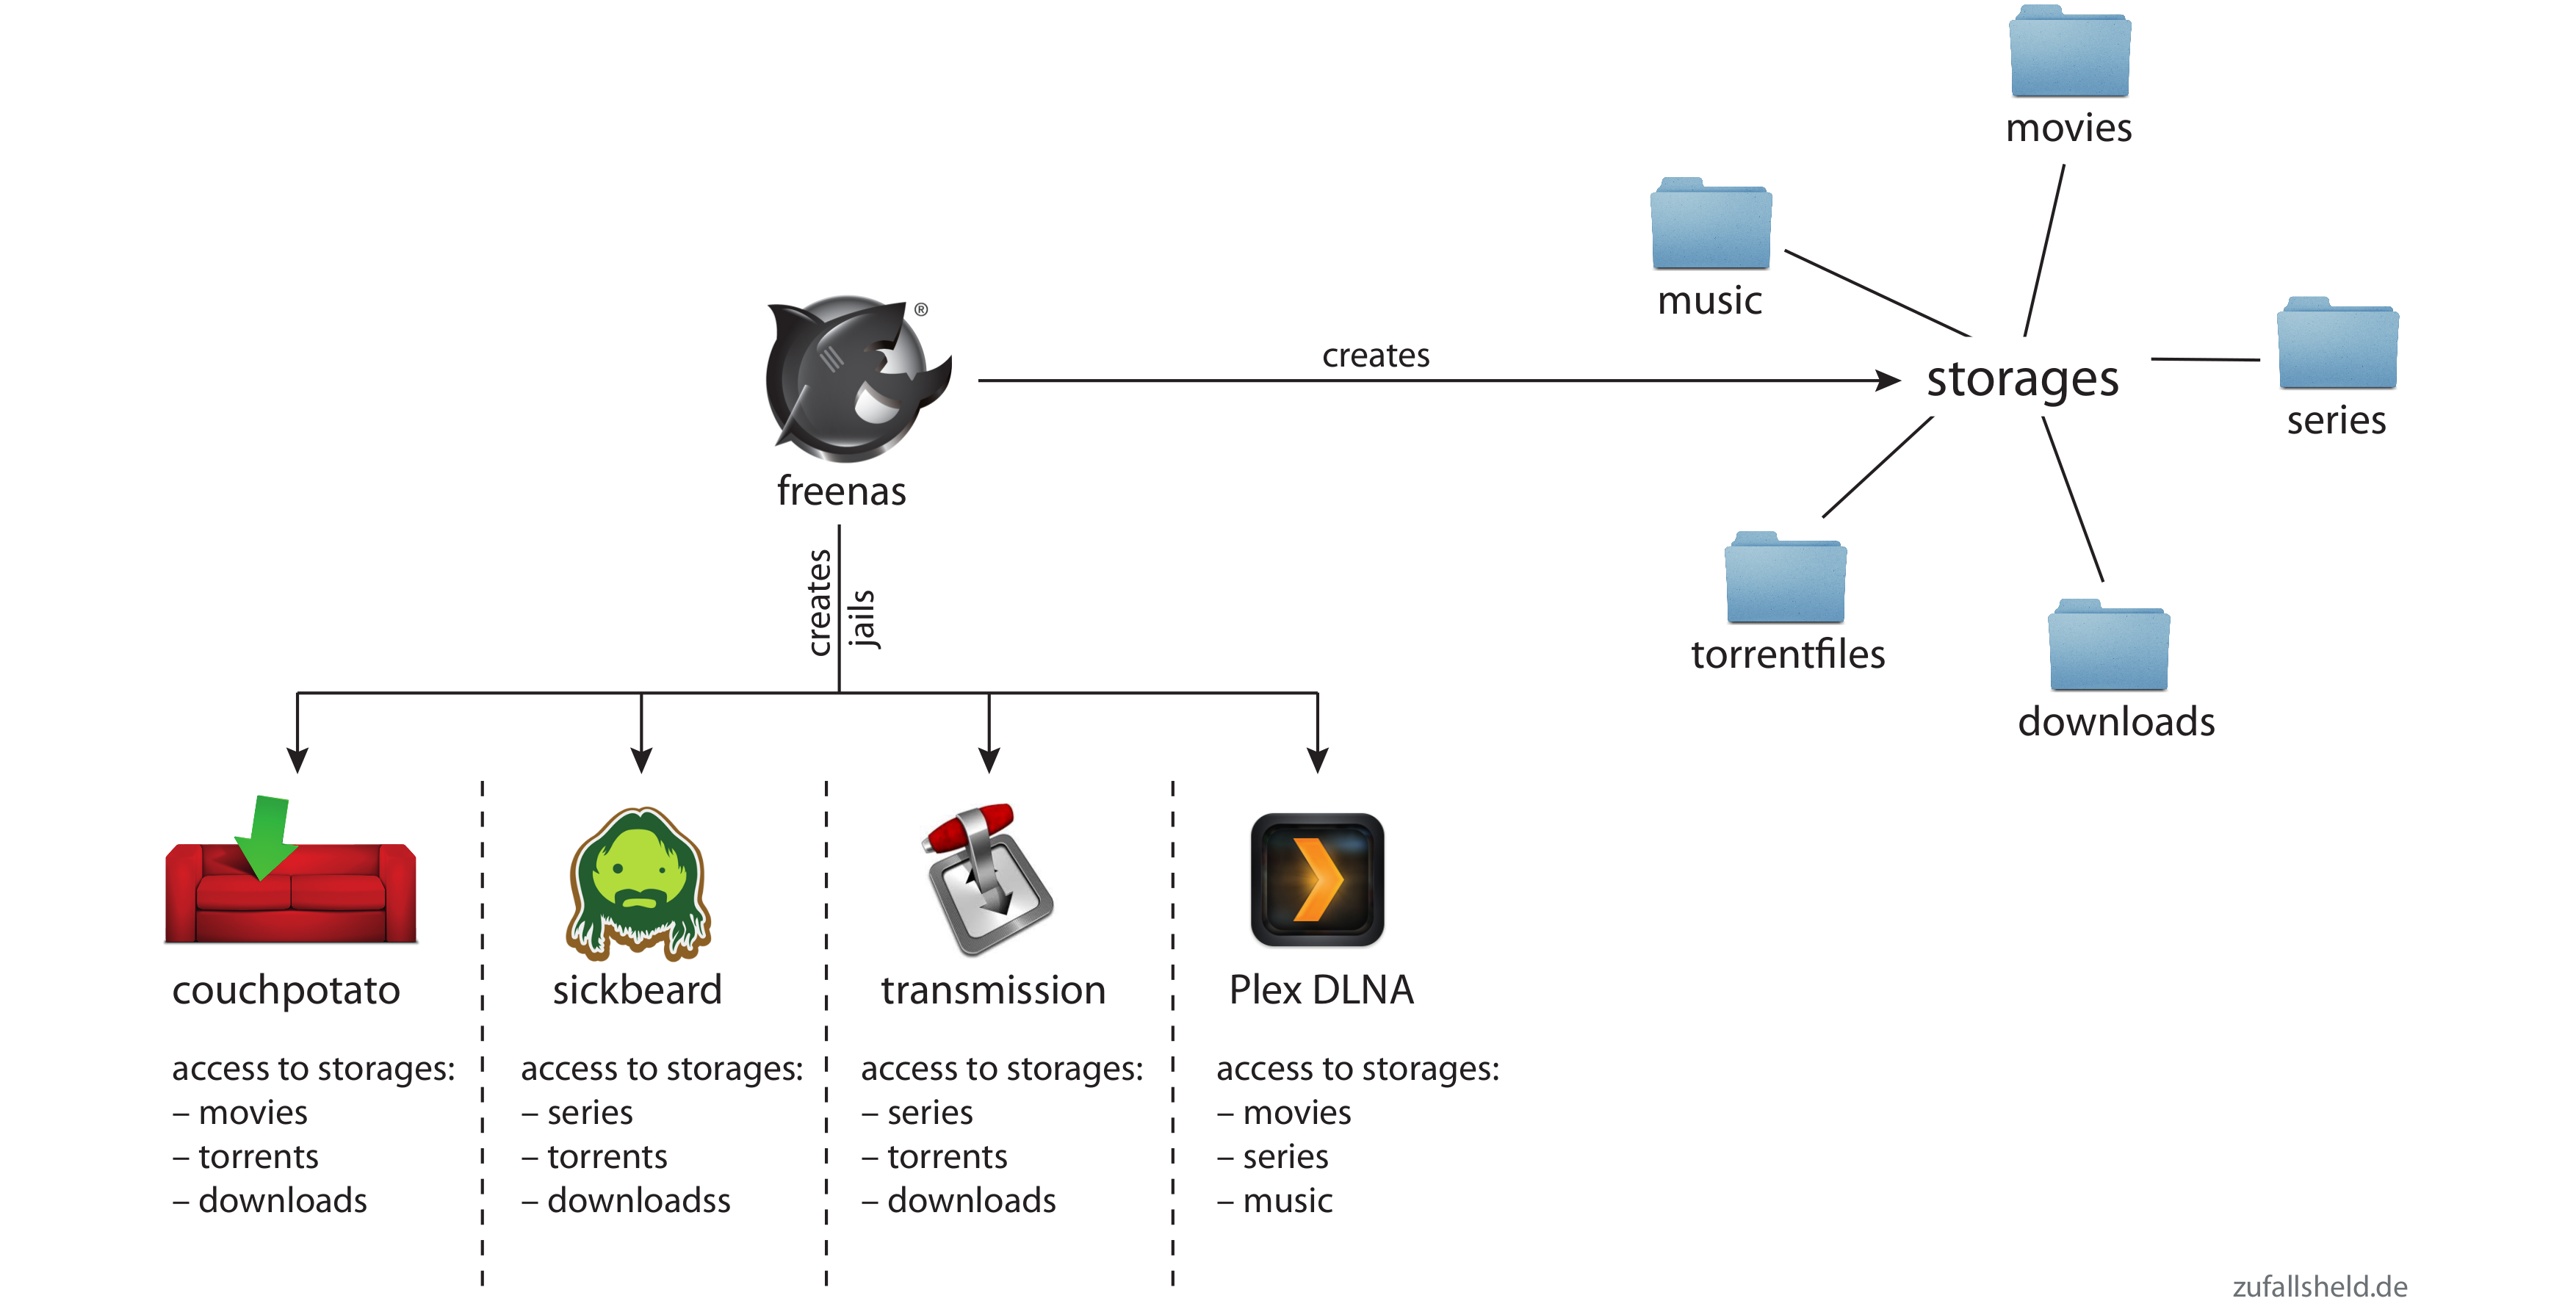
freenas_overview


The second image shows the steps that happen, when you want to download a movie or series via couchpotato/sickbeard.
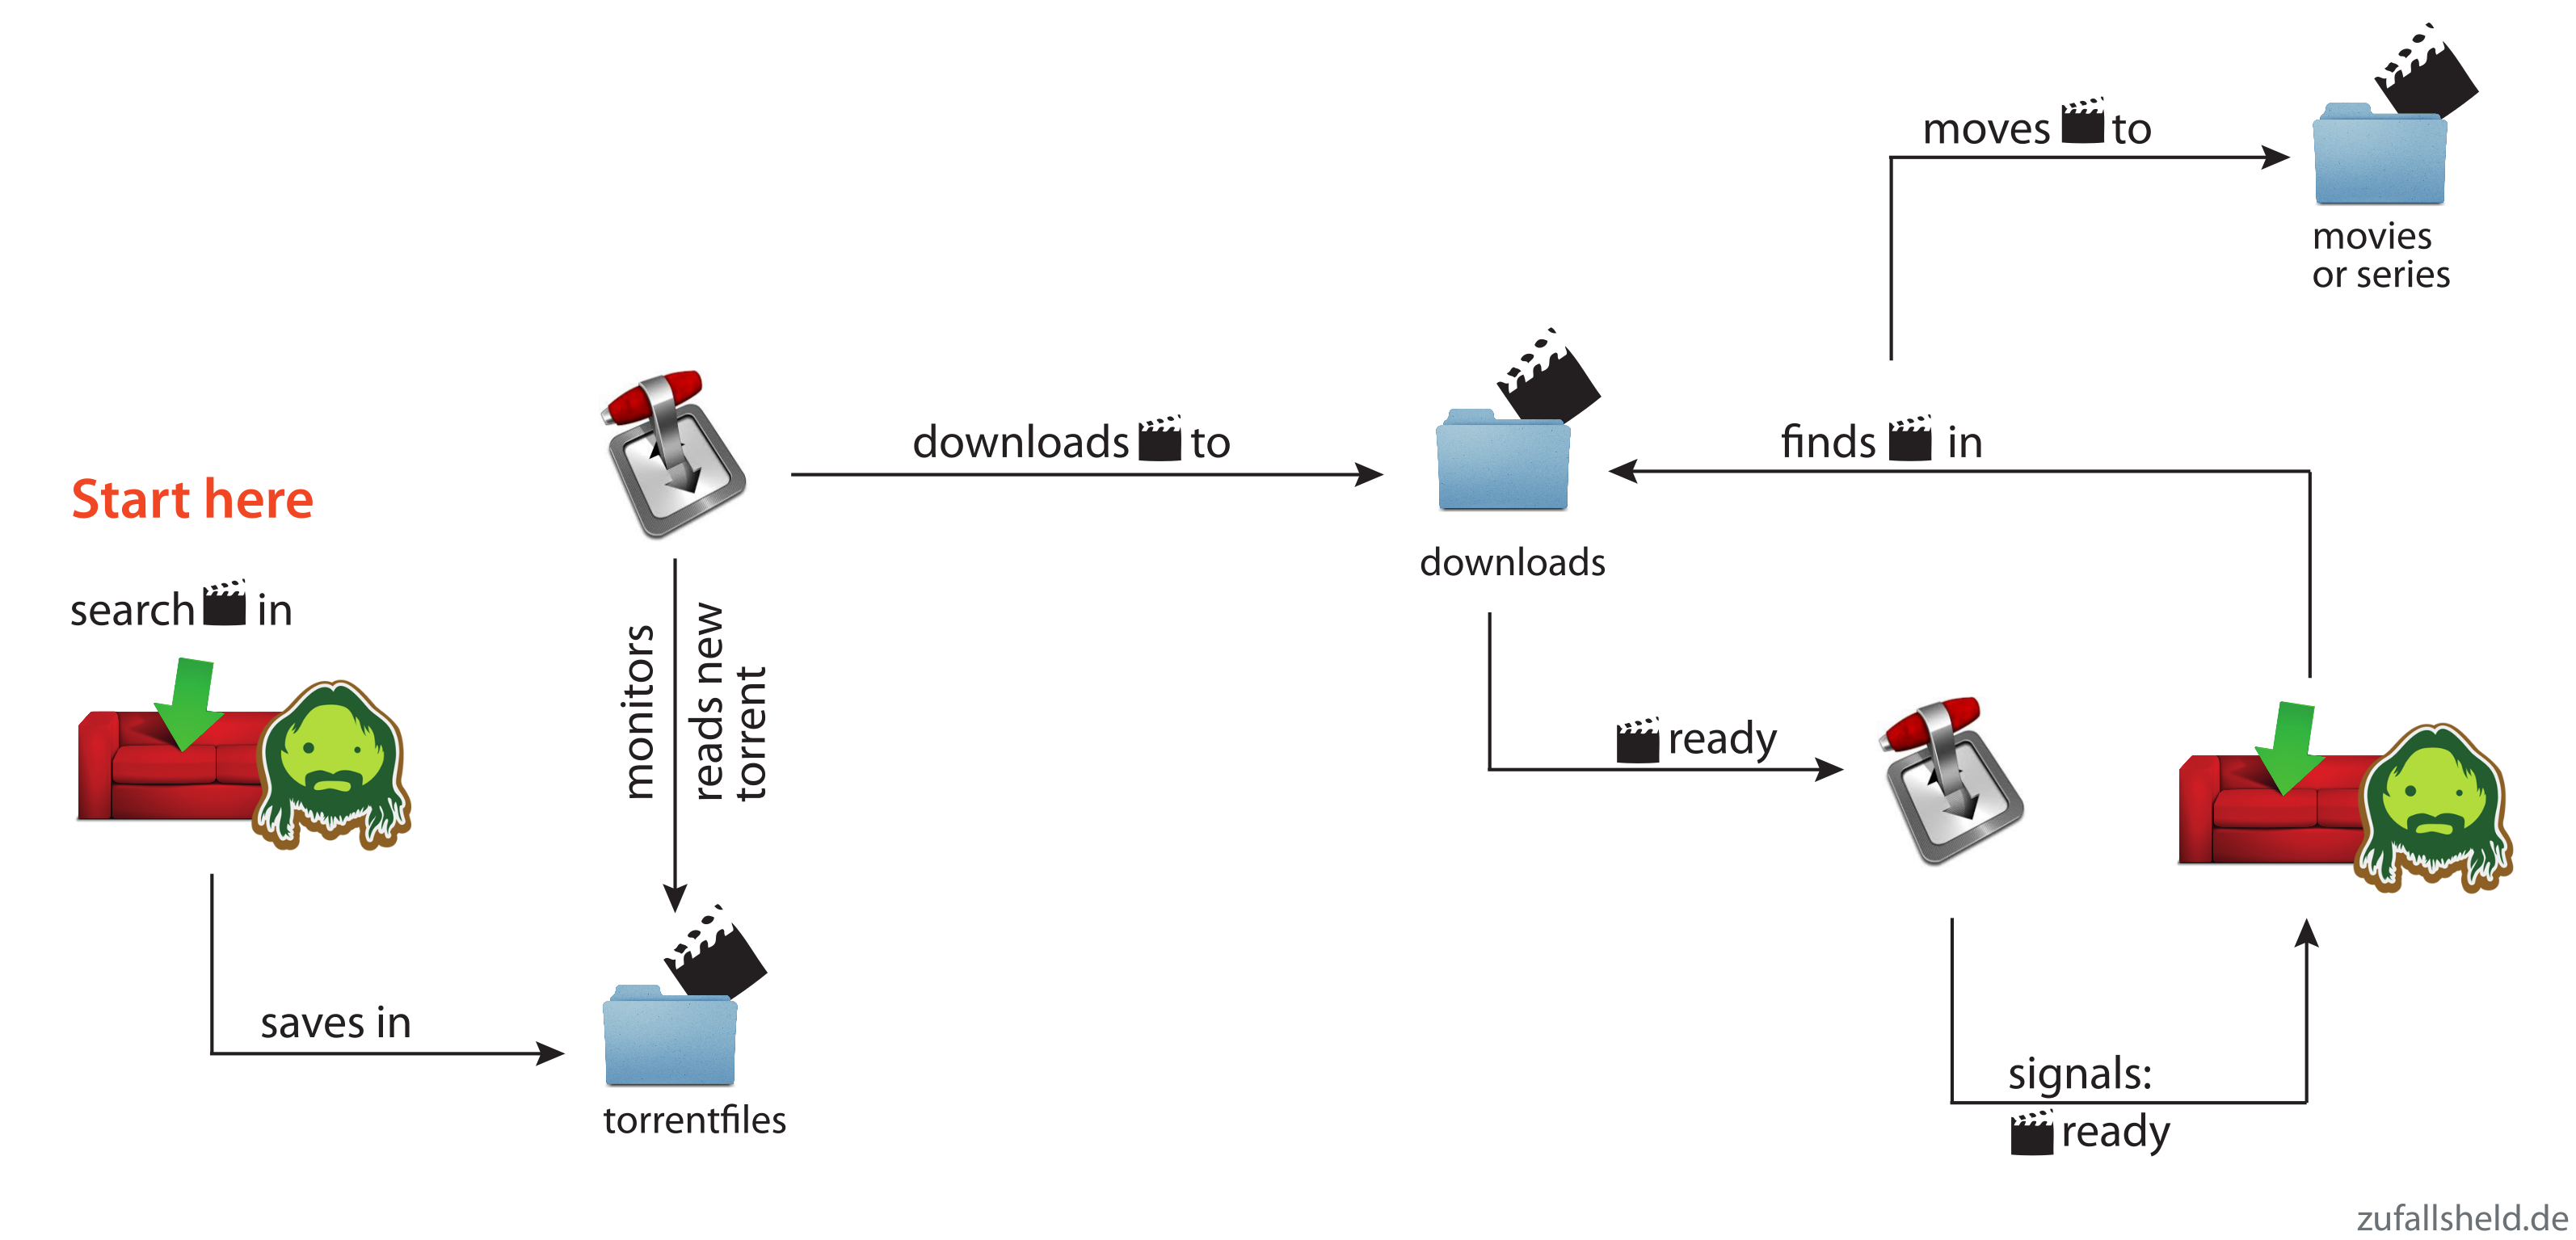
freenas_download_overview

Creating storage devices

Now is the time to add some storage to your server. That is the most important part and you should carefully read the documentation the Freenas community offers. I will not go into detail on what volumes or RAIDs to use. It mainly depends on your needs and what you’ve got hardware-wise.
My use-case is a simple movie- and music-streaming server with no personal or private information saved on it.

To simply create a new empty volume and attach disks to it, open Storage > Volumes > ZFS Volume Manager, give your new volume a name, add your disks and configure the layout.
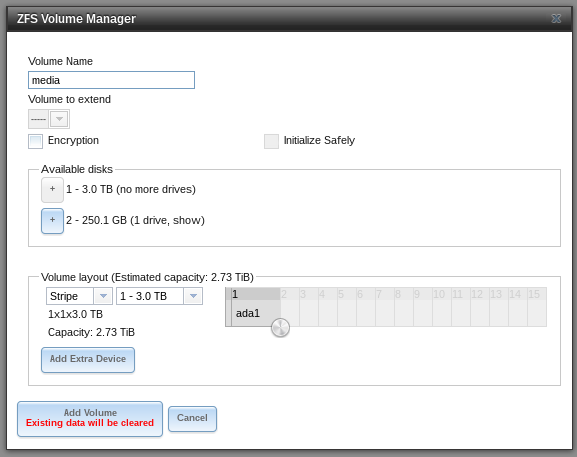
freenas_volume_manager

Creating datasets

To logically separate your files, e.g. movies from music, you can create datasets. These datasets can have separate permissions, quotas, etc. allowing you more control over your data.

I created datasets for every kind of data I want to manage: movies, series, music, downloads and torrent-files. To create a dataset click on your created storage, then hit the “Create dataset”-button (the one that looks like an excel-document with a plus). There, set the name for the dataset. You can ignore all other options for now, as they are for advanced users.

Changing permissions of the storage

Since there are many plugins and users who want access to your storage, you’ll have to configure the permissions for it. The best way is to set the ownership of the storage to nobody and give read/write/execute permissions to everybody. You should only do this, if you trust the users of your network. To change permissions, click on the “Storage” tab, select the volume you want to edit and click the first button in the bottom line that displays hard disks and a key. There, set the Owner (user) to “nobody”, the Owner (group) to “nogroup” and activate all buttons in the mode. Type of ACL should be set to Unix. Tick the box that says “Set permission recursively” so all other folders and files in the volume will have the same permissions.
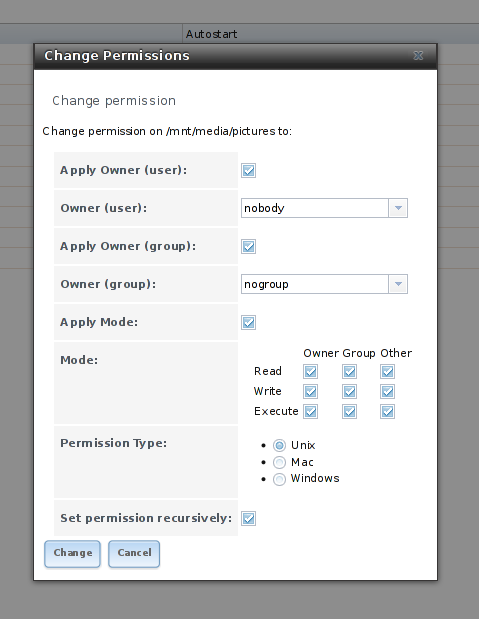
freenas_permissions

Adding sharing options

Since I want to access my music and movie collection not only with my TV but also with the computers I’m using, I have to add sharing possibilities. Freenas offers NFS, CIFS and AFP out-of-the-box. I don’t have an Apple-gadget or Windows machine at home, so I’ll only need NFS.

NFS

To add a NFS-share click on Sharing > Unix (NFS) Shares > Add Unix (NFS) Share. There, set the options “Mapall User” and “Mapall Group” to “nobody” and “nogroup” respectively. In the path, add all the storages-directories you want to share. You’ll have to create a separate share for every dataset. When you’re done, you can mount the directories via NFS, the address is the IP-address of your freenas-installation plus the folder you shared, e.g.

192.168.0.102:/mnt/media/movies

Installing the plugins

Installing plugins is very easy, as long as you stick to the available ones provided by Freenas. In the Plugins-menu, click on the plugins and then on Install, to install them. Each plugin is installed into a jail, a separate “operating system” in Freenas itself, but we’ll get to that in the next section.
When you’re done, your plugin-page should look like this:
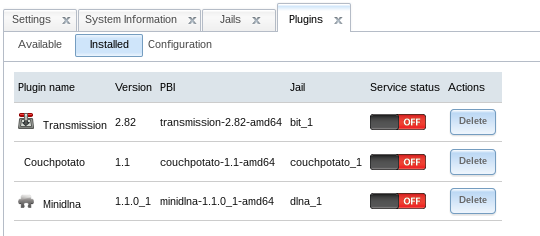
freenas_plugins

Enabling access to the jails

SSH to your Freenas

You’ll likely need command-line access to your Freenas installation and to the jails as well. To enable SSH access to Freenas, go to Services and click on the screwdriver next to SSH. Tick the “Login as root with password” box and save the settings. After that, enable the SSH-Service by clicking the red OFF-button. Now you’re able to connect to your Freenas with SSH by entering the following line into your terminal-emulator of choice:

ssh root@192.168.0.14

(change the address to the address of your Freenas)
Then enter the admin-password and you should be connected to your box.

Using Putty to enter your Freenas

If you’re on Windows and want to connect to your Freenas-installation using Putty, you have to enter the IP-address of Freenas into the “Host Name”-field, then press “open”.

putty

If Putty cannot connect, you probably didn’t use the correct IP-address or you forgot to enable SSH.

Entering the jails

To enter one of the installed jails, type “jls” on the command-line. There you’ll see the available jails. To connect to them, enter “jexec # tcsh” where # is the number of the jail.

[root@freenas] ~# jls
   JID  IP Address      Hostname                      Path
     1  -               bit_1                         /mnt/media/jails/bit_1
     2  -               couchpotato_1                 /mnt/media/jails/couchpotato_1
     4  -               ownbutt_1                    /mnt/media/jails/ownbutt_1
     8  -               dlna_1                        /mnt/media/jails/dlna_1
[root@freenas] ~# jexec 8 tcsh
root@dlna_1:/ #

Adding storage to the jails

Now we’ll have to add the storage to the plugins, so couchpotato, transmission and the DLNA-server can access the same storage and work together. Since jails are separate systems in the server-OS itself, they cannot by default access other parts of your system.

To add the storage, go to Jails, click the plus next to the plugin, open the “Storage” tab and click “Add storage”. You’ll then have to enter the source and destination addresses. 

The source is the storage or dataset you created in the first place. If you did not create datasets before, you either have to do this now or create normal directories as sources with mkdir on the server.
The destinations are directories in the jails that get mapped to the storages outside the jails.
If the destination addresses in the jails do not exist, tick the “Create directory”-box.
To manually create the directories, enter the jail, then you can create directories with the following command:
mkdir -p /media/downloads

Then enter the following command the get the permissions right:
chmod -R 777 /media/downloads

The following part is really tricky as Transmission, Couchpotato and Sick Beard behave very differently with the directories they download data to. I had to edited the following configuration multiple times, so be sure to stay up to date.
  1. Transmission (bit_1): You need the torrent-directory, where Transmission looks for torrents and the download-directory where it downloads the data to.
    - Download-Source: /mnt/media/downloads
    - Download-Destination: /media/downloads
    
    - Torrent-Source: /mnt/media/torrentfiles
    - Torrent-Destination: /media/torrentfiles
    
    - Series-Source: /mnt/media/series
    - Series-Destination: /media/series
    
    - Movie-Source: /mnt/media/movies
    - Movie-Destination: /media/movies
     
  2. Couchpotato: You need the downloads-directory where transmission puts its data into; you’ll also need the movies-directory, where couchpotato moves the downloaded and renamed movies to.
    - Download-Source: /mnt/media/downloads
    - Download-Destination: /media/downloads
    
    - Movie-Source: /mnt/media/movies
    - Movie-Destination: /media/movies
     
  3. Sickbeard: You need the series-directory where Sickbeard puts its data into; you’ll also need the torrents-directory, where Sickbeard puts the torrent file for Transmission to download them.
    - Series-Source: /mnt/media/series
    - Series-Destination: /media/series
    
    - Torrent-Source: /mnt/media/torrentfiles
    - Torrent-Destination: /media/torrentfiles
    
    - Download-Source: /mnt/media/downloads
    - Download-Destination: /media/downloads
     
  4. MiniDLNA/Plex: You’ll need every directory where files are located that you want to play using DLNA, e.g. movies and series.
    - Movie/Series/Music-Source: /mnt/media/{movies|series|music}
    - Movie/Series/Music-Destination: /media/{movies|series|music}
    

Configuring the plugins

Now that you have added the storage to the plugins, you can finally start them. Go to the Plugins-page and click the red OFF-button of all plugins. After that, they should be listed as on, except for miniDLNA, which we’ll have to configure first, but not now.

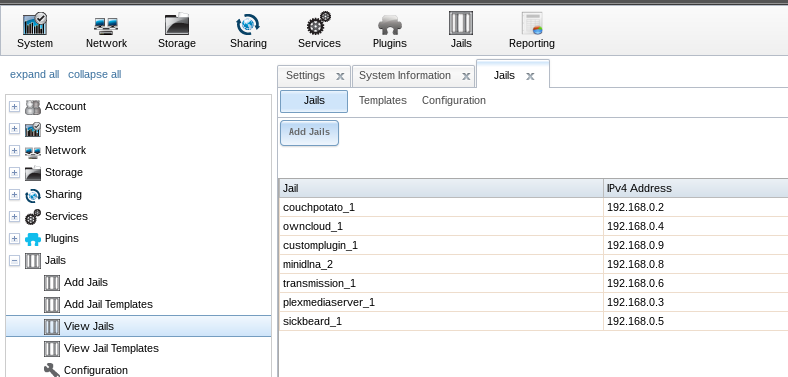
You can find the IP-adresses of the plugins here:
freenas_ip_addresses

Transmission

The “watch”-directory where Transmission looks for torrent-files is normally:

/usr/pbi/transmission-amd64/etc/transmission/Downloads

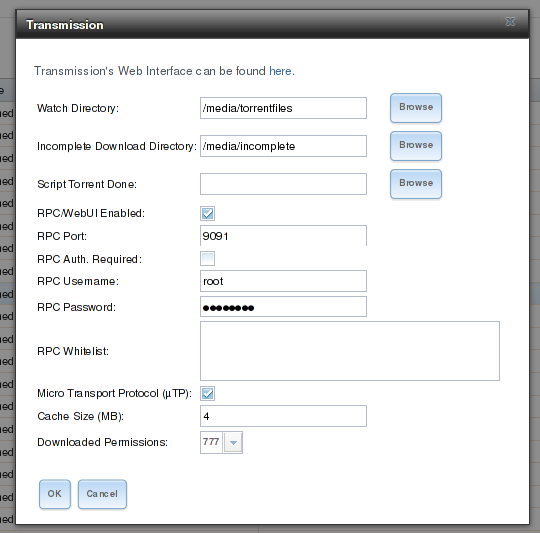
That’s 50 characters and if you add the jail-directory to it, it exceeds Freenas’ directory-length limit of 88 characters, so you have to change this. Open up the Transmission-settings in the Plugins-tab of Freenas and edit the “Watch Directory” to “/media/torrentfiles” and the Download-Directory to “/media/downloads”.
freenas_transmission_settings

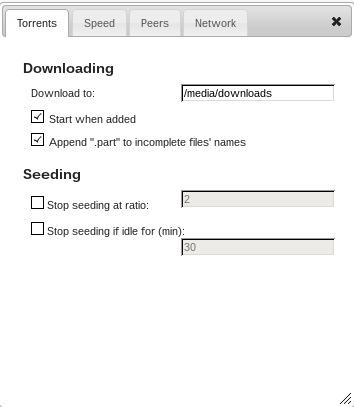
Next open the transmission-address in your browser. You’ll see the main interface of Transmission. Click the screwdriver icon in the down left corner to edit the settings. There you’ll see the “download to” option. There should be “/media/downloads” now, too.
transmission_settings

Now we’ll have to connect to the jail of transmission to manually edit a configuration file. Connect via SSH into your Freenas and connect to the jail as described in the chapter “Entering the jails”. Then you’ll have to edit the file, by entering this on the commandline:

edit /usr/pbi/transmission-amd64/etc/transmission/home/settings.json

But first, stop the plugin or else the settings will be overwritten. In the file, scroll down to the end where you can see the configuration-point called “umask”. Replace the “18” with a “0”. Save the file by pressing “escape”, then “leave the editor” and then “save changes”. After that start the plugin.

UPDATE:


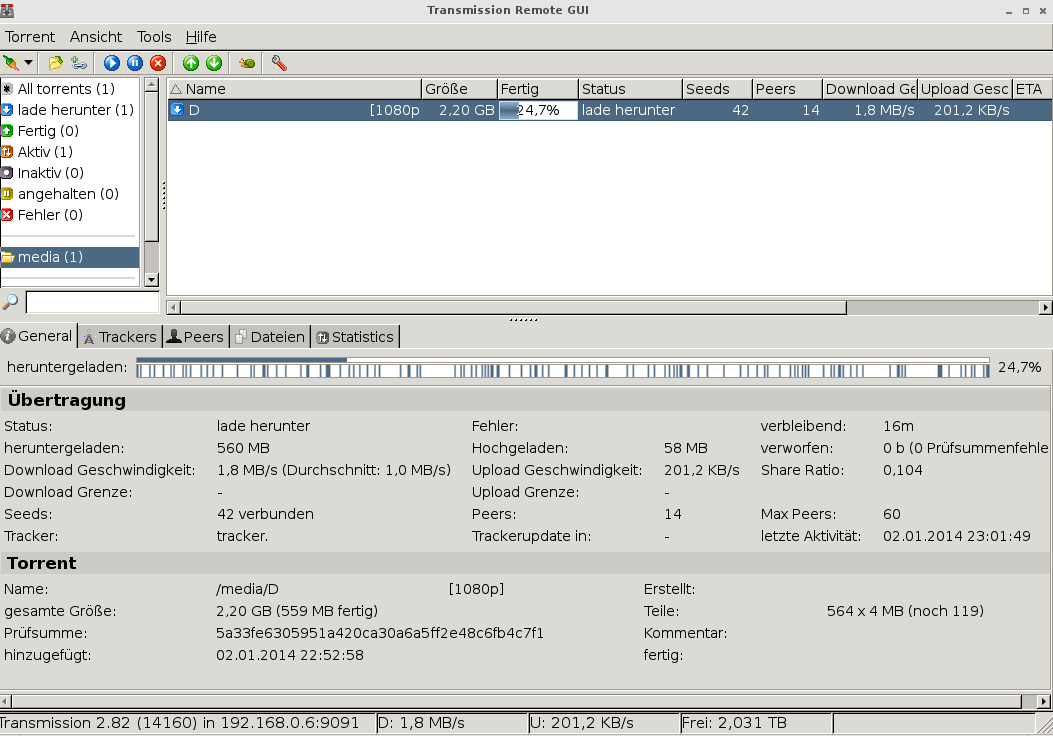
HolyK in the Freenas-forums mentioned a great front end for the remote transmission server, transgui. You can find it here or in your favorite package manager. It’s a nice replacement for the rather featureless web front end of transmission. It’s available for Linux and even Windows.
Transmission GUI

After you installed it, point it to the IP address of your transmission-server and then you can see the movies downloading and even add torrent- or magnet-links so they will be downloaded to you Freenas.

Couchpotato

Open the couchpotato-address in your browser. You’ll be greeted with the install wizard. Scroll down to advance in the wizard. Define a user name and password in the General section if you’d like and leave the port to 5050.

In the downloaders section choose Transmission. As host enter the address of your Transmission jail (you can find the address in the jail-section of Freenas). Set the “Directory” to the “Transmission-Destination” you set earlier.
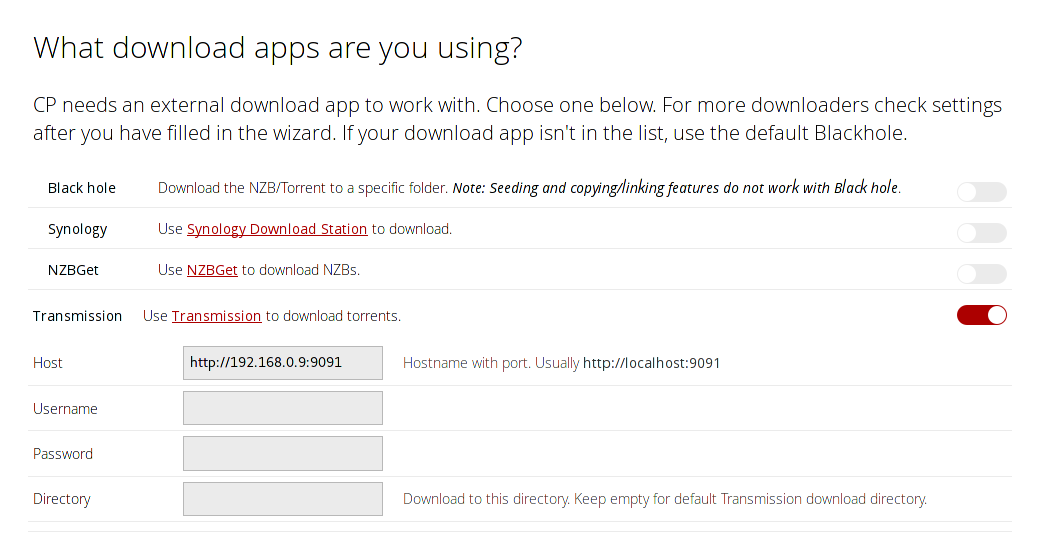
couchpotato_transmission_settings

Scroll further down to “Move & rename the movies after downloading?” (skip the “Are you registered at any of these sites?”-part).

In the “from”-folder set the same folder you just used for the Transmission-directory. The “to”-directory is where the renamed movies will be stored. Set it to the “movie-source” configured in the chapter “Adding storage to the jails”. Tick the “Cleanup”-box so leftover files will be removed after renaming the movies.
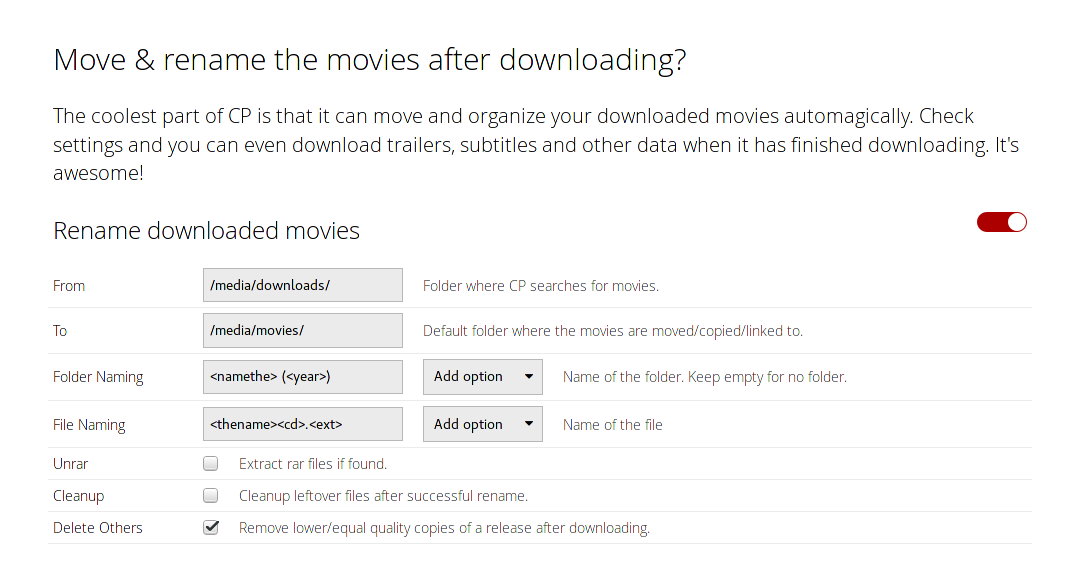
couchpotato_rename_settings

After that, scroll further down and click the huge green button and you’re done with the wizard.
On the main page of couchpotato, click the screw-icon in the upper right to get to the configuration-page. There are many things to tweak here, but I’m not going into detail about them. Right now you have to open the “General” Tab, click on “Show advanced settings” and then enter “0777” in the fields “Folder CHMOD” and “File CHMOD” as shown below.

If you do not do this, you probably will be getting an error-message later in Transmission, when downloading files (the download stops at around 4MB)!
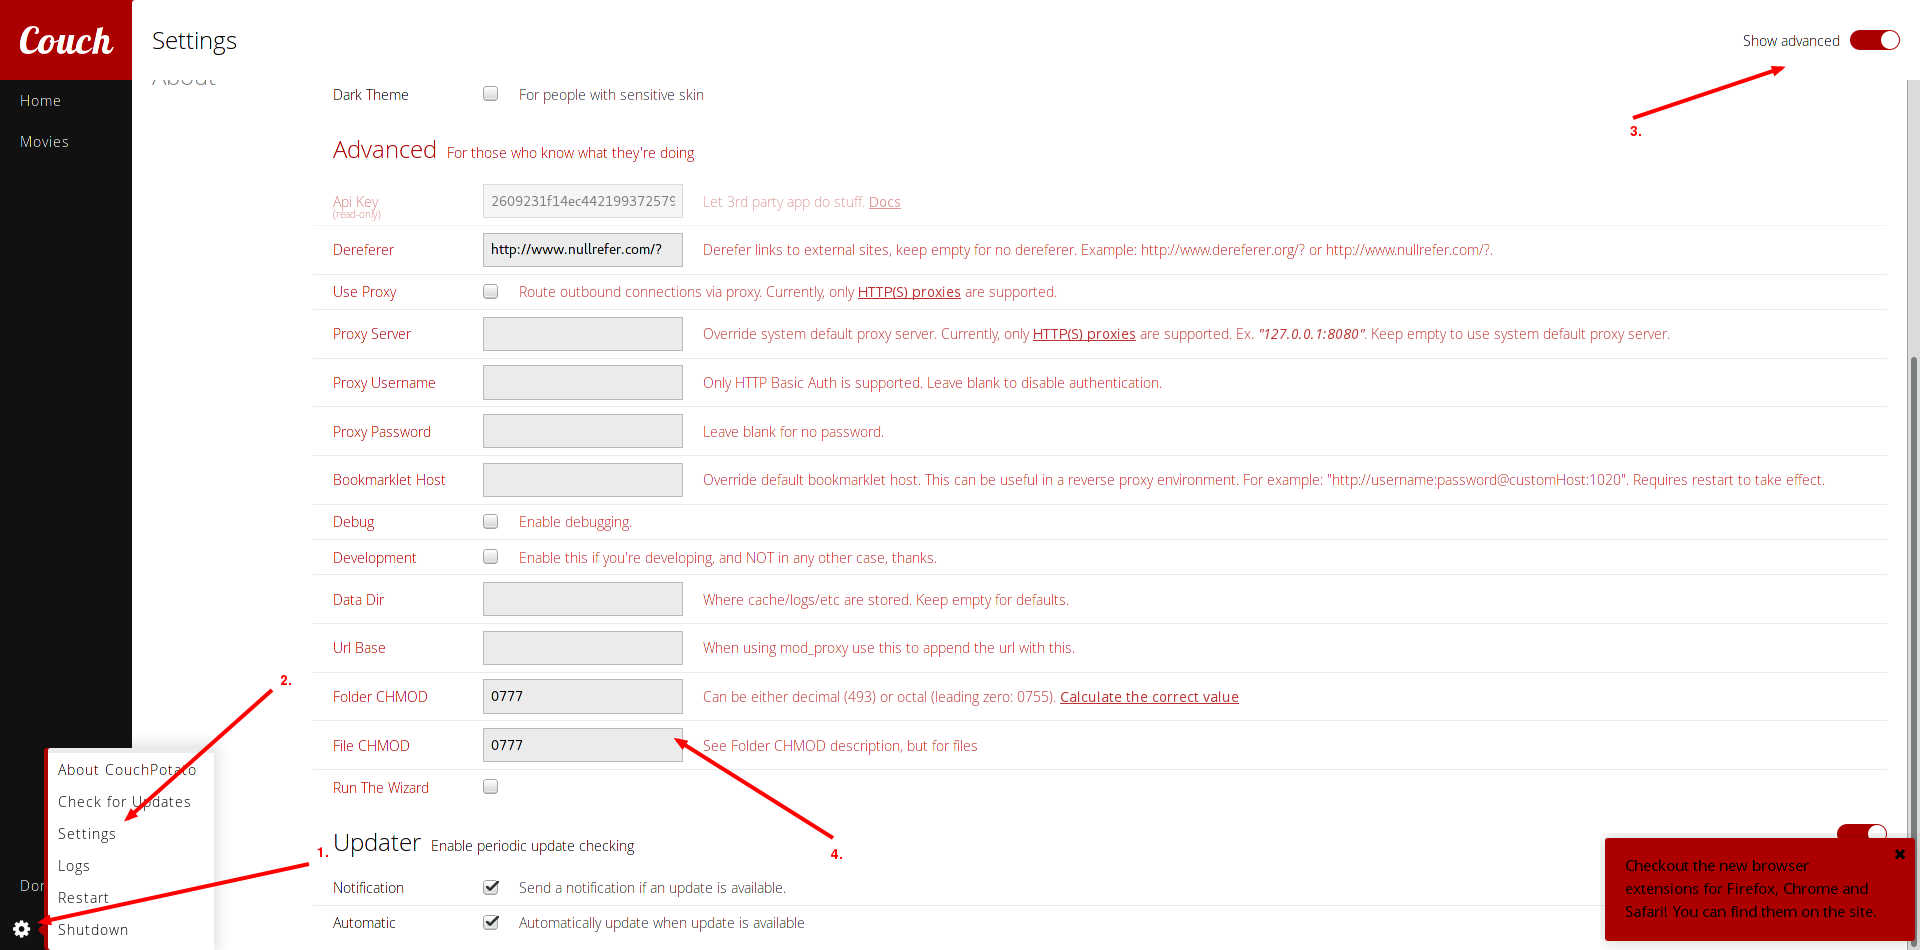
couchpotato_advanced_settings_chmod

Sickbeard

Install Sickbeard as usual and open the web interface. Since I currently only load movies with (free) torrents, there are some settings to make.

Open up the “Search Settings” tab in the config-tab.

Disable the search for NZBs and enable the search for torrents. In the Torrent Black Hole” enter the Torrent-Destination “/media/torrentfiles” you configured in the jail-storage and save the changes. It should look like this:
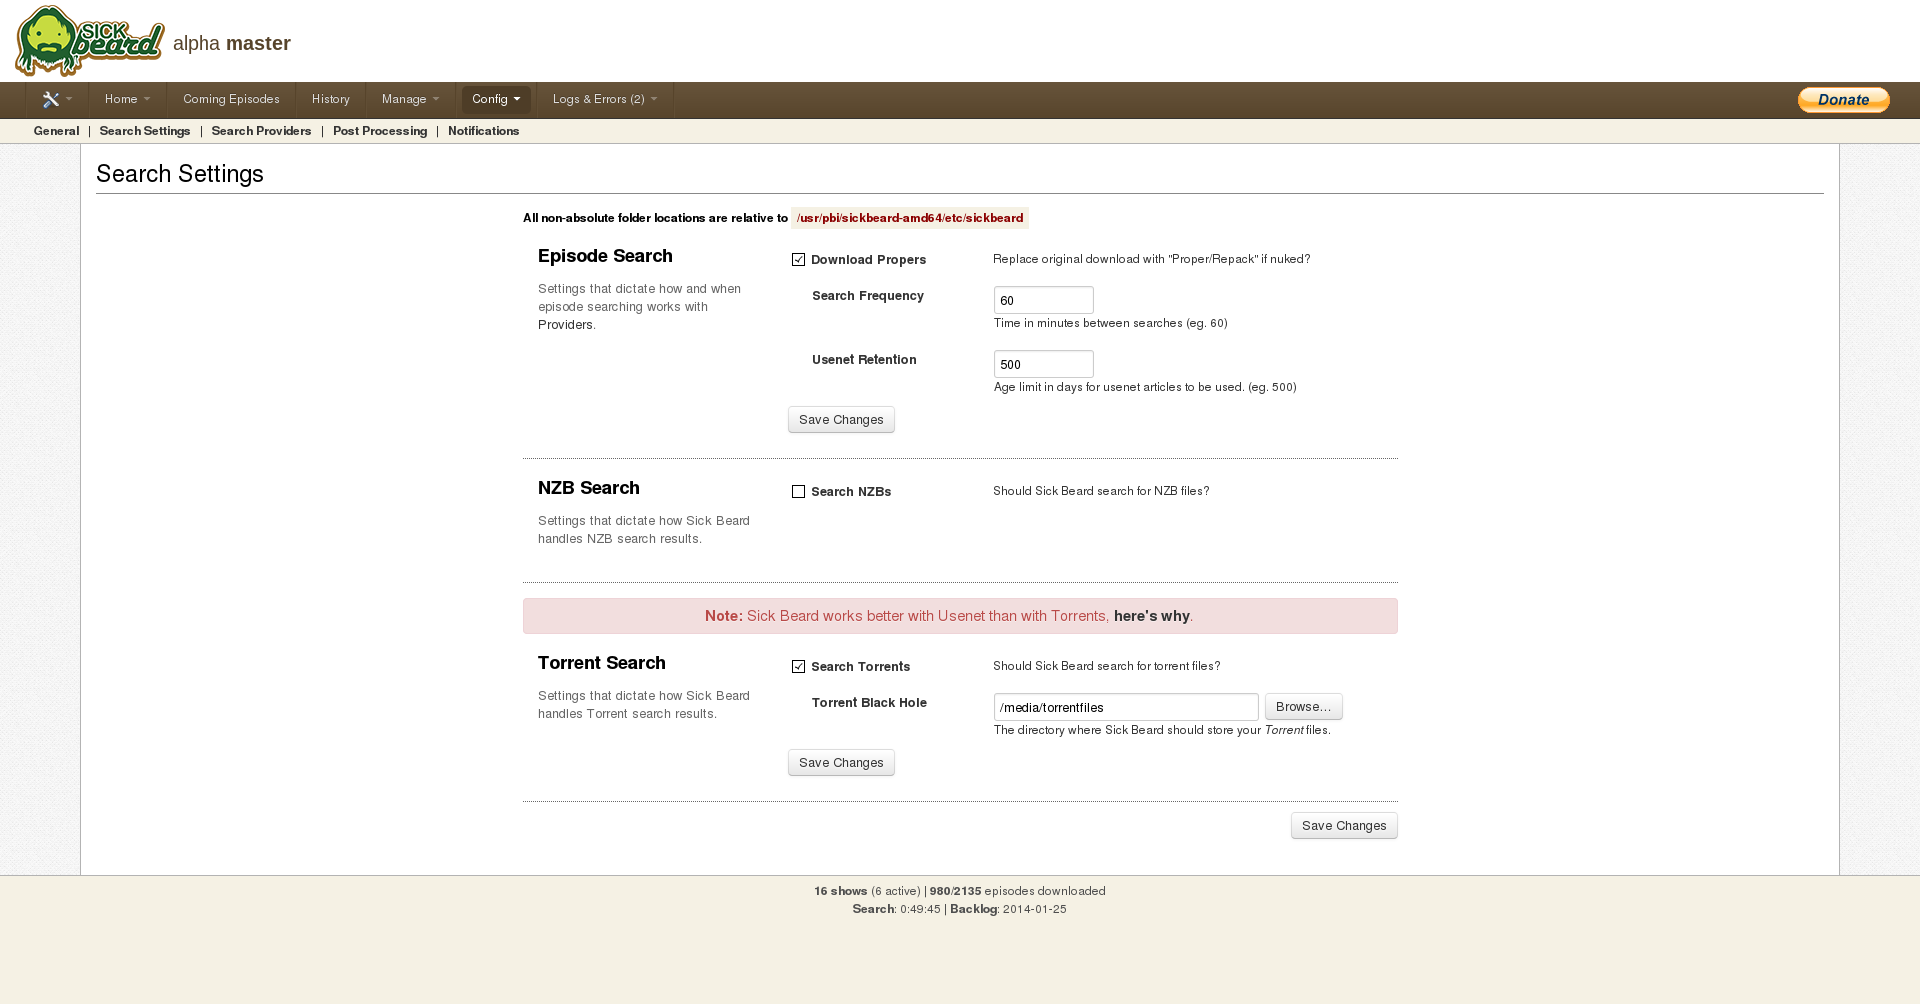
sickbeard_search_settings

Then go to the “Search Providers” tab. There, check the box for “EZRSS” as it is the only free torrent search for series. If you are a member of any other torrent sites listed there, check the boxes for them and enter your credentials for this site. Again save the changes.

Next, go to the “Post Processing” settings.

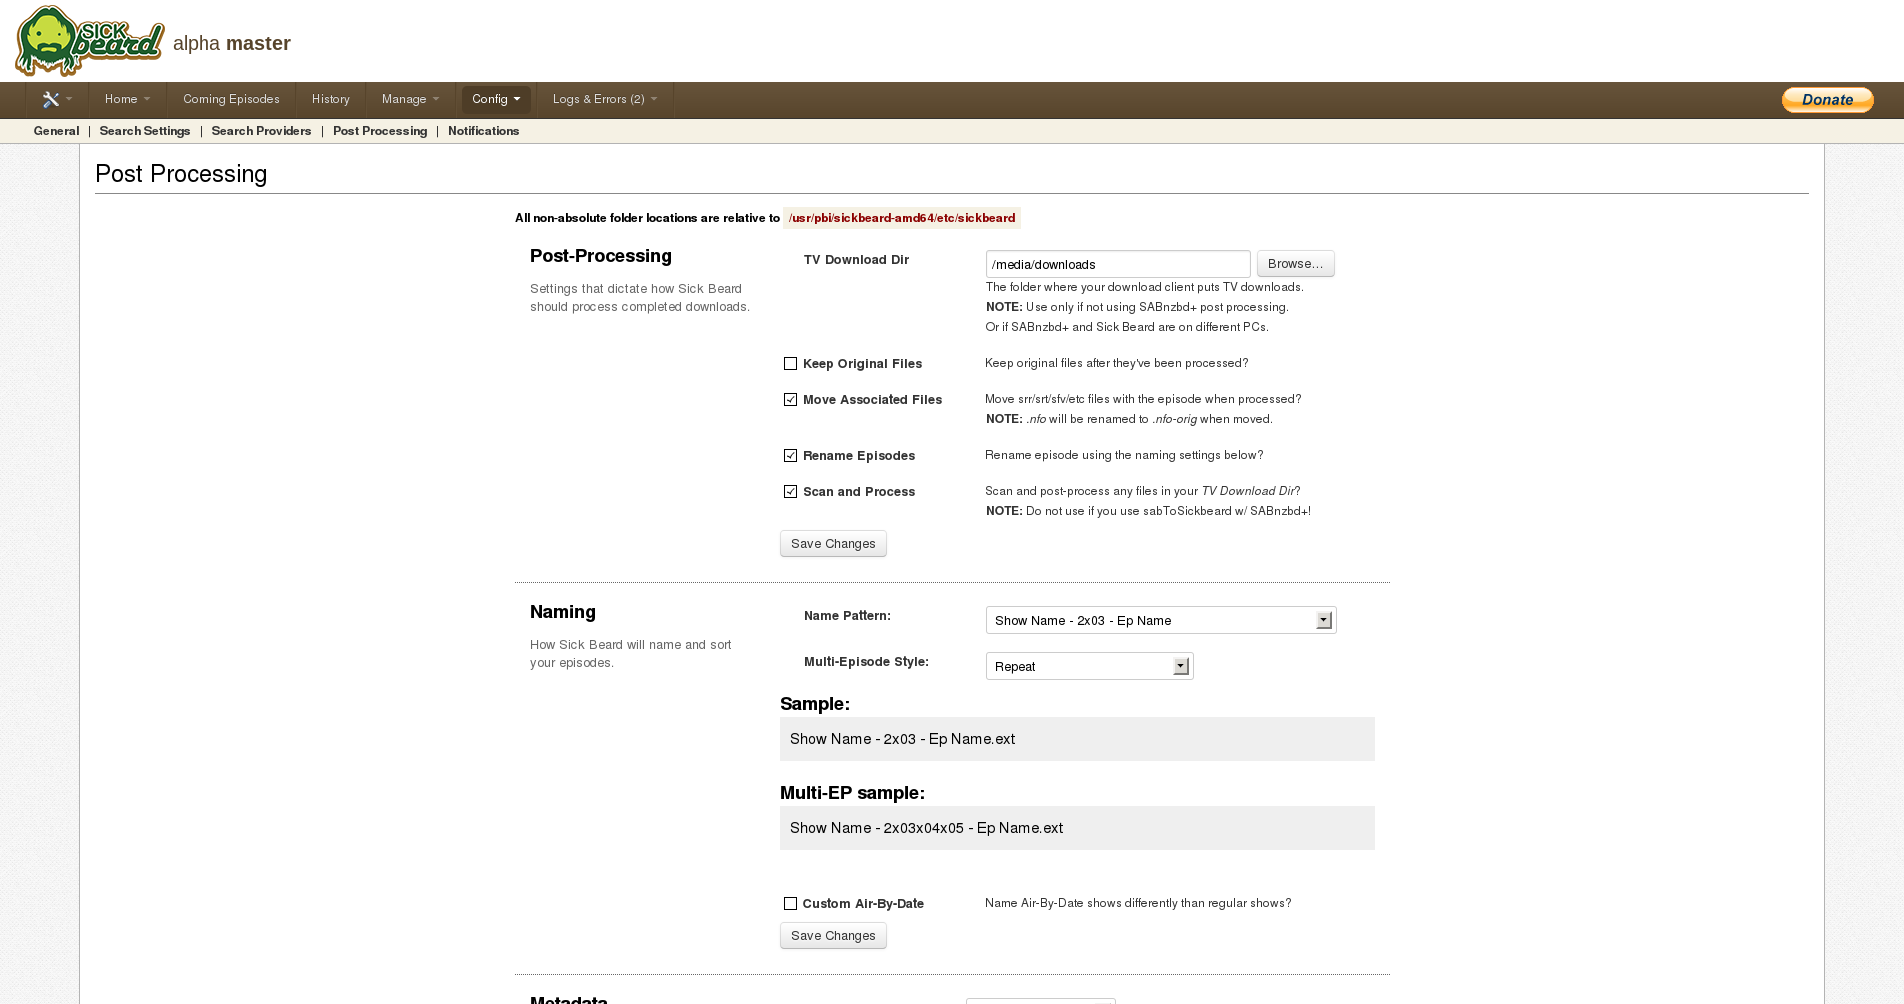
In the “TV Download Dir”, enter your Series-Destination “/media/downloads” and check the “Scan and Process”-box. You can also edit additional settings on this page but they are not important right now. In the end your settings should probably look like this:
sickbeard_post_process_settings

If you’re done, you can add new or existing shows and let them download!

DLNA

Now you have the choice to either use MiniDLNA or the Plex MediaServer. If you want a nice interface to manage you music and movies, use Plex. If you only need a DLNA-server, use MiniDLNA as it is easy to configure. I’ll describe the installation and configuration for both.

MiniDLNA

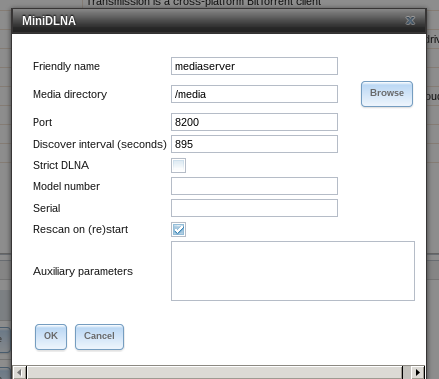
Open the Freenas-front end, go to plugins and open the MiniDLNA-configuration. There, set the name of the MiniDLNA-server to anything you like and the Media-directory to the destination set in chapter “Adding storage to the jails”. Leave the other options as they are.
minidlna_settings

The DLNA-server will only scan for new files in its directory on restart, so if you are adding a movie and do not restart the DLNA-server, it won’t be available for streaming. To work around this issue, use the fix described here. After rebooting the DLNA-server should now scan for new files every 5 minutes.

Plex MediaServer

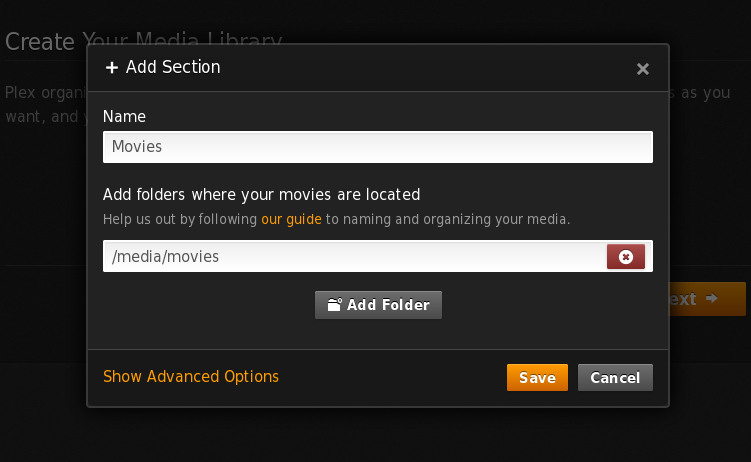
After installing the plugin, open the address of the Plexserver and you’ll be greeted with the End User License Agreement. Agree to it and jump to the “Get Started”-section. You can skip the register as it’s not needed. Leave the settings in “Basic Setup” as they are and go to the next step. There, you can add your music and movie-directories. Click on “add section”, then on “Movies” and insert into the second box your movies-directory. It should look like this:
freenas_plex_add_movies

Do this for your music and series, too.

If you have everything added, jump to the next section. There you can add some channels to use with Plex. I skipped them. Click “Next” and “Done” and your are it..done! Now you should see the dashboard of Plex filling with your movies and music.

DLNA is enabled by default, so you don’t have to do anything in this regard.

Conclusion

Now you are able to download movies with couchpotato and transmission and once they’re downloaded, they are automatically available on you DLNA-server for further streaming.

Mar 3, 2015

How-To Install FreeNAS To USB Drive

FreeNAS is an Open Source Storage Platform based on FreeBSD and supports sharing across Windows, Apple, and UNIX-like systems. It comes with a lot of protocols and services – here are some to mention: CIFS (samba), FTP, NFS, TFTP, AFP, RSYNC, Unison, iSCSI (initiator and target) and UPnP, Software RAID (0,1,5), ZFS, disk encryption, S.M.A.R.T/email monitoring with a WEB configuration interface (from m0n0wall). You can use it to build your own secure network file server to store all your important information on.

FreeNAS can be installed on compact Flash/USB key, hard drive or booted from LiveCD (version 7.x). Personally I like to install it on USB key to keep the software separate from the data on the hard disk. The rest of this article will show you how to do it. At the time of writing the current stable version is 8.0.2. The little graph on the right shown the number of downloads – this is what people download most:


They also have a 32-bit version (FreeNAS-8.0.2-RELEASE-i386.iso) and 64-bit version (FreeNAS-8.0.2-RELEASE-amd64.iso). You should choose 32-bit or 64-bit based on the hardware of the computer you are going to run FreeNAS on:


Download the .iso file from Source Forge and save it to your hard drive, for example in C:\Temp folder.

From here you can do two things:

1. Burn the .iso file to a CD. This will give you a bootable CD from where you can install FreeNAS to a hard drive or USB stick. The older versions (7.x) also had an option to run FreeNAS from the CD without installing it. With version 8.x this option is not available anymore.

2. Extract the embedded version of FreeNAS from the .iso file and write it directly to a USB stick. This is a faster way of getting FreeNAS installed but will not allow you to add additional software later.

In this article we are going to take the second approach. I will provide a separate posting on how to do variant 1 and install Transmission.

Note: As of version 8.0.1-BETA3 the image size increased. The new size requires a 2 GB USB storage device.

Step 1) Extract the FreeNAS image

We need to extract a file from the .iso file. If you already have a tool that can do that go ahead and use it. If not you can install the Daemon Tools Lite which is free for home personal use. Mount the .iso file and extract the FreeNAS_i386_embedded.xz (32-bit version) file. In case you downloaded the 64-bit version the name of the file will be FreeNAS_amd64_embedded.xz. Copy it to your hard disk.

For the rest of the article I will assume we chose the 32-bit version.


The .xz file is a compressed file. Un-compress it and extract FreeNAS_i386_embedded which is the image we have to write to the USB drive.

I use 7-Zip for extracting the files from .xz file. Make sure you use the latest version of 7-Zip. Right-click the FreeNAS_i386_embedded.xz file and choose 7-Zip -> Extract Here. This will extract FreeNAS_i386_embedded file and place it in C:\Temp


Step 2) Prepare the USB key

Plug the USB key in your PC and format the disk as FAT32. Sometimes Windows will not be able to format it (if it was partitioned or formatted with Linux file system for example). In this case you should try a “low-level” format using this tool:

HP USB Disk Storage Format Tool

Step 3) Write the FreeNAS image to USB key

The next step is to download Physdiskwrite from here. It is a ZIP file. Unzip it and copy physdiskwrite.exe and PhysGUI.exe to C:\Temp. Run PhysGUI.exe. It has a graphical interface and will display information about storage devices (hard drives and USB devices:


Remember the Device ID (first column) of your USB stick. Open a command prompt, change the folder to C:\Temp and type:
physdiskwrite -u FreeNAS-i386-embedded
It will list the disks (the same Device ID you got from Physdiskwrite) and will ask you to which of them to write the file. In my case it is drive 1 (type 1 and press)

It will ask you to confirm (press y followed by)


The program will start writing the file and you can see the progress. After it is done you have USB stick with FreeNAS installed on it. To try it reboot your computer and make sure it boots from the USB stick (either change the boot sequence in BIOS or use one of the hot keys during boot to enter the menu where you can select the device to boot from).

Some people are experiencing problems at this step. One suggested solution (thanks Jim) is:
Open a command window as admin (“cmd”)
Type “diskpart” and hit enter.
Type “list disk” and hit enter to find out the number of your drive.
Type “select disk X” (where you replace X with the number of your drive) and hit enter.
Type “clean” and hit enter.
after that go back to your temp folder and then try the process again.

If something goes wrong and you do not get a working FreeNAS on USB stick then try the first method – burn the .ISO file to a CD, boot from the CD and install FreeNAS to USB.

If you decide to go for version 7.x you get bit-torrent client (Transmission). It is missing in 8.0.2 but there are plans to be included in the future versions.

See Roadmap for 8.1

That is all.

Or almost. Probably you could have got the same information elsewhere – in the Google’s age it is hard to be original. Actually some time ago I came across a discussion about whether the blogging was declining. There were several responses in support of this – people were not seeing much sense in re-posting information available in 1000’s other places.

Saying that I would like to thank you for visiting my blog.

Feb 18, 2015

ASRock 960GC-GS FX Share Experience

I got this motherboard a month ago and it runs great so far. I bought it because I had a Phenom Quad Core 9500 2.2GHz in one of our old computers that wasn't being used. I installed that CPU in this mobo and it started up with no problems along with the DDR2 RAM. It worked fine with that CPU, internet browsing and streaming online videos was now a breeze especially on Netflix. 


Yesterday I received my new AM3+ 6300FX black edition CPU and installed it with some new RAM DDR3 8GB Kingston Hyperx 1600MHz at first it didn't start so I thought it was defective memory module but tried them in my other computer but it booted up fine so I reseated them and I had to push them in a little more with a bit of force and it booted up just fine. I also had to take out my Geforce GT610 graphics card also for it to boot I don't know why but I read on a forum somewhere that could be the problem for it not to boot up. I will update this if anything should happen.

My setup:
ASRock 960GC-GS FX Motherboard (of course)
AMD 6300 FX 8-3.5 GHz Black Edition unlock
HyperX DDR3 1600
Sapphire R7 260X 2GB GDDR5 OC
Western Digital 1TB HDD
Corsair CX600M watt PSU
Cooler Master G-Elite 430 Black Mid-Tower ATX Case

ASRock 960GC-GS FX Support | Drivers Download | Manual | CPU Support List | Memory QVL


Update:

I've had this board for two months now still running great. I got a new graphics card last week, a new Sapphire R7 260x 2gb GDDR5 overclock edition. I installed in with the drivers from the cd that came with it and is working awesome. I first bought this mobo just to use my older parts from an older computer but I ended upgrading everything, making it into a decent computer. So far I've really enjoy it and I can even play Farcry 3 on ultra settings...no joke. For my ram to run 1600mhz I went to BIOS and adjusted there. I do not intend to use this motherboard that long for gaming I just wanted something now. In the near future I plan on getting a MSI 970 gaming motherboard or a Gigabyte 990FX series motherboard but have to save up for that first. Overall I do enjoy this motherboard for internet browsing, Netflex, and playing Farcry 3 cause that's the only game I got right now lol.

Specifications


General

CPU

- Support for Socket AM3+ processors

- Support for Socket AM3 processors: AMD Phenom™ II X6 / X4 / X3 / X2 (except 920 / 940) / Athlon II X4 / X3 / X2 / Sempron processors

- Support for Socket AM2+ / AM2 processors: AMD Phenom™ FX / Phenom / Athlon 64 FX / Athlon 64 X2 Dual-Core / Athlon X2 Dual-Core / Athlon 64 / Sempron processor

- Supports 8-Core CPU

- Supports AMD OverDrive™ with ACC feature (Advanced Clock Calibration)

- Supports AMD's Cool 'n' Quiet Technology

- FSB 2600 MHz (5.2 GT/s)

- Supports Untied Overclocking Technology

- Supports Hyper-Transport 3.0 (HT 3.0) Technology

Chipset

- Northbridge: AMD 760G

- Southbridge: AMD SB710

Memory

- Dual Channel DDR3/DDR2 Memory Technology*

- 2 x DDR3 DIMM Slots**

- Supports DDR3 1866(OC)/1600(OC)/1333/1066 non-ECC, un-buffered memory

- Max. capacity of system memory: 16GB***

- 2 x DDR2 DIMM Slots****

- Supports DDR2 1066*****/800/667/533 non-ECC, un-buffered memory

- Max. capacity of system memory: 8GB***


*DDR3 and DDR2 are supported separately.


**DDR3 memory is only supported by installing AM3/AM3+ CPU.


***Due to the operating system limitation, the actual memory size may be less than 4GB for the reservation for system usage under Windows® 32-bit OS. For Windows® 64-bit OS with 64-bit CPU, there is no such limitation.


****DDR2 memory is only supported by installing AM2/AM2+/AM3 CPU.


*****Support with AM3 / AM2+ CPU.

BIOS

- 16Mb AMI legal BIOS

- Supports "Plug and Play"

- ACPI 1.1 compliance wake up events

- Supports jumperfree

- SMBIOS 2.3.1 support

- CPU, VCCM, NB Voltage multi-adjustment

 Audio, Video and Networking

Graphics

- Integrated AMD Radeon 3000 graphics

- DX10 class iGPU, Pixel Shader 4.0

- Max. shared memory 512MB

- Supports D-Sub with max. resolution up to 2048x1536 @ 60Hz

Audio

- 5.1 CH HD Audio (Realtek ALC662 Audio Codec)

LAN

- PCIE x1 Gigabit LAN 10/100/1000 Mb/s

- Realtek RTL8111G

- Supports Wake-On-LAN

- Supports LAN Cable Detection

- Supports Energy Efficient Ethernet 802.3az

- Supports PXE

 Expansion / Connectivity

Slots

- 1 x PCI Express 2.0 x16 Slot (PCIE2 @ x16 mode)

- 1 x PCI Express 2.0 x1 Slot

- 2 x PCI Slots

Storage

- 6 x SATA2 3.0 Gb/s Connectors, support RAID (RAID 0, RAID 1, RAID 10 and JBOD), NCQ, AHCI and Hot Plug

Connector

- 1 x ATA133 IDE Connector (Supports 2 x IDE devices)

- 1 x Floppy Connector

- 1 x IR Header

- 1 x Print Port Header

- 1 x Chassis Intrusion Header

- 1 x CPU Fan Connector (4-pin)

- 1 x Chassis Fan Connector (3-pin)

- 1 x Power Fan Connector (3-pin)

- 1 x 24 pin ATX Power Connector

- 1 x 4 pin 12V Power Connector

- 1 x CD In Header

- 1 x Front Panel Audio Connector

- 1 x SPDIF Out Connector

- 3 x USB 2.0 Headers (Support 6 USB 2.0 ports)

Rear Panel I/O

- 1 x PS/2 Mouse Port

- 1 x PS/2 Keyboard Port

- 1 x Serial Port: COM1

- 1 x D-Sub Port

- 4 x USB 2.0 Ports

- 1 x RJ-45 LAN Port with LED (ACT/LINK LED and SPEED LED)

- HD Audio Jack: Line in / Front Speaker / Microphone

 Other Features / Miscellaneous

Unique Feature

- ASRock OC Tuner

- ASRock Intelligent Energy Saver

- ASRock Instant Boot

- ASRock Instant Flash

- ASRock OC DNA

- ASRock APP Charger

- ASRock XFast USB

- ASRock XFast LAN

- ASRock XFast RAM

- ASRock X-Boost

Hybrid Booster:

- CPU Frequency Stepless Control

- ASRock U-COP

- Boot Failure Guard (B.F.G.)

- ASRock AM2 Boost: ASRock Patented Technology to boost memory performance up to 12.5%

Support CD

- Drivers, Utilities, AntiVirus Software (Trial Version), CyberLink MediaEspresso 6.5 Trial, Google Chrome Browser and Toolbar

Accessories

- Quick Installation Guide, Support CD, I/O Shield

- 2 x SATA Data Cables

Hardware Monitor

- CPU/Chassis temperature sensing

- CPU/Chassis/Power Fan Tachometer

- CPU Quiet Fan

- CPU Fan multi-speed control

- CASE OPEN detection

- Voltage Monitoring: +12V, +5V, +3.3V, Vcore

Form Factor

- Micro ATX Form Factor

OS

- Microsoft® Windows® 8 / 8 64-bit / 7 / 7 64-bit / Vista™ / Vista™ 64-bit / XP / XP Media Center / XP 64-bit compliant

Certifications

- FCC, CE, WHQL

- ErP/EuP ready (ErP/EuP ready power supply is required)

Feb 16, 2015

Drive Image and Backup for Windows

R-Drive Image is a potent utility providing disk image files creation for backup or duplication purposes. A disk image file contains the exact, byte-by-byte copy of a hard drive, partition or logical disk and can be created with various compression levels on the fly without stopping Windows OS and therefore without interrupting your business. These drive image files can then be stored in a variety of places, including various removable media such as CD-R(W)/DVD, Iomega Zip or Jazz disks, etc.


R-Drive Image restores the images on the original disks, on any other partitions or even on a hard drive's free space on the fly. To restore system and other locked partitions R-Drive Image is switched to the pseudo-graphic mode directly from Windows or bootable version created by the utility is launched from CD disc or diskettes.

Using R-Drive Image, you can completely and rapidly restore your system after heavy data loss caused by an operating system crash, virus attack or hardware failure. You can also use R-Drive Image for mass system deployment when you need to setup many identical computers. In other words, you can manually setup one system only, create an image of the system, and then deploy it on all other computers, saving your time and costs. If you need to restore only certain files from a disk image, you can connect that image as a virtual disk and copy those files directly from the disk image using Windows Explorer or any other file utility.

R-Drive Image is one of the best backup and disaster recovery solutions to prevent losing your data after a fatal system failure.

A free fully functional 30-day trial version is available for evaluation purpose.

R-Drive Image Features
  • A simple wizard interface - no in-depth computer management skills are required.
  • On-the-fly actions: Image files are created on-the-fly, no need to stop and restart Windows. All other disk writes are stored in a cache until the image is created. Data from image files are restored on-the-fly as well, except on a system partition. Data to the system partition can be restored either by restarting R-Drive Image in its pseudo-graphic mode directly from Windows, or by using specially created startup disks.
  • Image files compression. Image files can be compressed to save free storage space.
  • Removable media support. Image files can be stored on removable media.
  • Startup version. A startup version can be used to image / restore / copy partitions locked by the OS. The computer can be re-started into the startup version either directly from Windows, or from an external USB device, a CD/DVD disk, or 6 floppies. The startup version can use either a graphic user interface, or a pseudo-graphic mode, if the graphic card isn't supported. Support for UEFI boot for modern computers.
  • USB 2.0 and 3.0 support in the startup version. With hard drives prices constantly going down, an external IDE-USB 2.0 or 3.0 HDD case with an appropriate hard drive is an ideal (fast and reliable) solution for storing backup files for system and other partitions that can be restored only in the startup version. Do not use numerous unreliable CD discs and slow CD/DVD recorders any more. Remember: with the incremental backup, this hard drive is not to be too large.
  • Network support in the startup version. R-Drive Image startup version supports disk image file creation and restoration over the Microsoft network (CIFS protocol).
  • Extended List of the supported devices in the startup version. The list of hardware supported by R-Drive Image startup versions has been extended. VIEW THE LIST
  • An image file can be connected as a read-only virtual disk. Such disk can be browsed through and files/folders can be found and copied.
  • Individual files and folders restoration. Individual files and floders rather than entire disk can be restored either during the restoring action or from a image file connected as a virtual disk.
  • Image files splitting. Drive images can be split into several files to fit a storage medium.
  • Image Protection. Disk image files can be password-protected and contain comments.
  • New partition creation. Data from a disk image can be restored on a free (unpartitioned) space on any place on a hard drive. The size of the restored partition can be changed.
  • Partition replacement. Data from a disk image can be restored on other existing partitions. R-Drive Image deletes such partitions and restores data on that free space.
  • Disk to Disk copy. An entire disk can be directly copied on another one.
  • Image files verification. You may check if your image files are good before you store them or restore data from them.
  • Scheduler. A time for disk image creation may be scheduled and the process can be run in unattended mode.
  • Script creation for frequent or unattended actions. Such scripts for creating an image file and appending data to an existing image file are created from the R-Drive Image interface the same way the actual action is performed. Scripts are executed from a command line and such command can be included to any command file.
  • Action Report. When disk image is successfully created or the action fails the report can be automatically sent over e-mail or an external application can be launched.
  • Support for the ReFS file system (Resilient File System), a new local file system Microsoft has introduced in its Windows 2012 Server. All disk actions are supported, except partition resizing.
  • Full support for the GPT partitioning layout. R-Drive Image can create GPT disks, resize them, and change their partition layout during copy/restore operations.
  • Support for Windows Storage Spaces (Windows 8/8.1 and 10), Linux Logical Volume Manager volumes, and MacRAIDs.

How To Make Windows 7 OS On USB Flash Drive

As you all know creating a bootable USB, or installing Windows 7 or Vista using USB is a piece of cake. It doesn’t take much time and effort to have a bootable USB. Now, after replying to several e-mails about installing Windows 7 or Vista on a USB drive, I have decided to write this detailed guide.


Requirements to install Windows 7 on USB:

# An USB flash drive with a minimum of 6 GB disk space to install Windows 7 or Vista. You can use a 4 GB drive to install XP.

# Bootable Windows 7 USB or DVD.

# Free time

So let’s begin with the installing Windows 7 on USB procedure:

1. First of all, connect your USB to the machine and backup all the data from the USB drive.

2. Download VirtualBox portable here, double-click on the executable file and extract the contents to your USB.

3. Now, go to the VirtualBox portable folder in USB, and execute the Portable-VirtualBox (.exe) file.

4. From here onwards, you need to follow the onscreen procedure to create a virtual disk and install Windows 7 on USB. Follow the install Windows 7 on VirtualBox guide to complete the process.

5. Once you finish the installation process, you can safely close VirtualBox and remove your USB drive.

6. You can now use this Windows 7 USB drive on any Windows machine that you want. To use Windows 7 on other machine, connect the Windows 7 USB, open USB drive, and run portable-VirtualBox file.

How To Convert Windows 7 OS To A Virtual Machine

In this guide, we will cover how to create a virtual Windows machine by cloning your existing Windows operating system. And once you have a clone of your OS in the form of virtual drive you can use free virtualization solutions like Virtual Box, VMware Player or Microsoft Virtual PC to carry and access your personalized Windows OS on any machine.

Here are the steps that you need to follow in order to clone your Windows OS. In this guide, we are cloning our Windows 7.

1. First download and install Paragon Go Virtual software. Paragon Go Virtual is available for free of cost, but you need to register (free) with Paragon software to avail the free license. During installation, click Get free serial button to head over to the official registration page and enter particulars to get the license via email. Enter the product key and serial key, and complete the installation.

Pargon Go Virtual

2. Once installed, you will be asked to reboot your machine to complete the procedure.

Pargon Go Virtual Installation2

3. Run Paragon Go Virtual application and click P2V Copy option to start the P2V Copy Wizard.

Convert Your Windows 7 Into A Virtual Machine To Carry On USB Drive Step2

4. Once the wizard is launched, click Next button to see disk volumes and external hard drives, if any.

5. Check the box next the Widows installation drive and click on the Next button to proceed further.

Convert Your Windows 7 Into A Virtual Machine To Carry On USB Drive Step3

6. The wizard will detect the OS present in the selected drive and prompts you select a virtual software that you want to use to run the virtual machine. Select a virtual software from the available three (VMware, VirtualBox and Microsoft Virtual PC) that you are familiar with and then click Next button (we have selected Oracle VirtualBox).

Convert Your Windows 7 Into A Virtual Machine To Carry On USB Drive Step4

7. In the properties page, enter a name for your virtual machine and change the memory allocation before hitting the Next button.

Convert Your Windows 7 Into A Virtual Machine To Carry On USB Drive Step5

8. In the next window, you can change the properties of virtual disks. Click Next button to go with the default one.

Convert Your Windows 7 Into A Virtual Machine To Carry On USB Drive Step6

9. On this screen you need specify the location where you want to save the virtual machine. You are almost done. Click Next button again to the start the process of virtual machine creation.

Convert Your Windows 7 Into A Virtual Machine To Carry On USB Drive Step7

Convert Your Windows 7 Into A Virtual Machine To Carry On USB Drive Step9

10. Depending on the amount of data present on your Windows drive, it might take a few minutes to hours. Once the process is completed, install a virtual machine and then open the virtual machine by clicking the appropriate option. You are done!

How To Backup VirtualBox Disk Image

VirtualBox is one of the best free virtualization software out there, if not the best. Users who have used VirtualBox for some time probably know how difficult it is to clone or move a virtual machine as VirtualBox assigns a unique identity number (UUID) to each virtual machine.


Even though there are guides available to backup or move a VirtualBox virtual machine (.VDI) without using third-party tools, you need to follow a very lengthy procedure. So, here we are to share a free utility to backup virtual machine in a few steps.


CloneVDI is a free utility that lets you backup VirtualBox virtual machine (VDI) with ease. Other than backup, you can use this tiny tool to increase virtual drive size, view virtual drive info, and header info as well.

Here are the key features of CloneVDI:

# Reads VDI, VHD, VMDK, Parallels HDD, RAW files and physical drives, writes VDI

# Ability to compact the clone virtual machine

# Ability to enlarge the maximum size of a virtual disk

# Generate new UUID for the clone

# Information about the source VDI, internal file system, & partition map

How to use CloneVDI tool:

Step 1: Make sure that your virtual machine is shut down and powered off.

Step 2: Download CloneVDI zip file and extract the zip file contents to a folder on desktop.

Step 3: Run CloneVDI (.exe) file. Select the VDI file that you want to clone and then select the destination.

Step 4: Use the option Increase virtual drive size to option if you need to enlarge the clone virtual machine.

Step 5: Click Proceed button and wait for a few minutes to complete cloning process.

5 Best Free Disk Imaging/Cloning Utilities for Windows

Creating a good backup of your computer system involves not only backing up all of your data, but also backing up all Windows and system files when they are in a working and stable state. When a hard drive crashes or the Windows operating system becomes corrupt, it would be preferable to not only be able to load back your data quickly, but also to load back the entire OS with all of your user settings, bookmarks, installed drivers, installed applications, and more.

A good way to have both things taken care of at once is to create an image of your hard drive. By creating an image, your entire system state, including the OS and data files, is captured like a snapshot and can be reloaded at any time. It’s the best way to protect your data and is the fastest solution also. However, it’s not necessarily the easiest solution since most imaging programs require a bit of trial and error when performing a restore.

In this article, I’ll mention a couple of my favorite freeware programs for cloning a hard drive. You’ll find a lot of paid solutions also like Acronis, which make the process easier, but can cost a good chunk of change. If you hate computers and want the simplest process possible, then go for commercial software. Otherwise, read on for some great freeware apps for cloning your hard drive.

Paragon Backup & Recovery

Paragon Backup & Recovery is one of my favorite tools for backing up and restoring hard drives at home. It has a slew of features and is very reliable. It’s been around for a very long time and therefore the software is polished and works perfectly on all versions of Windows from Windows 2000 to Windows 8.1 32-bit or 64-bit. Here’s a list of features that make Paragon one of the best freeware utilities in this category.

  • Complete disk backup including GPT disks
  • Differential backups so that you can create one full image and then save space on future backups. I believe Paragon is the only freeware one I mention here that supports differential backups.
  • Unique backup capsule feature that lets you store the backup on a local hard disk in a hidden partition for easy recovery if they active partition fails
  • Linux and WinPE bootable recovery media options
  • Restore an entire image or only certain files and folders from an image
The only annoying thing about the program is that it includes all the features from the commercial version too and when you try to use one of them, it will try to upsell you the paid version of the program. It’s not a major nuisance, but it’s slightly annoying. I would rather they just strip it down to the bare minimum and if I like the program, I might be interested in purchasing the more feature-full version.

The free version can still do a lot of other stuff too like create, delete, and formats partitions, hide/unhide partitions, and mark partitions as active.

DriveImage XML

DriveImage XML is a completely free data recovery program that you can use to create images and backups of logical drives and Windows partitions. Here are a couple of the major features of this program:

  • Quickly backup logical drives and Windows partitions to image files without having to restart Windows (you can remain logged in)
  • Easily browse, view or extract files from the images
  • Restore the images to the same drive or to a different drive
  • Copy data directly from drive to drive
  • Schedule automatic backups and image creations with Task Scheduler
  • Run the program from the Live CD or from the WinPE boot CD-ROM
The nice thing about DriveImage XML is that it uses Microsoft’s Volume Shadow Service (VSS), which means you can create hot images of hard drives that are in use. It supports Windows XP, Windows Server 2003, Windows Vista, Windows 7 and Windows 8.

The one thing to remember though when restoring an image is that the partition you are restoring to needs to be of the same size or larger. You cannot restore to a smaller partition size than the original. Also, DriveImage XML does not perform incremental backups after the first backup image, so you’ll either have to have a lot of space or you will have to delete older backups.

Macrium Reflect Free

Macrium Reflect Free is another popular free utility for disk imaging or disk cloning. In terms of design, the GUI for Macrium is much better than Drive Image XML. It’s clean and looks more modern. The layout is also easier to navigate and understand.


You can clone a disk or image a disk. Cloning is better if you want to move everything on one disk to another hard disk, i.e. a larger disk. Imaging a disk can be scheduled whereas cloning has to be done manually. You can then restore the images to the same hard drive, a replacement hard drive or even to a new computer, though the last option will require a paid version of Macrium to restore to the new hardware.

Macrium also has a Linux rescue CD and Windows PE rescue CD that can be used to restore an image to a new hard drive. The restore process is fairly straightforward and if you get confused anywhere, they have tutorials for creating images, restoring images, troubleshooting problems, etc. in the knowledgebase. It’s a good program for a novice user.

EaseUS Todo Backup Free

EaseUS creates a lot of different products and one of the best is Todo Backup. Again, like Paragon, they want to upsell you to their paid versions, but the free version worked just fine for me when performing a backup and restore.


It’s got a simple clean interface and is a little better than Paragon when it comes to upselling. It just have a little bar at the bottom of the window that say “Upgrade Now to get a more powerful edition”.

Using the free version, you can only recover to the same disk or a new disk on the same machine. If you want to recover to new hardware, then you’ll have to purchase their paid software just like Paragon and Macrium do. Feature-wise, it’s closest to Paragon in terms of what it supports. You can restore using their WinPE bootable media and it works as expected.

I also found EaseUS Todo backup to be very easy to use, especially when following their online guides. Overall, it’s a great choice for a novice user.

CloneZilla

If you’re more of an advanced user, then CloneZilla may be the right choice for you. Clonezilla is basically a live CD that you boot from and then work with from there. Unlike other programs, it doesn’t have an executable file that you can run inside Windows. That right there will be reason enough for most people to choose something else.


However, if you’re familiar with the DOS environment and really want the most customization options for creating your backup or disk image, then CloneZilla has you covered. Here’s an abbreviated list of features:
  • Supports a large range of file systems including ext2, ext3, ext4, xfs, jfs, FAT12, FAT16, FAT32, NTFS, HFS+, UFS, VMFS3, VMFS5 and minix
  • Both MBR and GPT formatted hard drives supported
  • Image file can be stored locally or on an NFS server, Samba server, or SSH server.
Performing a clone and restore in CloneZilla was a bit more work than I had expected and it certainly had many pitfalls for novice users. Thankfully, they have some documentation with step by step instructions for performing common operations. Again, this is a great tool for advanced users only.

Those are my favorite 5 tools for cloning or imaging a disk in Windows. If you have another suggestion not mentioned here, feel free to post it in the comments. Enjoy!

How To Setup DD-WRT on Virtualbox

Maybe you are interested to use/try DD-Wrt for your hotspot or using it for our hotspot billing software, unfortunately but you don’t have a compatible router hardware or don’t have any brave to flash your factory router firmware with DDWRT to avoid any unwanted things.


Actually DD-WRT provides X86/ PC Version for free, that installable on your own PC. The problem is , that it is not in virtualbox compatible image. Therefore you won’t able to install it directly to virtualbox, unless you convert it to virtualbox disk (vdi) image first, with vboxmanage command. But the problem does still exist, you may be able to install it to your virtualbox, but the converted image is read only. It won’t save the changes you have made. Once you reboot the router, you will be losing any changes/settings that you have made. The good news is we have fully functional(read/writeable) ddwrt in Virtualboxdisk image (vdi).

Just do the following steps to get fully working DD-WRT on virtualbox with network setup
  1. Download our ddwrt-vdi image compressed file from here
  2. Extract the compressed file
  3. Create the new virtual machine (OS: Linux, Version: Other linux) and Use existing virtual disk: DDWRT-X86.vdi that we have provided earlier
  4. Virtualbox Network settings: adapter 1 attached to Host-Only adapter
  5. Go to File > Preferences > Network > Select “VirtualBox Host-Only Ethernet Adapter” > Edit , IPv4 Address: 192.168.1.254 IPv4 Network Mask: 255.255.255.0
  6. Use your web browser to access http://192.168.1.1/ username: admin password admin , after that you can setup your WAN Connection to DHCP/Static IP address and configure the router as needed
  7. Once you have done configuring the router, you would need to change the network settings in virtualbox : Adapter 1 attached to Bridged adapter (select your WAN ethernet interface card that connected to your ADSL modem/gateway router), Adapter 2 attached to Bridged adapter( Select your LAN ethernet interface card that connected to your Access Point)
Note: The default console login username is root and password admin, You would need to have 2 ethernet cards on the Host PC.

Network Layout:

(ADSL Modem/Gateway router) ——DHCP/Static IP WAN[[DDWRT X86 on virtualBox]] LAN—Wireless AP ——Client

Green Tea Extract Stops Gum Bleeding

An Isfahan Medical University study has found that the green tea extract helps stop gum bleeding after tooth extraction.


After tooth extraction, it’s important for a blood clot to form to stop the bleeding and begin the healing process.

Mehrdad Fanaei conducted the research on patients in two 31-member groups who have their mandibular molars removed.

The patients in the first group were asked to bite on a green tea-soaked gauze pad and the patients in the second group were asked to apply pressure to stop the bleeding by placing the gauze directly over the extraction site.

After one hour, the gauzes were carefully removed and the extraction sites were observed for bleeding.

Green tea helped reduce bleeding and led to the formation of blood clots sooner compared to the second group.

Green Tea for weight loss

There are various eating plans available on the market nowadays, one among which happens to be the green tea extract fat burning plan.


Green tea for weight loss works because of an increase in the rate of metabolism on the other hand it also helps to speed up the expenditure of energy. This specific herbal tea is one of the most popular green tea for weight loss. It is ever more popular among men and women both. Its popularity probably stems from the fact that it tastes really good. Recently Hollywood stars tend to be buying green tea extract in order to shed pounds for a motion picture role and several additional famous people in addition claim that they are using the green tea to help them reduce weight.

Enhance Body Fat Burning

You can get this particular herbal tea as either tea leaves with which you can make plain old tea or you can get this tea in the form of pills. You’ll discover a lot of fat reducing capsules that features green tea herb, and they’re commonly designed to function in a number of approaches using the herbal tea factor built-in in order to enhance the fat burning capacity of the dieter.

Why Green Tea for Weight Loss?

In case you would like to delight in only the main advantages of the herbal tea without any added materials these vitamin supplements you’ll be able to make a decision on weight-loss herbal tea, that’s surely just as refreshing and also beneficially related to weight loss. You should keep in mind though this particular herbal tea is usually good for fat decline it can contain caffeine, so this is typically not suitable for anyone, for example, those with caffeine sensitivity. Just note that green tea for weight loss itself will not be sufficient to help you reduce weight, doing regular exercise needs to be a must.

Adding CommentLuv plugin on Blogger

CommentLuv is one of the excellent plugin for wordpress users, which gives excellent linkback activity for every commenter in your blog. Blogger default commenting system is actually secure, but reader interaction is too really significant. So Most of the bloggers are proving their interest to get backlink from the blog commenting. So before publishing post in your blogspot blog, you need to replace the default commenting system. Since blogger launch date, Google did not implement a commenting system. So most of the commenter are starting to comment on the WordPress CommentLuv system. If this plugin installs in blogger your user engagement system becomes full. So today I am starting to enforce this method “How to add CommentLuv plugin for Blogger blogs”.

How to add CommentLuv plugin for blogger blogs.

How to install CommentLuv plugin in WordPress Blogs?

Installation of the Plugin is a very simple process. Just login into WordPress dashboard and then go for Plugin > Add New, and search with keyword “CommentLuv”. Simply click on Install Now and then activate the Plugin. Just adjust the settings in CommentLuv plugin page. That’s it.

How to integrate CommentLuv with Blogger blogspot blogs?

To integrate the CommentLuv plugin into blogger blogs, follow the steps. To do this, we need to make use of third party website.

1. Open http://intensedebate.com site and create an account by clicking on “Signup”.

How to add CommentLuv plugin for blogger blogs.

2. Fill up the form with required details, then submits and click on the activation link from your Email account. Make sure to tick the option “I want to install inteseDebate on my blog or website”.

How to add CommentLuv plugin for blogger blogs.

3. Now login into your IntenseDebate account, then go for Sites > Add BlogSite.

How to add CommentLuv plugin for blogger blogs.


4. Enter the blogspot blog URL in “Step 1: Specify URL”.

How to add CommentLuv plugin for blogger blogs.

5. Now select the Blogger platform “Step 2: Choose Platform” then go to Last step

6. In Step 3: Installation follows the instruction to install this plugin in your blog. Tick mark on “All new posts” (Recommended).

How to add CommentLuv plugin for blogger blogs.

7. Now go to the Blogger dashboard, download your blogger template in “.XML” format from “Backup/Restore

How to add CommentLuv plugin for blogger blogs.

How to add CommentLuv plugin for blogger blogs.

8. In this step upload the blogger template now by clicking “Choose file” selection. Then click on “Upload file and continue” it.

How to add CommentLuv plugin for blogger blogs.

9. Now you will redirect to below given screen. Just copy the template code.

How to add CommentLuv plugin for blogger blogs.

10. Go to your blogger profile and navigate to Template > Edit html. Select original code of your template by pressing Ctrl + A and replace it with code copied in the above step. This code is not damaging your original template code or anything else. Then “Save template”.

How to add CommentLuv plugin for blogger blogs.

11. Once done, click on the link which says “Configure this IntenseDebate account”. Then click on “Activate” to active the CommentLuv plugin.

How to add CommentLuv plugin for blogger blogs.

How to add CommentLuv plugin for blogger blogs.

Conclusion:

The CommentLuv plugin is top one of the wordpress plugin, which is used by most of the wordpress bloggers to interact with commenters. But in Blogger platform, there is no option to change the default comment system. IntenseDebate.com (This is developed by WordPress team) integrating the CommentLuv system into your blogger blog code. It has spam protection system also. Just follow the above steps to integrate this plugin and enjoy as WordPress plugin.

Wordpress Ping List for Faster Indexing of Blog Post

WordPress ping list are very useful to extend your blog reach to major search engines. We all know that blog has a big advantage over static/dynamic sites in the form of Ping. If you are not aware of pinging feature of WordPress, then here are my 2 cents for you.


When ever you publish, edit or modify a post, WordPress sends ping to all the Ping services which is listed under your ping update service. So this way, ping services get notified about new post and search engine will quickly index them.

Now by default WordPress notifies all major ping services but we can always extend our limit by pinging more services by adding them manually.

Over the time, I have compiled a list of ping services for WordPress, which will help you to ping more services. Here is list of my working WordPress ping list:

 1: http://blogsearch.google.com/ping/RPC2
 6: http://api.my.yahoo.com/RPC2
 7: http://api.my.yahoo.com/rss/ping
 8: http://bblog.com/ping.php
 9: http://blog.goo.ne.jp/XMLRPC
 10: http://blogdb.jp/xmlrpc
 11: http://blogmatcher.com/u.php
 12: http://bulkfeeds.net/rpc
 13: http://coreblog.org/ping/
 14: http://mod-pubsub.org/kn_apps/blogchatt
 15: http://www.lasermemory.com/lsrpc/
 16: http://ping.amagle.com/
 17: http://ping.bitacoras.com
 18: http://ping.blo.gs/
 19: http://ping.bloggers.jp/rpc/
 20: http://ping.cocolog-nifty.com/xmlrpc
 21: http://ping.blogmura.jp/rpc/
 23: http://ping.feedburner.com
 24: http://ping.myblog.jp
 25: http://ping.rootblog.com/rpc.php
 28: http://ping.weblogs.se/
 29: http://pingoat.com/goat/RPC2
 30: http://rcs.datashed.net/RPC2/
 31: http://rpc.blogbuzzmachine.com/RPC2
 33: http://rpc.icerocket.com:10080/
 34: http://rpc.newsgator.com/
 35: http://rpc.pingomatic.com
 36: http://rpc.technorati.com/rpc/ping
 37: http://rpc.weblogs.com/RPC2
 38: http://topicexchange.com/RPC2
 39: http://trackback.bakeinu.jp/bakeping.php
 40: http://www.a2b.cc/setloc/bp.a2b
 43: http://www.blogoole.com/ping/
 44: http://www.blogoon.net/ping/
 45: http://www.blogpeople.net/servlet/weblogUpdates
 46: http://www.blogroots.com/tb_populi.blog?id=1
 49: http://www.blogstreet.com/xrbin/xmlrpc.cgi
 50: http://www.mod-pubsub.org/kn_apps/blogchatter/ping.php
 53: http://www.popdex.com/addsite.php
 54: http://www.snipsnap.org/RPC2
 55: http://www.weblogues.com/RPC/
 56: http://xmlrpc.blogg.de
 57: http://xping.pubsub.com/ping/

Here is a quick guide for newbie to add these ping update services.

How to add or update WordPress ping list:

Login to your WordPress dashboard. Go to Writing under settings tab and scroll down to update services and add all the above ping list. Here is a screenshot for quick understanding:


Well, controlling WordPress ping update services is just first step to SEO and there are many things which you need to do to SEO optimization of your blog.