Showing posts sorted by date for query Apple. Sort by relevance Show all posts

Apr 20, 2015

World's Smallest Android Set-Top-Box

Chinese handset maker Xiaomi revealed the Mi Box Mini, an Android TV-like device that can play games. Everyone and their mother (in Tech News) is monitoring Xiaomi, the *fourth largest smartphone maker in the world behind Samsung, Apple and Lenovo (owners of Motorola). But that doesn't mean everything they put out is gold.


Xiaomi's been at the TV game the longest after it's smartphone when they first released the Mi Box, their answer to Apple TV. Like the Apple device, the Mi Box could play games, download apps, and stream content. However, unlike the Apple device, the content supported by Xiaomi is mostly China-centric, and this is no different with the Mi Box Mini.


Let's a take a step back and look at the Mi Box Mini. The thing is small, sleek, and did I mention small? At the size of a smartphone charger, the Mi Box Mini only has a plug and an HDMI output. It connects online via Wi-Fi. Xiaomi is offering "1.4 million hours" of content to go with it.

Of course, since it's an Android device, and similar to Android and Apple TV, the Mi Box Mini also has another feature going for it: gaming. The Mi Box Mini's specs surpass those many early Android consoles:


Most of the content available on the Mi Box Mini, and the Mi Box, for that matter, is in Chinese. Some of it might also be illegal and unlicensed content, but I did find Archer in English.Most of the content available on the Mi Box Mini, and the Mi Box, for that matter, is in Chinese. Some of it might also be illegal and unlicensed content, but I did find Archer in English.


Okay, enough about the video, onwards to video games! Sadly, like its predecessors, the Mi Box Mini isn't a gaming machine, even after the various deals that Xiaomi has made, including the one with Ouya. Part of the problem of the device as a gaming platform is Xiaomi's own lackadaisical offerings.

The company has on its store, free of charge, games like Timberman, Flappy Bird and Plants Versus Zombies. Of course there are also loads of Chinese-made mobile games. The games are simple casual titles that would find their way onto many a smartphone, mine included (I really liked Timberman).


Now, according to Xiaomi's forum's and Engadget, there's a way to side load apps onto the Mi Box Mini. I haven't figured out how. There's no Micro SD or SD slot anywhere, so the hardware is limited to 2 GB of usable memory. The Mi Box Mini should also connect to any Bluetooth controller, however it's not connecting to my Moga Pro.


However, at a price of about $30, the Mi Box Mini is incredibly attractive for people looking for a media solution to terrestrial and cable TV. With Xiaomi supposedly slated to hit State-side in the coming year, they may work out something with the Mi Box Mini for Western audiences. I still can't get over how tiny the box is.

Apr 10, 2015

How-To Reset Factory Default iPhone 6

If any damages have been caused to your Apple iPhone 6 by downloading unauthorized software or other means, a restore to original factory settings is one way to repair the issues. A full restore will delete all of the data on it, including all pictures, music, contacts and videos. This can easily be done from the phone or using iTunes.
Remember: this removes EVERYTHING from your phone and resets it back to factory settings. If you’re sure you wish to proceed with this, follow the simple steps below. We will discuss restoring your iPhone through iTunes using a backup further down in the article.

Reset From Device
  1. Click on “Settings” and then on “General.”
  2. Scroll to the bottom of the General tab and click “Reset.”
  3. Tap “Erase all Content and Settings.”
  4. Enter your passcode (if there is one) and confirm your reset by tapping “Erase iPhone.”
Your device should give you an estimate as to how long this process will take. Depending on how many apps you have, it could be anywhere from a few moments to an hour or more. During this time, the device is completely inoperable. Once finished, your phone will be like new. This is something you should do if you ever give or sell your phone to someone else as it erases all of your information.

Reset From iTunes

You may wish to simply restore using a backup of your device so that you can keep your settings, email and apps. This process involves a few more steps, but it’s still fairly simple.
  1. Connect your iPhone to your computer with its cable and allow iTunes to launch. You’ll see a button appear for your phone under “Devices” on the upper-left side of your screen. This lets you know the phone is properly connected and recognized. Select the button.
  2. If iTunes is set to automatically sync when the device is connected, it will start transferring data right away. This is a very important step so that all newly-added content will be saved, including any songs or apps you’ve purchased and photos you’ve saved. If iTunes does not automatically begin to sync, do so manually now. Press the “Sync” button at the bottom-right corner of the “Summary” option located in the left pane in iTunes.
  3. Once the sync has completed, head back to the information page within iTunes. In the middle of the main window, you’ll see two buttons. Click on the “Restore” button. Once you have done so, iTunes will warn you that restoring your iPhone to factory settings will erase all media and data. If you’ve already successfully synced, simply click the “Restore” button again to begin the process.
  4. As soon as you click the “Restore” button the second time, iTunes will automatically start the process. You’ll see several different message on the screen where iTunes tells you things – such as that it is extracting the software needed to restore your device. You’ll see things such as a message that it’s being verified with Apple, as well. Do NOT disconnect your phone from your computer while this process is going.
  5. iTunes will tell you when the phone is finished being restored, but you aren’t done quite yet! You have to restore your settings and sync everything back to the device. Let the iPhone restart itself after restoration. You may then see a message saying it needs to activate – just wait a moment and it will then tell you that process is finished.
  6. On the iTunes screen, you’ll see two options: “Set Up as a New iPhone” or “Restore From a Backup“. If you wish to restore your settings, email, contacts and other information, you’ll of course choose the “Restore From a Backup” option. Select the name of your iPhone from the drop-down menu on the right side of the screen.
Once you click the button, iTunes will restore all settings and files you backed up earlier in this process. It will likely take several minutes – make sure you don’t disconnect the phone during this time. As soon as everything is restored to the iPhone it will restart itself once again. If iTunes is not set to automatically sync, please do so again now manually. This step is critical: it is when all of your files, apps, music and such will be transferred back to the iPhone.

Voila! Your iPhone 6 is now restored to original factory settings and all of your data has been synced back to the phone. You can unhook the phone from the computer and use it now!

Apr 2, 2015

Gum Infection and Diseases

The gums are also called the gingiva. These are firm fibrous tissue connected to the jawbone. They are considered healthy when they are at least 1 mm thick with a good blood supply. Along with age, they decrease slightly and expose more surface of the tooth. Inflammation of gums is known as gingivitis. This condition is caused due to bacterial infection in the gums. Gingivitis is the first stage which may further lead to periodontal disease or gum disease. If not treated in time it may result in tooth loss.

Gum Disease

The term implies bacterial growth and generation of conditions that, with time, destroys the tissue around the teeth. "Periodontal disease" is another term for this state. Plaque keeps forming on the surface of teeth due to the presence of bacteria which further causes gum disease. If plaque remains on the surface of the tooth for more than 24 hours, it is transformed into tartar or calculus. Tartar is strongly bonded with the teeth and can be removed only by professional cleaning. Gum disease occurs in two stages: gingivitis and periodontitis. Generally, the former precedes the latter.

Gingivitis

Gingivitis is the first stage of gum disease. Food debris, mucus and bacteria form a sticky material which gets deposited on the exposed parts of the tooth. If this material is not cleared from the tooth, it may lead to tooth decay. If adequate plaque control is done, gingivitis can be reversed. By proper treatment from a dentist, coupled with adequate brushing and flossing at home, gingivitis can be cured.

Periodontitis

If gingivitis is not treated properly, it may lead to periodontitis. The word "Periodontitis" means diseased condition surrounding the tooth. "Peri" means surrounding or around and "odontos" means tooth. Moderate periodontitis can be considered as the first level of periodontitis which in worse condition enters the advance level.

● Moderate Periodontitis
This is a low-grade gum infection. A superior grade toothbrush cannot control this disease due to the large quantity of calculus. Bacteria in this calculus creates waste products. These products have toxins and volatile sulfur compounds. The toxins destroy the bones and gums surrounding the teeth. The inner layer of the gum and bone move away from the tooth surface. A pocket is formed between the teeth and gums. In this space, debris may get stored. The plaque spreads. It grows below the gum line. The space in healthy gums is up to 3 mm deep. If this increases to 5 mm, it is called "moderate periodontal disease". As the disease increases, the pockets become more deep. Due to this, more gum tissue and bone are affected. As a result, the teeth become loose gradually and finally there is loss of the affected tooth.

The volatile sulfur compounds caused by bacteria leads to bad breath. Sometimes teeth look healthy, but pockets might be present. These can be detected by x-rays and periodontal probing. The periodontal probe measures the pocket depth around every tooth. Generally, periodontal disease is not limited to one tooth. It affects several teeth simultaneously. If the dentist finds that the depth of the pockets has decreased to 1-3 mm after some treatment, it is concluded that the Periodontitis is under control.

● Advanced Periodontitis
This condition is said to occur if the depth of the pockets becomes more than 6 mm. Then, surgery is unavoidable. The surgery can be performed by a dentist or a periodontist. During the surgery, the diseased tissue is removed and the tooth structure is completely cleaned. This makes it difficult for plaque and calculus to gather. In case the disease has led to a defect in the bone, the area has to be reshaped or a bone graft procedure is necessary. The gums have to be stitched around the teeth in a proper place and generally lower than before. Further, if daily brushing and flossing is done, the region can be freed from plaque.

Gum Abscess

This is also called "periodontal abscess". It usually occurs amongst people who have periodontal disease that has already caused bone loss around the root of the tooth. The gum is separated from the base of the tooth which allows the bacteria to enter deep root from where they are very difficult to clean. The bacteria in the periodontal pocket alter with time and more destructive species may replace the earlier ones. The byproducts of these bacteria can dissolve more bone. The gum abscess can become worse, if there is pus formation and this pus is trapped under the gum. This infection can spread towards the ear or neck or below the lower jaw. Even opening the mouth may become difficult due to the swelling and inflammation.

Sometimes, there is a conspicuous swelling around the tooth. If the gum is pushed by a finger, there is a pain. If the region is probed, blood and pus ooze out. At times this abscess can burst and cause pus to drain. This causes some relief. There are two types of gum abscess. An acute one is accompanied by pain, swelling and fever. A chronic one can be painless and the person is unaware of its formation in the jawbone. The area of infection is surrounded by a fibrous sac (granuloma) that does not contain pus, but has non-infectious sterile tissue. Such abscesses are detected by X-rays.

Symptoms of Gum Disease

Though gum disease has been divided into various stages, symptoms of all the stages are almost same. Following are some of the signs and symptoms which will help you to identify the disease better and faster.
  • Discoloration of gums. Gums may appear red or reddish purple
  • Bleeding gums, generally while eating something hard like apple, brushing, using dental floss, etc.
  • Swollen gums. Swelling may subside on its own but is recurring
  • Bad breath and metallic taste in mouth
  • Receding gums, which make the teeth look longer or larger
  • Extra space between the teeth
  • Gums may become tender to touch
  • Formation of deep pockets between the gums and the tooth (not found in the gingivitis stage)
  • Tooth loss may be one of the major symptom or concern in the advanced periodontitis stage
Gum Disease Treatment

Treatment of gum disease totally depends upon the seriousness of the infection. Antibiotic treatment can be given if there is a minor infection. It can be non-surgical or surgical treatment.

Non-Surgical Treatment: After going through the tests to find out the exact cause of the infection, first and foremost thing is dental cleaning. Dentist will remove the plaque from the tooth. Deep-cleaning may also be done which will include scaling and smoothing of the surface. This will give your gums a clean and smooth surface to bind again with the tooth.

Surgical Treatment: Surgical method will be used only in case of serious conditions where the roots and tooth are severely infected. Flap surgery or pocket reduction, soft tissue grafts, bone surgery, bone grafts, guided tissue generation, etc. are some of the surgeries which may be recommended according to the severity of the condition. Some drugs may also be prescribed along with surgery to reduce pain and to stop the regrowth of bacteria.

Hope this Buzzle article helped you to understand about various stages of gum diseases. Brush your teeth with soft bristle toothbrush, twice a day. Flossing before brushing will help you to clean all the food particles stuck in between the teeth. Good oral hygiene and regular dental check-up will help you to avoid gum disease and other infections.

Mar 22, 2015

Foods That Contains Low Purine

Purine is a substance that is found in the majority of foods that we consume and when purines are broken down by the body it produces uric acid. Uric acid is a waste by-product that is filtered out by the kidneys before being eliminated from the body. However some people are not able to flush out the uric acid from the body which can lead to gout.

Gout is a condition where there is a buildup of uric acid in the body which leads to the formation of urate crystals. These crystals which forms generally in the joints cause swelling and inflammation accompanied with severe pain. Although a gout attack can be treated with medicines, making dietary changes can help to prevent an attack. Limiting the amount of purine by consuming low purine foods is the best way to manage gout. Let us make a list of these low purine food items which will aid in drawing up a low purine diet.

Low Purine Foods Lists

Food Name Total Purines in mg
Apple 14
Broccoli 81
Strawberry 21
Potato 16
Orange 19
Dried Fig 64
Cucumber 7.3
Kale 48
Lettuce 13
Grape 27
Watercress 28
Cheddar Cheese 6
Green Pepper 55
Oyster Mushroom 50
Marinated Green Olives 29
Peanuts 79
Leek 74
Cantaloupe 33
Kiwi fruit 19
Cauliflower 51
Brussels Sprouts 69
Carrot 17
Aubergine 21
Banana 57
Soya beans 80
Cabbage 22
Cherry 7.1
Hazelnuts 37
Green Peas 84
Pineapple 19
Peach 21
Rhubarb 12
Chicory 12
Vienna Sausage 78
Spinach 57
Tofu 68
Yogurt 8.1
Tomato 11

High Purine Foods List

If you are suffering from gout then you need to avoid eating foods that are high in purine. Here is a list of foods that are high in purine.
  • Anchovies
  • Sweetbread
  • Consomme
  • Gravy
  • Sardines
  • Goose
  • Mincemeat
  • Mackerel
  • Mushrooms
  • Caviar
  • Tuna fish in Oil
  • Mussels
  • Sardines
  • Scallops
  • Bouillon
  • Red meat
  • Fish Roe
  • Foie Gras
It is best to avoid these food items. In addition to these dietary changes, a person suffering from gout should also take care of the following things.
  • Limit the amount of fat and increase the water intake. Drinking adequate amounts of liquid will keep the body hydrated and will help in flushing out the extra uric acid.
  • You also need to go easy on alcohol and should avoid drinking beer, whiskey, rum and gin as they contain very high amounts of purine.
  • If you are overweight you have a greater tendency of having a gout attack. It is best to lose the extra flab by opting for moderate exercise regularly. Do not indulge in any fad diets or quick weight loss schemes as you will end up harming your body.
  • Maintain an ideal body weight and follow a diet that is high in complex carbohydrates and low in protein.
  • Switch to brown rice and whole wheat bread and eat dairy products that are low-fat like skimmed milk, low-fat cheese and organic yogurt.
  • When you dine out or attend a party do not go overboard with the food and stick to healthy options like a clear soup instead of a cream based soup.
  • If you are having a salad, order a low-fat vinaigrette dressing instead of creamy dressings smothered in mayonnaise.
  • People suffering from gout should have no more than two to three eggs a week.
  • Avoid eating tofu and red meat altogether and have freshwater fish which is low in purine.
  • You also need to avoid organ meat like liver, brain, kidneys and heart of chicken, turkey or lamb.
So, this was all about low purine foods and how it should be incorporated in your diet to avoid a gout attack. Following a diet of low purine food for gout has been proved quite successful to decrease gout attack.

Mar 21, 2015

Pure Honey and Pregnancy

Pregnancy is the most important phase in a woman's life. It is a roller coaster ride and of course a once in a lifetime feeling generally associated with many food restrictions and problems. Whatever it may be, along with the regular tests and check up, what really matters is the pregnancy diet. It's really important to eat the right kind of food in right amounts and most importantly healthy food. The diet should be planned according to the requirement of the mom as well as the baby because the main aim is to provide maximum nutrients and vitamins to the growing fetus. One of the foods to eat during pregnancy is the unpasteurized yet healthy food, raw honey.

We are all well-aware of honey being the universal ayurvedic remedy for many illnesses and ailments owing to which it should be a part of our regular diet. Honey has been extensively used for healing and as a natural sweetener almost always.

Although a pregnant female should indulge in a healthy diet, it shouldn't be high on calories. According to observations, many women crib about weight gain that is popularly associated with pregnancy. Substituting raw honey in place of conventional sugar is the best option to opt for if you really don't want to gain those extra pounds.

Morning sickness which is one of the earliest signs of pregnancy can be overcome by consuming raw honey, since it helps freshen your mind and makes you feel good. Also, if you happen to suffer from constipation which many pregnant females do, this is the best remedy.

Another raw honey benefit is the fulfillment of the energy needs. It is a good source of carbohydrates, which helps boost energy and strengthens the muscles. Hence, it should be included as a part of a pregnancy diet.

Further, many women and gynecologists trust raw honey. Owing to its health benefits, it can be proved that it is safe to consume without any major side effect. However, an evident danger is that it is not a pasteurized and processed product. We all know what pasteurization is; it involves the killing of certain harmful bacteria after exposure to high temperatures. Raw honey has spores of Clostridium botulinum, which is an endospore producing harmful bacteria causing food poisoning or botulism in humans. However, you could surely avoid this by going for a trustworthy local brand that sells good quality raw honey.

Incorporation in Your Diet

If you want to consume raw honey, it's better to supplement it with milk or yogurt since this would suit the body perfectly. Along with the fruits that are recommended during pregnancy, you could just pour a spoonful of honey on top and then have them. You could also make smoothies or honey mustard salad by mixing oil, vinegar, salt, pepper, and mustard with either raw fruits or vegetables. Another way to go about it is by mixing honey with fruit juices, cinnamon, apple cider vinegar, and lemon juice. However, too much consumption of raw honey is not good for the would-be-mom as well as the baby and is definitely not advisable.

Though raw honey is extremely safe to use, it is not good for children below one year of age. However, this cholesterol-free, nutritious, and natural sweetener is healthy in all ways!

Mar 19, 2015

Healthy Diet for Low Blood Sugar Levels

When the blood glucose level falls lower than normal the condition is known as hypoglycemia. Certain diseases like some kinds of tumors and liver disease cause a certain type, known as organic hypoglycemia, which usually need surgical or medical treatment. However, there is another kind, which affects some people in whom the body responds in a different manner when food is digested. Some types of foods are digested as well as absorbed swiftly, which results in a sharp spike of glucose in the bloodstream. While the body adjusts quite smoothly to this spike in most people, in some people there is an over-reaction, and a process is set off to lower the blood glucose, resulting in a sharp drop in the blood glucose level. This causes many people to suffer from low blood sugar. Such individuals should follow a diet that helps maintain their blood sugar levels. The information provided in the following paragraphs, will help you change your diet and manage your blood sugar levels.

Hypoglycemia in People with Diabetes
There are two types of hypoglycemia; one that is related to diabetes and one that occurs in people who do not have diabetes. Low blood sugar occurs when the blood sugar levels drop significantly. The main source of glucose is carbohydrate-rich food. When a person skips meals, undergoes rigorous physical activity or takes in a lot of alcoholic beverages, it may result in low blood sugar. The body begins to breakdown the stored reserves of glucose in order to produce energy. People with diabetes tend to take medications and injections that helps lower their blood sugar levels. In some cases, diabetics tend to suffer from side effects of diabetes medications. The oral diabetes medications and insulin injections cause the blood sugar levels to drop significantly.

People often complain of low sugar, during their sleep. These people may find themselves having nightmares, excessive perspiration and may wake up feeling excessively tired, confused or disoriented. Other symptoms include feeling excessively hungry, nervous, dizzy, confused, difficulty speaking, anxiety and weakness.

Diet for Diabetics Suffering from Hypoglycemia
People with low blood sugar should speak to a qualified dietician and plan their low blood sugar diet. However, there is no hard and fast rule when it comes down to hypoglycemic diet. The basic idea is that you should eat food at the correct time to avoid feeling faint and weak. Let us have a look at foods for low blood sugar patients.
  • Carbohydrates should not be eliminated from the diet. Instead, the consumption of complex carbohydrates should be increased. Complex carbohydrates are absorbed at a slower rate compared to simple carbohydrates and hence do not cause the quick fluctuations in blood sugar levels. Some of the complex carbohydrates are legumes, vegetables, whole grain rice, pasta, cereals and breads.
  • Stay away from foods comprising simple carbohydrates like soda pop, pastries, cookies, cakes, candy, pies, molasses, honey, table sugar, jellies, and jams.
  • Increase the consumption of high fiber foods. Fiber is the undigested part of grains, legumes, vegetables and fruits. When these foods are eaten the carbohydrate is absorbed more slowly, thus preventing the sharp spikes and lows of blood sugar that is a characteristic condition. Some of the sources of soluble and insoluble fiber are whole grains such as cereals, bran, brown rice, and wheat; vegetables like cauliflower, broccoli, Brussels sprouts, and cabbage; root vegetables like potatoes, sweet potatoes, carrots, and beetroots; fruits like apples, strawberries, and citrus fruits; dried beans, peas and other legumes.
  • Instead of drinking fruit juice, it is better to eat the whole fruit, whether fresh or canned. The fiber in the fruit slows down the absorption of sugar.
  • It is advisable to have smaller meals interspersed with snacks.
  • It is best to avoid beverages and foods that contain caffeine because it causes similar symptoms, thus worsening your condition.
  • Alcoholic beverages should be avoided, as alcohol causes a drop in blood sugar levels, especially if taken on an empty stomach.
  • It is advisable to get your body weight down to optimum levels according to your height, as excessive weight can hinder the body's ability of using insulin.
Types of Hypoglycemia not Related to Diabetes
There are two types of hypoglycemia that can affect individuals without diabetes. The first type is reactive hypoglycemia, also called the postprandial hypoglycemia. This occurs when the body over-reacts to the increase in blood glucose level, within 1-4 hours after meal. The other type includes fasting hypoglycemia. It is also known as postabsorptive hypoglycemia. This condition is often connected to an underlying disease like liver disorder.

Hypoglycemic Diet for Non-Diabetics
When there is a fall in the blood glucose level, the consumption of carbohydrate containing foods can increase it back up, hence a snack or a meal should be eaten. Some people think that eating a candy bar or drinking a sweet carbonated beverage is the obvious solution. However, these foods are made up of simple sugar, which will cause a spike in the blood glucose level and a corresponding sharp fall, thus resulting again in low blood glucose.

A better choice would be eating foods that comprise complex carbohydrates such as cereal, bread, soft pretzel, bagels, or whole grain crackers. The body derives glucose from foods that are made of complex carbohydrate for a longer time period, therefore there is less fluctuations in the blood glucose level. For example, any food made with grain, such as whole wheat bread along with cheese, or any other protein-cum-fat food, is the best combination to eat if you have a tendency for hypoglycemia. This is because the protein and fat slow down the process of digesting the carbohydrate, thus stabilizing the blood glucose level in the body.

The protein-cum-fat food includes half a peanut sandwich on bread with some raw carrots. Low fat cheese eaten along with whole grain crackers will also suffice. You should eat some plain yogurt mixed with fresh fruits to bring up your blood sugar levels. Other foods for blood sugar fluctuations include low-fat milk with banana, half an apple with half cheese slice along with whole wheat bread.

Good Foods for Low Blood Sugar
The following list consists of food for low blood sugar. You can try to include these foods in your diet and overcome low blood sugar. These foods are rich in proteins, good fats, complex carbs and fibrous carbohydrates.
  • All types of beans
  • Broccoli
  • Brussels sprouts
  • Cabbage
  • Carrots
  • Cauliflower
  • Celery
  • Cucumbers
  • Lean meats and poultry (beef, chicken and turkey)
  • Lettuce
  • Mushrooms
  • Nut butters (peanut butter)
  • Nuts
  • Onions
  • Peppers
  • Plain yogurt
  • Protein powders
  • Spinach
  • Vegetables
  • Water
  • Whole grains
It is important that you eat more than three meals a day. You should munch on something healthy every 3 hours to maintain your blood sugar levels. Include complex carbohydrates, proteins, low-fat and high fiber foods in your diet. If you suspect your blood sugar level dropping, immediately eat some complex carbohydrate food. It is dangerous if your blood sugar levels drop below 70 mg/dL. The aim of a hypoglycemia diet is to slow down the absorption of food. Speak to a healthcare expert or a dietitian for advise before starting any type of diet for low blood sugar.

Mar 16, 2015

Lemon Juice for Weight Loss

While there are certainly no substitutes to burning calories through long runs and weight training, dietary alterations aid weight loss by influencing internal metabolic processes. Extensive research into the effects of lemon water intake on the body has revealed new health benefits. This vitamin C rich fruit influences body's digestion chemistry to create favorable conditions for natural weight loss.

As weighing scales shoot up world over, with large consumption of processed foods raising obesity concerns, weight loss lists high on priority lists. A whole multimillion dollar industry devoted to weight loss techniques, has evolved to take care of this problem. People spend their life savings in consulting dietitians and subscribing to special miracle diets, when the solution is pretty straightforward - Eat measured quantities of healthy food and exercise more.

Drinking a glass of squeezed lemon juice mixed with warm water every morning is a highly energizing dietary addition that will help you lose weight. You can also add lemon to green tea and drink it for weight loss. This combination is known to be very effective. Another recipe is drinking tea and apple cider vinegar, mixed with lemon. This new weight loss aid, validated by medical research, coupled with a balanced diet and regular exercise will help your slimming campaign. Well, selling an idea without evidence to back it up makes no sense. Here is a scientific analysis of why lemon water's good for you.

How Does Lemon Water Aid Weight Reduction?

A glass of water mixed with juice (squeezed from half or a full lemon) diluted according to taste, drunk twice a day works wonders. Here's why.

High Pectin Fiber Content Reduces Hunger
Lemon is abundant in fiber and especially pectin, which naturally caused a drop in hunger, reducing the probability of overconsumption, contributing to a reduction in weight over time. Controlling hunger and differentiating between physical and psychological hunger is essential. Eat when you are hungry, rather than when you want to. Instead of trying to kill hunger with coffee or tea, just have a glass of lemon water.

Acts as a Diuretic & Aids Digestion
Lemon juice, by its nature, acts as a diuretic and laxative (particularly because of the hot water you mix it with) making a person lose his water weight and promoting healthy bowel movements. It reduces the possibility of constipation and heartburn. It helps cleanse your colon, thus reducing the accumulation of body waste. Lemon water provides a stimulus to the production of digestive enzymes in the liver. All in all, the citric fruit is ideally suited to kick-start your digestive process.

Correlation Between Vitamin C and Weight Reduction
Research has revealed an inverse correlation between the amount of vitamin C content in a body and body mass. Apparently, the abundant supply of vitamin C provided by lemons and other citrus fruits can trigger biochemical reactions that reduce fat content.

Lemon Polyphenols Reduce Weight Gain
Polyphenols from lemons have been recently shown to influence the body's lipid mechanism reducing weight gain and insulin resistance. This makes the consumption of lemon water all the more beneficial.

Other Benefits
Besides aiding weight loss, lemon water has many other benefits.
  • It has natural antiseptic properties, causing it to reduce the risk of infection in various body tissues.
  • Its consumption has a natural detoxifying effect on the body. It helps in clearing out toxins.
  • It contains copious amounts of vitamin C and minerals like potassium, magnesium and calcium.
  • Hot lemon water develops and stabilizes your immune power, when you are down with flu or cold.
After you wake up in the morning, drink a glass of warm lemon water. Not only will you feel refreshed, but it will also help your digestive system get into gear. Lemon juice affects the teeth enamel causing slight erosion if exposed for long. You might want to sip the water through a straw to reduce exposure. A warm glass of lemon water sets the right tone for your daily weight loss program. It must be remembered that there is no escape from rigorous exercise, if you plan to lose a considerable amount of weight. It's tough to start an exercise regimen, but with time it only gets better as you see the benefits. So begin today and don't forget the lemonade.

Mar 13, 2015

Effective Remedies for Spider Veins on Legs

The legs are one of the most common places where spider veins or telangiectasias can develop. Telangiectasias usually appear as red, purple, or blue-colored, fine thread-like marks that closely resemble the look of a spider web, and hence, the name spider veins. They usually develop just beneath the skin on the legs, face, hands, upper thigh, and below the knee joint.

Telangiectasias are a bit similar to varicose veins. Varicose veins are usually larger than telangiectasias, and they can become swollen or enlarged over a period of time. Varicose veins are broken capillaries that generally result from the widening and narrowing of the capillary wall, which eventually causes the capillary wall to tear.

Causes and Risk Factors

Telangiectasias can appear due to a problem in circulation, which in turn, can be caused by the gradual weakening of the blood vessels with advancing age. The valves present in our legs maintain the flow of blood in one direction, i.e., from the legs to the heart against the force of gravity. But due to certain factors, they may fail to function properly. This in turn, can cause some blood to flow back into the veins. As a result, such veins can become a bit swollen and distinctly visible.

Sitting or standing in the same position for a prolonged period of time can aggravate this condition. Body weight can also have an effect on the development of telangiectasias. It has been observed that factors, like a family history of telangiectasias, pregnancy, obesity, hormonal fluctuations, a sedentary lifestyle, leg injuries, tumors in the abdomen, use of birth control pills, and excessive exposure to sun can increase the chances of developing spider veins.

Treatment and Natural Remedies

The conventional treatment options for this condition are sclerotherapy and laser treatment. However, telangiectasias do not cause any health problem, other than being a cosmetic concern. Therefore, they usually do not require any medical treatment. However, they may look unsightly, and so, it is quite normal for people to look for some ways to get rid of this condition. Natural remedies can be of great help in this regard. The following are some of the simple home remedies that can help prevent the development of spider veins or reduce their visibility.
  • Excess body weight can put more pressure on the legs and cause the appearance of telangiectasias. So, try to reduce the pressure on your legs by maintaining an ideal body weight.
  • Exercise regularly to improve the circulation of blood. This can also help strengthen the veins, and thus prevent the development of spider and varicose veins. Walking, swimming, and jogging are some ideal exercises to prevent this condition.
  • Reduce your salt intake, as excessive intake of salt or sodium can aggravate spider veins.
  • Never sit for a long time with your legs crossed. Also avoid sitting or standing at a stretch for a prolonged time period.
  • If your job or occupation requires you to sit or stand for a long time, then take short breaks in between to elevate your legs for a few minutes.
  • Avoid wearing tight clothing that can impede the flow of blood in the legs.
  • Try to avoid high heel shoes. Always wear comfortable footwear that can provide adequate support to your feet and legs. You can also take the help of support stockings or compression hose to get rid of telangiectasias.
  • Include more vitamin C-rich foods, like citrus fruits, oranges, grapefruit, berries, as well as whole grains and green vegetables in your diet. This can help strengthen the veins, and treat and prevent telangiectasias.
  • Vitamin K is another natural remedy, as it can help prevent blood leakage from the veins. Green vegetables, cabbage, tomatoes are some good sources of vitamin K. Creams and ointments containing vitamin K can also be applied on the affected area to diminish the appearance of spider veins.
  • To reduce the appearance of telangiectasias, soak a soft cloth in apple cider vinegar and wrap the affected area for about half an hour.
  • Witch hazel, Japanese pagoda tree extract, and horse chestnut extract are some herbal remedies for this condition. These herbal preparations can help improve blood circulation and strengthen the blood vessels.
Before using any kind of herbal remedy, like witch hazel or horse chestnut, never forget to talk to your physician. To sum up, adopt a healthy lifestyle, exercise regularly, wear the right type of clothing and footwear, avoid sitting or standing in one position for a long time, and follow a balanced diet for preventing this condition.

Mar 11, 2015

The Side Effects of Low Potassium

Potassium is one of the most vital minerals required by the human body. It has an important role to play in several body functions, including the smooth functioning of heart, kidney and skeletal system. Along with other electrolytes, such as magnesium and sodium, potassium produces electricity in the body. The deficiency of potassium - either because of low intake or unrestricted loss, initially surfaces in form of certain side effects, and turning a blind eye to these side effects only worsens the person's condition in the long run.

Low Potassium (Hypokalemia)

Hypokalemia, also referred to as potassium deficiency, is caused when the level of potassium in the body falls below the optimum level. Though rare, the chances of a person suffering from hypokalemia because of low potassium intake through his daily diet do exist. In most of the cases, this condition arises when high amount of potassium is lost through urine or vomiting. At the same time, there are cases wherein hypokalemia is caused as a result of the person's dependence on medications like Amphotericin, Antacids, Corticosteroids, Fluconazole and Insulin; all of which are known to decrease the levels of potassium in the body. Regardless of what the underlying cause is, lack of potassium in the body can hamper several body functions and trigger some life-threatening conditions which have to be treated at the earliest to avoid fatality.

The condition characterized by high potassium levels in blood is known as hyperkalemia, while the condition wherein less than required level of potassium is found in the bloodstream is known as hypokalemia. Both these conditions can lead to severe complications, and thus it is important to ensure that the optimum levels of potassium are maintained. Experts put the optimum level of potassium in our bloodstream in the range of 3.5-5.3 mEq/L. Only around 2 percent of the total potassium available in the body goes to the bloodstream, and minor discrepancies in this amount can surface in form of some obvious side effects on the body.

Side Effects of Low Potassium

Low potassium side effects usually surface in form of various signs and symptoms of potassium deficiency, including weakness, irregular heartbeat, stomach disturbances and frequently occurring muscle cramps. The person also experiences excessive fatigue, constant thirst, dryness of skin, and recurring chills. As these signs of low potassium are often associated with several other disorders, they are often misdiagnosed for some other health problem - which results in treatment delay. In such circumstances, the person has to go for certain tests, like the electrocardiogram, which are useful in diagnosis of this condition.

Other than these signs and symptoms, this condition also triggers other side effects on the body - most of which are attributed to the body functions wherein this mineral has a key role to play. The adverse effects of this condition also include relentless nausea, accompanied by frequent vomiting, diarrhea and constipation. Similarly, frequently occurring headache and insomnia are other low potassium side effects to watch out. People who consult a doctor with these seemingly minor problems are often asked to go for a tests and electrocardiograms as a part of hypokalemia diagnosis.

If the initial side effects of low potassium are ignored, the person's health can further worsen and result in severe health complications, such as heart attacks, high cholesterol, low blood pressure, etc. It has also been observed that the low potassium levels for extended periods lead to permanent scarring of the kidney. The inclusion of dietary supplements is one of the numerous methods to tackle this condition, but one needs to make sure that he opts for such supplements only after consulting a medical practitioner or a certified dietitian - these supplements do have certain side effects of their own.

Low Potassium Levels: What to Do?

As we said earlier, this is a condition which shouldn't be taken lightly, and it is in the best interest of the individual to consult a doctor when any of the symptoms of potassium deficiency surface. While the doctor will study the case and prescribe the treatment process, there are some simple things which can be done (alongside the medical treatment prescribed by the doctor) to tackle this condition. Ideally, an individual suffering from hypokalemia has to opt for a healthy, potassium rich diet to reverse this condition and return to normalcy. This would mean including potassium rich foods such as avocados, bananas, lima beans, tomatoes, apple cider vinegar, chicken and salmon in their daily diet. If he is taking any medication which is interfering with the body potassium levels, he should promptly consult a medical practitioner to decide the future course of action.

As in case of high potassium levels in blood, even low potassium levels can lead to grave consequences on the individual's health. It's important to tackle potassium deficiency signs and symptoms at the earliest, as there are high chances of the condition worsening with time. Potassium deficiency is one of the major health concerns in this era of junk food, and has to be tackled properly at the earliest. If that's not done, all the body functions wherein potassium has a key role to play will be hampered, and that will have a drastic impact on your overall health.

Choosing The Best Bluetooth Headset for iPhone6

Bluetooth headsets have been in demand as they make it a lot more convenient to have a conversation on the move. iPhones are some of the most expensive handsets out there, and many people buy them for their symbolic value. So, when people decide that they want to have a Bluetooth for their iPhone, they look for something that will complement their device.

Top Bluetooth Headsets for iPhone 6

Jawbone Era
Jawbone is one of the highest-selling Bluetooth devices and its new offering Jawbone Era has garnered positive reviews. It has introduced an accelerometer in the gadget which allows you to pair the device by shaking it four times, and tapping the device (when it is connected) twice will allow you to answer an incoming call. Another feature that has impressed most is that it can remember up to eight devices, out of which two can be connected simultaneously. The audio clarity is great, courtesy its wideband HD speaker. It is priced at $98 (Amazon) which is a fair price considering the features it has to offer.

Jawbone Icon HD + The Nerd
Jawbone Icon HD + The Nerd is second on the list courtesy its HD quality audio and simultaneous A2DP multi-point capabilities. And all of you who are wondering what role does 'Nerd' play, well, it is just an audio adapter which acts as an automatic pairing device, making it easier for you to use the headset for taking calls on your laptop. The voice clarity is superb and the Nerd makes it relatively easy to receive calls. Some cons are that the Nerd is only available in the pack, that is, you can't buy it separately. Also, at the price of $108 (Amazon), there certainly are better options to consider, like the Plantronics Voyager Pro +.

Plantronics Voyager Pro +
If you are someone who looks for substance over style, then Plantronics Voyager Pro Plus can very well be the headset for you. Its design may not impress all, but the audio quality on this headset is by far the best in this segment. Its long battery life ensures that it doesn't die in the midst of that important call. It supports stereo Buletooth, and the music quality is commendable. Overall, a very good package if you don't mind a bulky design. Priced at $74.50 (Amazon).

Jabra Easycall
Jabra is one of the leading manufacturers of Bluetooth headsets. Its range of headsets has been received well over the years and Easycall continues the legacy. The setup is easy and it pairs easily with the iPhone 4. Like other headset devices, it offers you the convenience of selecting the best-fitting earpiece which you can select from over four different sizes. The Digital Signal Processing (DSP) technology ensures that the voice clarity is good even when you there are external disturbances. With a 6 hours of talk-time and 8 hours of standby, the battery life is among the best. A word of caution for music aficionados - the headset doesn't support music playback, but you can always rely on your phone for that. It is strategically priced at $50 (Amazon), which makes it a value-for-money device.

When the iPhone 6 had just come into the market at first, many people complained that the Bluetooth pairing on it did not work well with headsets and other similar cell phone accessories. Constant disconnection was noticed, but Apple fixed this problem with their subsequent releases of iOS updates. Today this is not a problem anymore, and even the new iPhone 6 that will work on Verizon will be work fine when paired with a Bluetooth headset.

The headsets can be bought from a number of sources, but if you want to get a feel of the weight and the look of the device, you can very well head off to a retail store. People who regularly drive and talk on the phone will find these Bluetooth headsets especially useful.

Share My Top 10 iPhone Apps

About 60,000 Apple iPhone applications available till date and making the list of top 10 apps, is certainly a daunting task. Some applications are best for users who access social networking sites, while some work great for music lovers. Some work as virtual assistants to photographers and some guide students round the clock to minify their distance to academic propensity. Here is an attempt to enlist the top 10 iPhone apps for one and all.


Top 10 iPhone Apps of All Time

Pandora Radio
This list will be incomplete if Pandora Radio is not included in it. Pandora Radio creates customized radio stations and you can listen to your favorite tracks and singers without changing the radio stations every now and then.

Instapaper
If you frequently visit blog sites then you must have this iPhone application. Instapaper enables you to save the online stories and blogs and you can read them in your free time. To use this iPhone application, you have to register on Instapaper.com and create an account.

AroundMe
AroundMe is a must have application for people who roam a lot. This iPhone application provides you information about important services that are available in your surrounding, which include, coffee shops, petrol stations, bars, banks, restaurants, movie halls and hospitals.

ShoZu
ShoZu is a handy and useful application for those who frequently upload images and videos on the web. With this application you can upload videos and photographs on almost 50 sites at a time. These include, Flickr, Facebook, Twitter, Blogger, Photobucket, WordPress, MySpace and Photoshop.

Jott
This iPhone application transcribes your voice memos into text. All you need to do is simply tap on the record button and start speaking. You can record the voice messages and save them for future use. This application is useful for saving addresses and phone numbers on the go.

Google Mobile App
With this iPhone application you can make a quick and easy search of any data in your iPhone. Whether it's searching for a contact number or finding an address, Google Mobile App scans your mobile and helps you find the required data. This application also supports Google Docs, Gmail, YouTube, Picasa and Blogger.

Tweetie
Tweetie is a must have iPhone application for active users of Twitter. With this iPhone application you can access to more than one Twitter account at a time and perform all the tasks that can be performed on a desktop. You can download this application at $2.99 at your App Store.

Meebo
With this iPhone application you can stay connected to your friends and chat them by instant messaging on Yahoo, MSN, AIM, Gtalk, etc. Using Meebo is a nice way to cut down SMS and you can chat with your friends on the go.

WritingPad
A must have iPhone app for those who send e-mails and need to type text frequently. While using this application all you need to do is drag your finger along the letters and spell out the words. Initially the application is difficult to use, but with gradual use it becomes quite easy to handle.

Facebook
Having a Facebook application is need of the time! With this free iPhone application you can stay online on your Facebook profile and go social all the time. You can chat, check your wall, upload and view photos and do many more things.

Top 10 Apps for Kids
  • Mad Libs Lite
  • Toddler Teasers: Shapes
  • Airport Mania: First Flight Lite
  • Freshwater Aquarium
  • Sneezies
  • Squiggles
  • Weetwoo! Kid Videos
  • Chuzzle
  • Itsy Bitsy Spider
  • Old MacDonald
Top 10 Apps for Business
  • ClockIn
  • eBay Mobile
  • Evernote
  • iTerminal
  • Encamp
  • mbPointer
  • iBank
  • Analytics App
  • LinkedIn
  • Quickoffice Mobile Office Suite
Top 10 Free iPhone Apps
  • iBooks
  • GodFinger
  • Windows Live Messenger
  • Apple Store
  • Find My iPhone
  • Chop Chop Tennis
  • Facebook
  • Pandora Radio
  • Twitter
  • Skype
Top 10 Apps for Students
  • BigWords
  • iStudiez Pro
  • EZ Read
  • SimpleMind
  • EverNote
  • Wikipanion
  • Dictionary.com
  • myHomework
  • PI83 Graphing Calculator
  • Chegg
Top 10 Apps for Photographers
  • PhotoArtista Oil
  • Image Blender
  • AutoStitch Panorama
  • SketchMe
  • Pano
  • Photoshop Express
  • Pro HDR
  • ShakeItPhoto
  • Instagram
  • Iris Photo Suite
I now wrap up this piece, content, that you have digested some information on the top 10 iPhone apps. So, how about finding the best iPhone application that suits your need and getting it from the App Store... Now!

How-To iPhone Data Recovery

iPhone being the giant star in the world of mobile telephony that it is, is prone to a number of untimely damages, both external and internal. If you're clueless about how to recover the lost photos, e-mails, messages, and other important data that were trustfully put into your iPhone, because of the fact that a wonderful information repository this device is, allow me to discuss a few easy software you need to install for successful data recovery on your iPhone. Mind you, the ones discussed here are not free of cost. However, they ensure the recovery of data of even a formatted iPhone. Let's awaken the pirates in us, and locate the lost treasures with the help of the methods discussed below.


Data Recovery Software

While the iPhone is a complicated device, loss of data is no new thing. However, without panicking, you can recover your lost data by using a popular data recovery software specially designed for Apple devices. Follow the steps given below:
  1. Before downloading any software, make sure you stop uploading new music or image files into your iPhone. The moment you realize that your data is lost, you should not transfer any file from iPhone to Windows OS, and vice-versa. Chances are that they will end up being corrupted too.
  2. Download a good data recovery software for your iPhone that is capable of searching for the deleted files onto your phone's hard-drive. There are many techniques and software available on the Internet, many of which are free of cost. However, paid software such as iCare Format Recovery, iPhone Data Recovery Software, and DriveSavers are brilliant picks for the recovery of all kinds of data lost from your iPhone.
  3. Make sure you have 50 MB of hard-disk space available on your phone, and approx. 512 MB of memory free. The reason behind this is the fact that the software would not be able to operate properly if there is no adequate space free in the system.
  4. When the software is downloaded, install and run it on your phone. It will take a while to crawl through your iPhone's hard-disk in search for all the lost data.
Tip: After a thorough crawling, the data recovery software will recover all your data back to its original place. Remember, you should go for such software only when you have never backed-up your data on your computer before. However, if you've already made a back-up of all your files on your PC with the help of iTunes, in three simple steps, you can get all your data back to your iPhone. Some more software options are lined up below:
  • iPhone Backup Extractor
  • Paraben's iRecovery Stick
  • MiniTool Power Data Recovery
  • Data Recovery Mac
Take the following method into consideration if you've created a backup of your iPhone's data into your PC/Mac with the help of iTunes.

Recovering Lost Data: iTunes

Just a single sync, and you have all your data backed up in iTunes. If you're convinced you backed up all the data on your iPhone before any data was lost, iTunes can very well help you out in recovering it. Here's how:

1. The first step is to connect your iPhone with your PC in the very normal way you sync both.

2. Look for the back-up of your files on your computer. You'll find it in the C drive of your computer, unless you have saved it manually somewhere else. Here go the paths:

For Windows XP or Vista: C:\Documents and Settings\USERNAME\Application Data\Apple Computer\MobileSync\Backup

For Mac: Library/Application Support/MobileSync/Backup

3. When you're successful in following the path, you will see a filename that has an .mdbackup extension. This is your back-up. Click on it.

4. Select the option that says Restore, and your files will be sent to the phone from your PC. Note that, restoring contacts is difficult in this case, and you have to get them in a file, and manually feed them. However, it's much better than losing 'em all mysteriously.

Method Two is always advisable for the DIY kinds, and is definitely the very first option (cheapest too) for iPhone users. However, for those who know their lost files don't exist in the iTunes backup folder, Method One is highly recommended. Some of them might cost a bomb, but the results are satisfactory. As the last bit of advice, always create a backup of your data in your iTunes folder to avoid all kinds of data loss.

Mar 4, 2015

OpenMediaVault

OpenMediaVault (OMV) is a complete and free open-source software (FOSS) network-attached storage (NAS) operating system (OS). It is developed and designed primarily for home use. Developer Volker Theile began development of OpenMediaVault in 2009 Previously he worked with the FreeNAS project.


OpenMediaVault is based on the Debian Linux distribution. It is licensed through the GNU General Public License v3 as published by the Free Software Foundation. OpenMediaVault uses Debian's official standard for package management, the Advanced Packaging Tool (APT). OpenMediaVault is designed to be configured and administered via the Webinterface, which is written in Ext JS, and is currently compatible with 32 and 64bit hardware

Features

Through an Application programming interface (API),  OpenMediaVault is designed for features to be added to the Webinterface via the Plug-in System. The developer provides a group of core Plug-ins that can be installed via the Webinterface, while others are developed by the community. Many of the community supported Plug-ins are currently hosted in an unofficial plugin repository.

Other features include:
  • Multi Language web based graphical user interface (GUI)
  • Protocols: CIFS (Samba), FTP, NFS (Version 3 and 4), SSH, rsync, iSCSI, AFP and TFTP
  • Software-RAID with the RAID-Level 0, 1, 4, 5, 6 and 10 plus JBOD
  • Monitoring: Syslog, Watchdog, S.M.A.R.T., SNMP (v1/2c/3) (Read-Only)
  • Statistic reports per E-Mail
  • Statistic graphs for the CPU-workload, LAN transferrates, hard disk usage and RAM allocation
  • GPT/EFI partitioning >2 TByte possible, ext4 maximal 16TiB
  • Filesystems: ext2, ext3, ext4, XFS, JFS, NTFS, FAT32
  • Quota
  • User and groupmanagement
  • Access controls via ACL
  • Link Aggreggation Bonding, Wake On LAN
  • Plug-in system
Plug-ins

Core Plug-ins are developed by Volker Theile
  • ClamAV - Antivirus software
  • Digital Audio Access Protocol - provides audio files in a local network (also for iTunes)
  • SAN and iSCSI - blockbased access datastores over the network
  • Lightweight Directory Access Protocol - Information request and changes of an Directory service
  • Logical Volume Manager - enables the possibility to create and administrate dynamic partitions
  • Netatalk - File-, time- and printserver for Apple Macintosh
  • Plug-in to support the use of an Uninterruptible power supply
  • easy changes to the Routing tables
  • Plug-in, which allows (automatic) backups to external USB hard disks
External Plug-ins are available via additional package repositories. The majority of those Plug-ins are developed by a group called OpenMediaVault Plugin Developers. The status of all Plug-ins can be viewed online.

Minimum System requirements
  • IA-32 (i386/i486) or AMD64 platform
  • 1 GiB RAM
  • 2 GiB hard drive, solid-state drive, or USB flash drive with static wear leveling support (NOTE: The entire disk is used as a system disk. This disk can not be used to store user data.)
  • 1 hard drive, solid-state drive, or USB flash drive for storing user data
  • 1 network card

Freenas 9.2.1 with Transmission and Couchpotato

Freenas 9.2.1 with Transmission and Couchpotato/Sickbeard as a DLNA-Server

I’m going to describe how to set up Freenas with the popular plugins couchpotato and transmissions to use them for downloading movies/series and streaming them via DLNA as well as mounting the storage on Linux.

With this setup, I manage my movie collection and my wanted movies with couchpotato, which uses transmission to download them. I also use Sickbeard to download TV series. Then I can stream them with the DLNA-server to my TV.

I’m running Freenas 9.2.1 on a HP ProLiant G7 MicroServer N54L (affiliate link). Freenas itself is running on a micro-USB stick. I’m not going to describe how to download and install Freenas on the stick, as described in detail in the docs.

Table of contents

Configuration

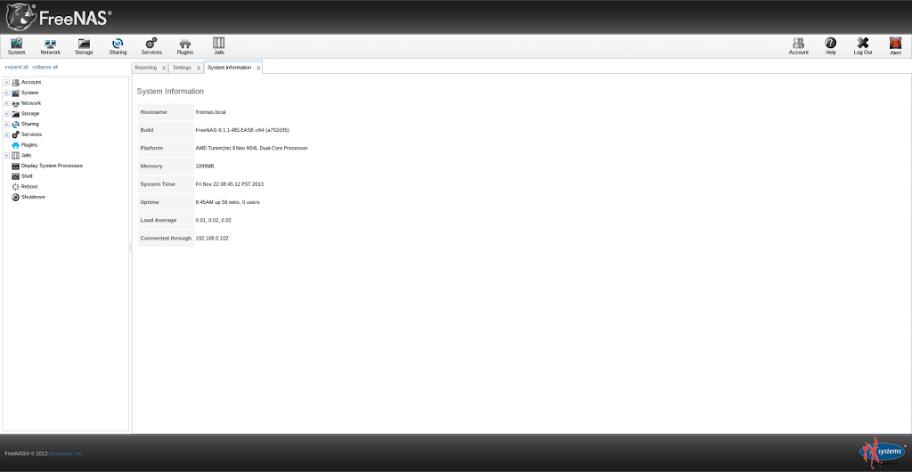
After starting the server and waiting some minutes, Freenas is available under a web-front end. The URL is a local IP-address, which is shown when Freenas has finished starting. After opening it, you’re presented with the System information.

freenas_systeminformation

See the red alert in the upper right corner? Push it. It says that you need to set a password for the admin-account that you’re using.

Since Freenas 9.2.0 the first time you access the FreeNAS administrative interface, a pop-up window will prompt you to set the root password. You should set a hard to guess password as anyone who knows this password can gain access to the FreeNAS administrative GUI.

Network settings

Next on we have to edit the network settings. Go to network > Global configuration. There you can change the name of your Freenas, set the default gateway, name server and so on. Since I use my server at home, I set the gateway and name server to the address of my router. If you want to, you can enable the netwait feature. If enabled, your server will ping the addresses in the IP list when it starts to check if a network connection is possible.
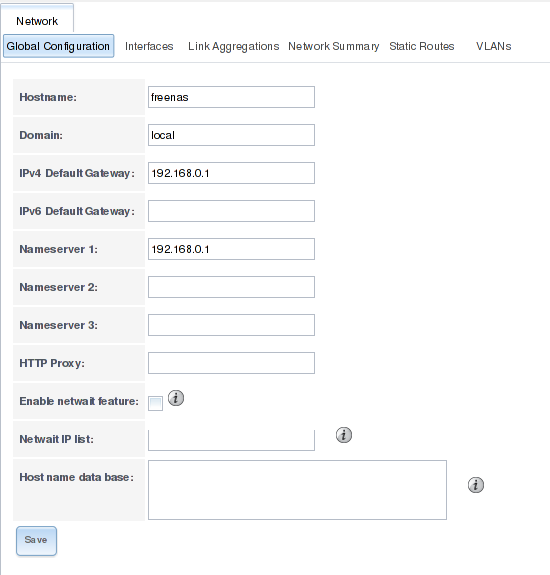
freenas_network_settings

General settings

There are some more settings that you should know about and edit. Open the System > Settings tab.
If your network is secure and only authorized people join it, you may let the “Protocol” option set to “HTTP”. Generally it is recommended to set it to “HTTPS“.

The next option defines the address and port your Freenas-installation listens to; set it to the IP-address the Freenas currently listens on. Set the HTTP-port to 80 and the HTTPS port to 443. Next on there are specific settings for your language, keyboard map and timezone. Set it according to your preferences.

If you’re not using a syslog server or directory service, leave the last two options empty.
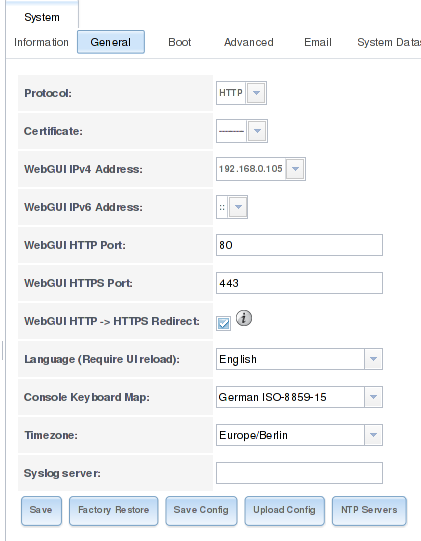
freenas_network_settings_1

Overview of storages and jails

The next steps will include creating storages and jails. To get a better understanding on how these components will work together, my beautiful girlfriend created two diagrams that show how the magic happens.

The first image shows the storages and jails that I created and what jails can access which storages.
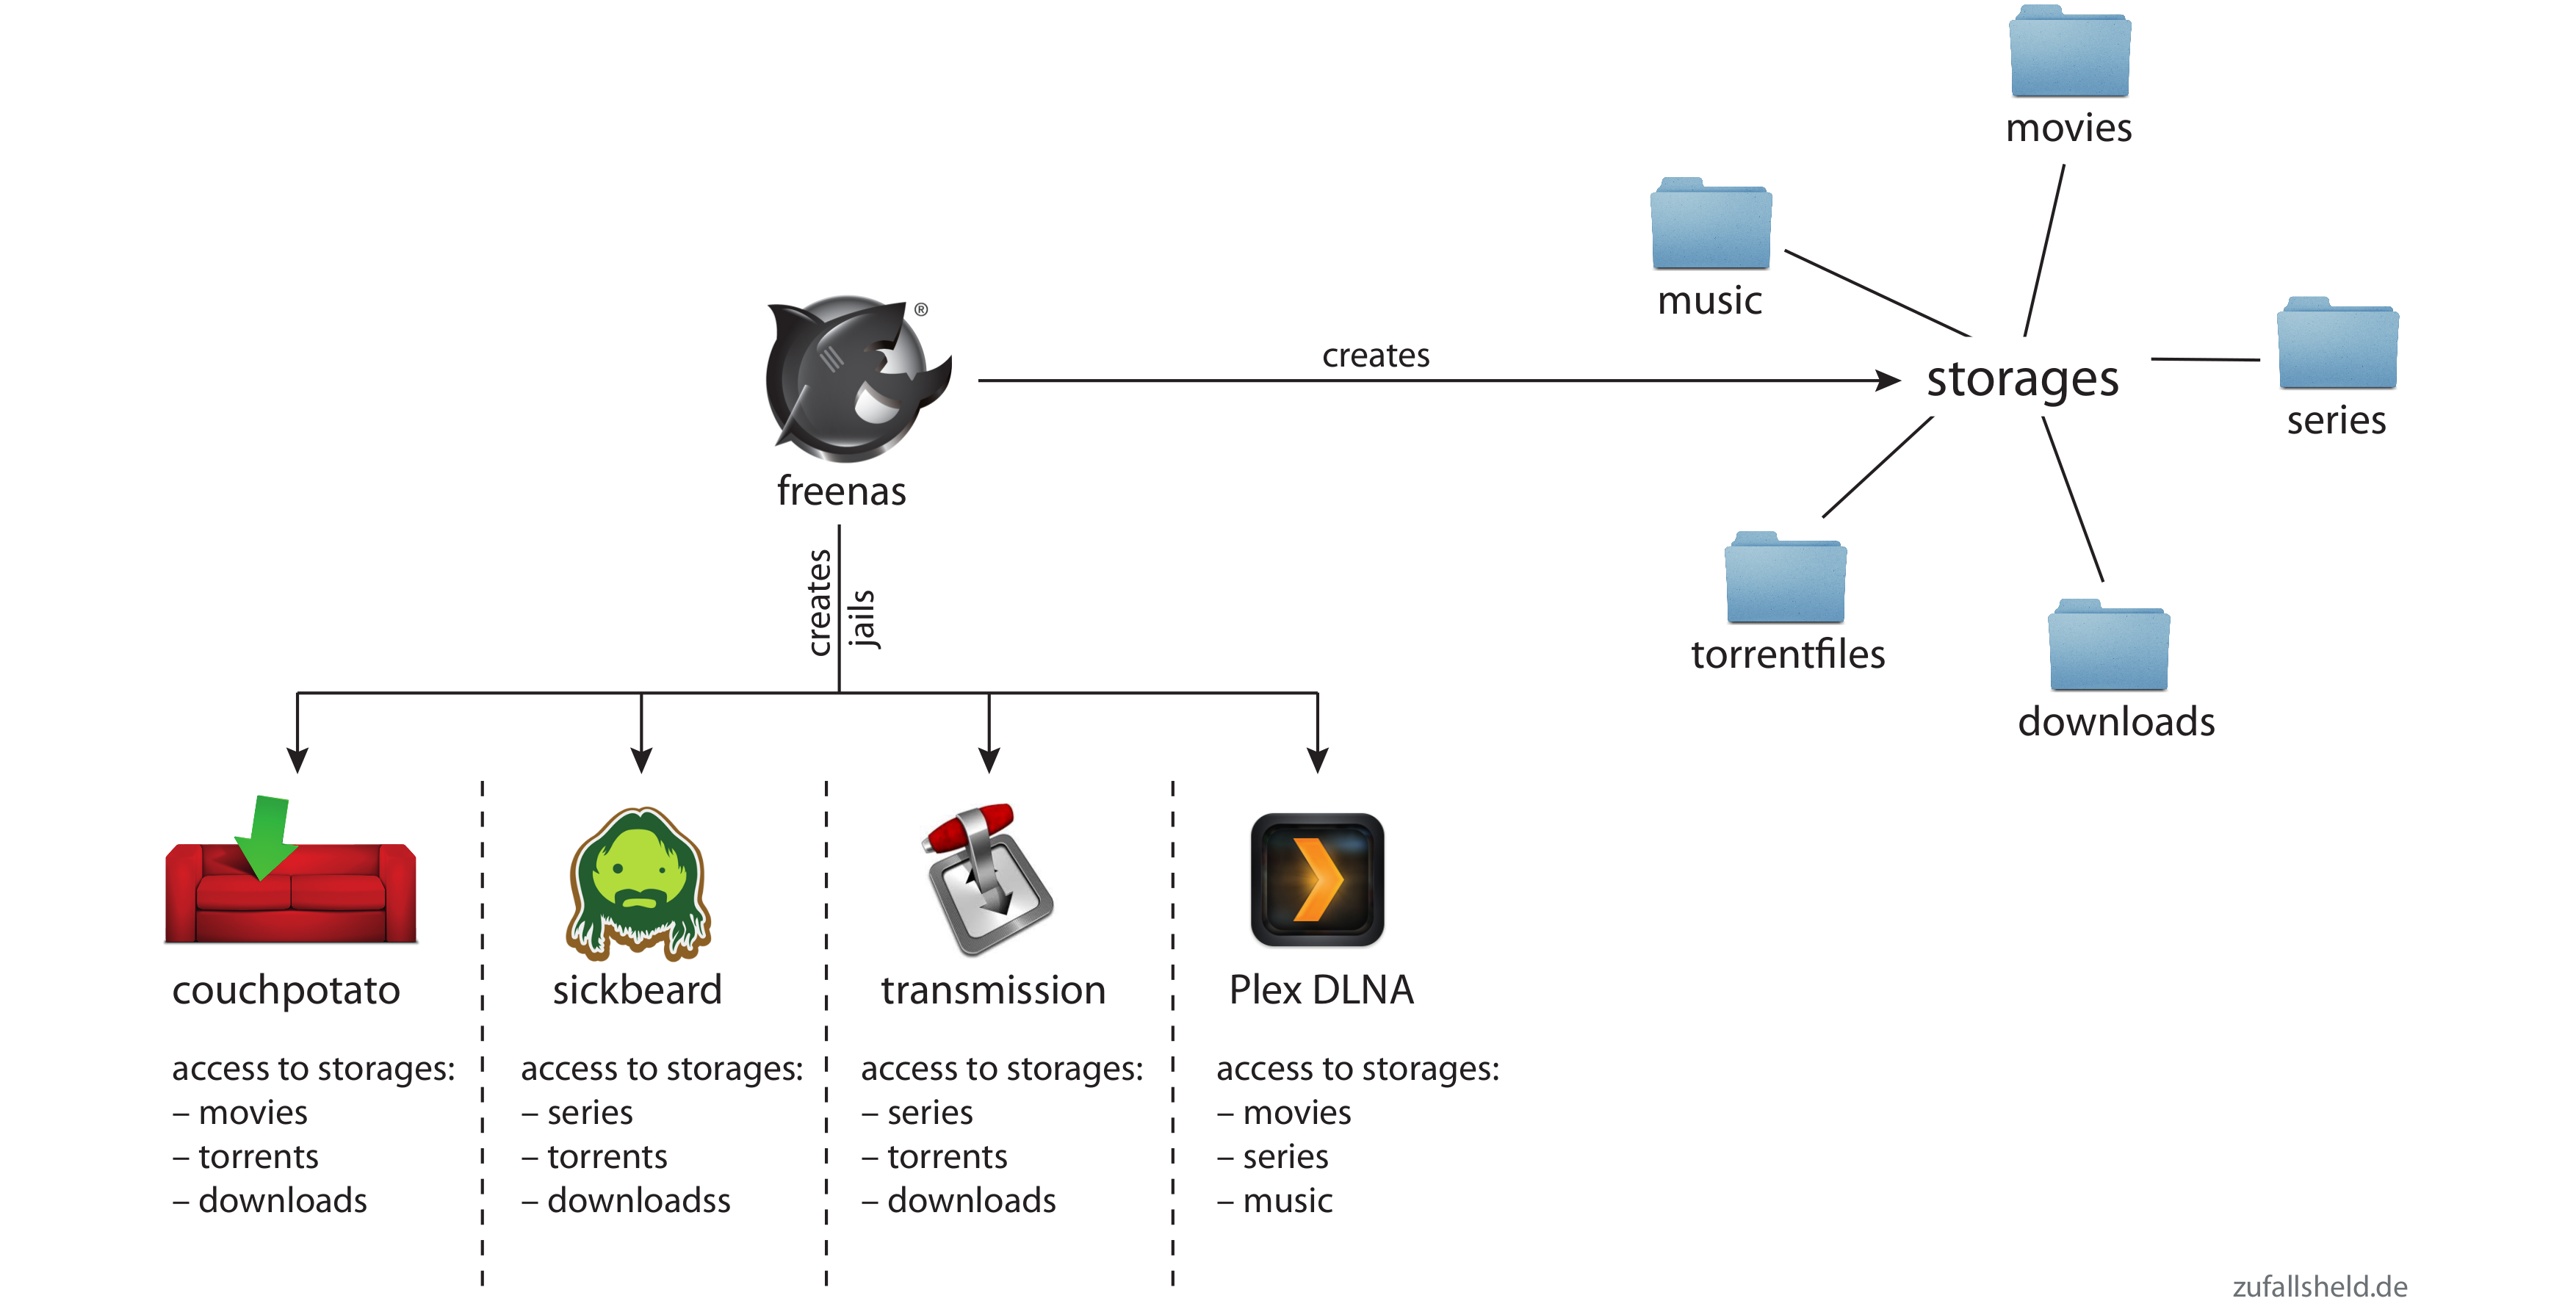
freenas_overview


The second image shows the steps that happen, when you want to download a movie or series via couchpotato/sickbeard.
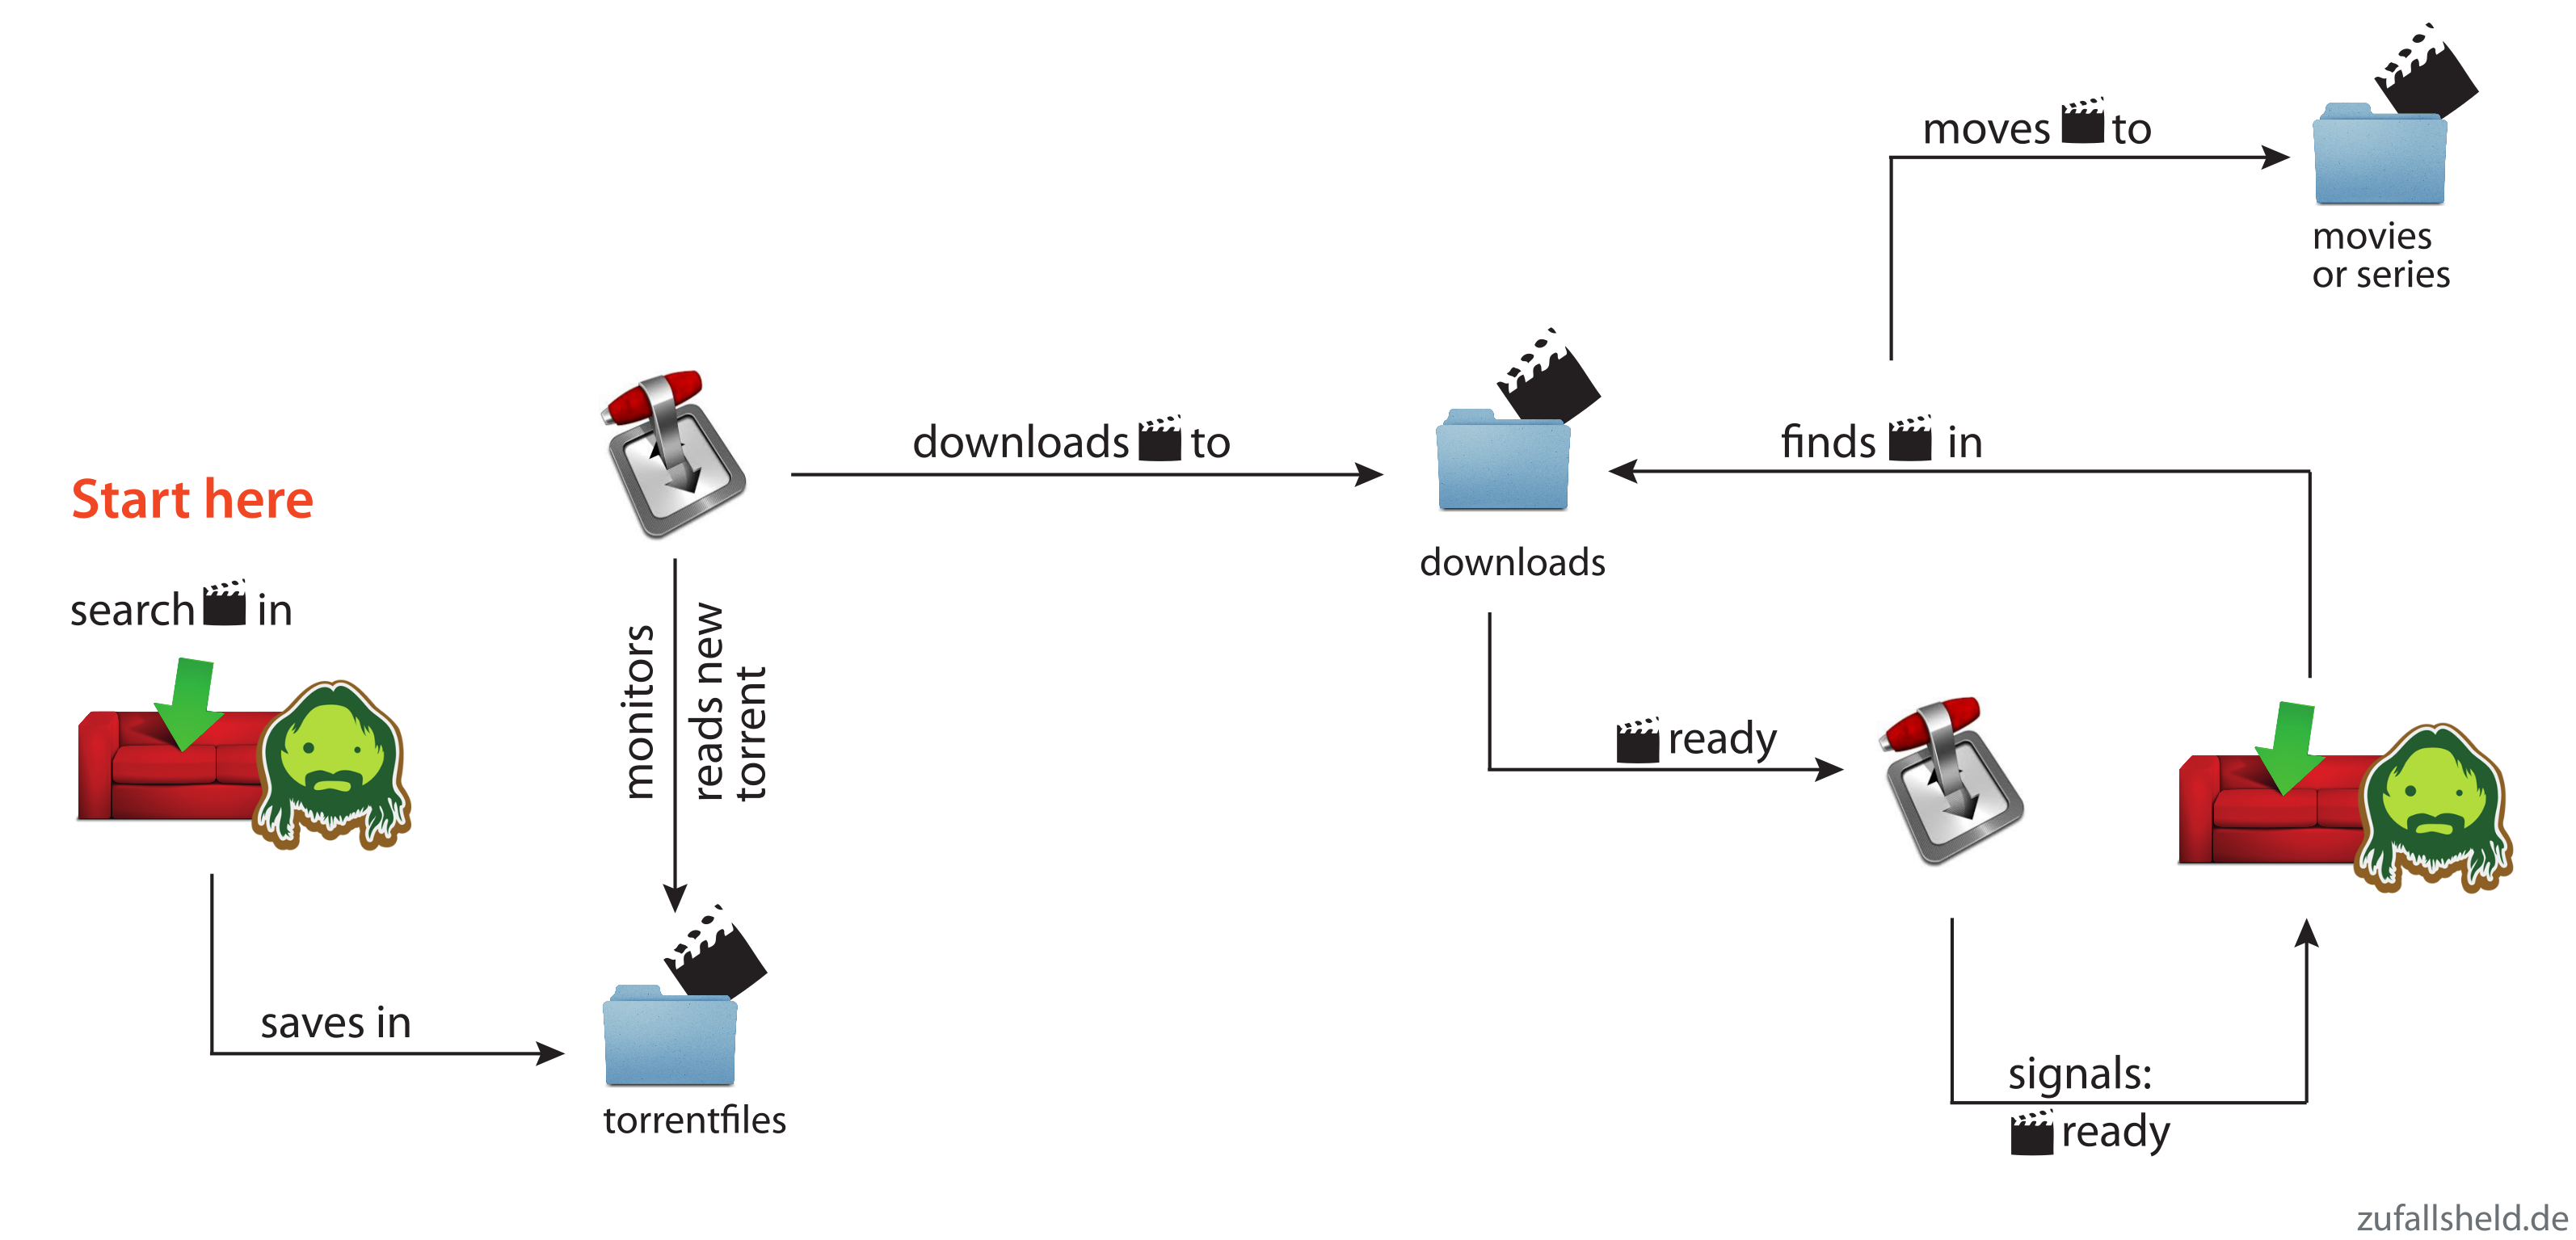
freenas_download_overview

Creating storage devices

Now is the time to add some storage to your server. That is the most important part and you should carefully read the documentation the Freenas community offers. I will not go into detail on what volumes or RAIDs to use. It mainly depends on your needs and what you’ve got hardware-wise.
My use-case is a simple movie- and music-streaming server with no personal or private information saved on it.

To simply create a new empty volume and attach disks to it, open Storage > Volumes > ZFS Volume Manager, give your new volume a name, add your disks and configure the layout.
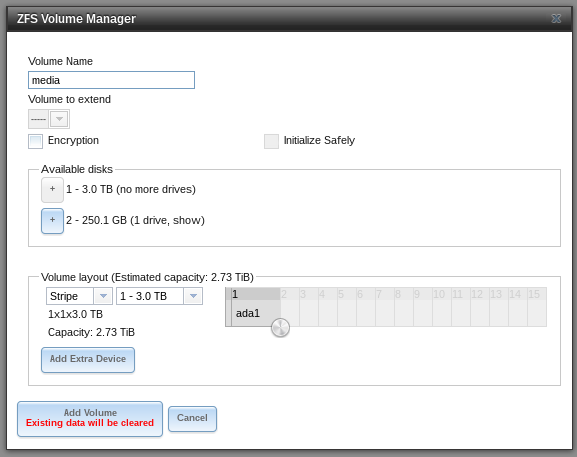
freenas_volume_manager

Creating datasets

To logically separate your files, e.g. movies from music, you can create datasets. These datasets can have separate permissions, quotas, etc. allowing you more control over your data.

I created datasets for every kind of data I want to manage: movies, series, music, downloads and torrent-files. To create a dataset click on your created storage, then hit the “Create dataset”-button (the one that looks like an excel-document with a plus). There, set the name for the dataset. You can ignore all other options for now, as they are for advanced users.

Changing permissions of the storage

Since there are many plugins and users who want access to your storage, you’ll have to configure the permissions for it. The best way is to set the ownership of the storage to nobody and give read/write/execute permissions to everybody. You should only do this, if you trust the users of your network. To change permissions, click on the “Storage” tab, select the volume you want to edit and click the first button in the bottom line that displays hard disks and a key. There, set the Owner (user) to “nobody”, the Owner (group) to “nogroup” and activate all buttons in the mode. Type of ACL should be set to Unix. Tick the box that says “Set permission recursively” so all other folders and files in the volume will have the same permissions.
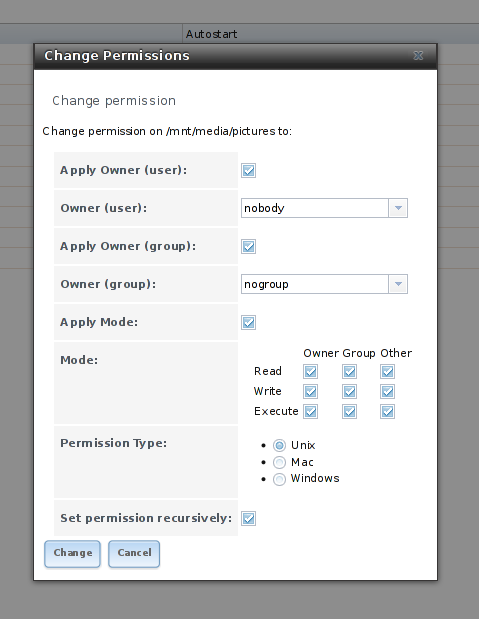
freenas_permissions

Adding sharing options

Since I want to access my music and movie collection not only with my TV but also with the computers I’m using, I have to add sharing possibilities. Freenas offers NFS, CIFS and AFP out-of-the-box. I don’t have an Apple-gadget or Windows machine at home, so I’ll only need NFS.

NFS

To add a NFS-share click on Sharing > Unix (NFS) Shares > Add Unix (NFS) Share. There, set the options “Mapall User” and “Mapall Group” to “nobody” and “nogroup” respectively. In the path, add all the storages-directories you want to share. You’ll have to create a separate share for every dataset. When you’re done, you can mount the directories via NFS, the address is the IP-address of your freenas-installation plus the folder you shared, e.g.

192.168.0.102:/mnt/media/movies

Installing the plugins

Installing plugins is very easy, as long as you stick to the available ones provided by Freenas. In the Plugins-menu, click on the plugins and then on Install, to install them. Each plugin is installed into a jail, a separate “operating system” in Freenas itself, but we’ll get to that in the next section.
When you’re done, your plugin-page should look like this:
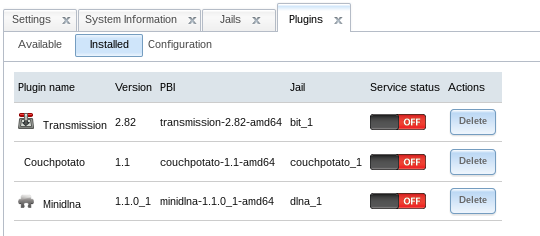
freenas_plugins

Enabling access to the jails

SSH to your Freenas

You’ll likely need command-line access to your Freenas installation and to the jails as well. To enable SSH access to Freenas, go to Services and click on the screwdriver next to SSH. Tick the “Login as root with password” box and save the settings. After that, enable the SSH-Service by clicking the red OFF-button. Now you’re able to connect to your Freenas with SSH by entering the following line into your terminal-emulator of choice:

ssh root@192.168.0.14

(change the address to the address of your Freenas)
Then enter the admin-password and you should be connected to your box.

Using Putty to enter your Freenas

If you’re on Windows and want to connect to your Freenas-installation using Putty, you have to enter the IP-address of Freenas into the “Host Name”-field, then press “open”.

putty

If Putty cannot connect, you probably didn’t use the correct IP-address or you forgot to enable SSH.

Entering the jails

To enter one of the installed jails, type “jls” on the command-line. There you’ll see the available jails. To connect to them, enter “jexec # tcsh” where # is the number of the jail.

[root@freenas] ~# jls
   JID  IP Address      Hostname                      Path
     1  -               bit_1                         /mnt/media/jails/bit_1
     2  -               couchpotato_1                 /mnt/media/jails/couchpotato_1
     4  -               ownbutt_1                    /mnt/media/jails/ownbutt_1
     8  -               dlna_1                        /mnt/media/jails/dlna_1
[root@freenas] ~# jexec 8 tcsh
root@dlna_1:/ #

Adding storage to the jails

Now we’ll have to add the storage to the plugins, so couchpotato, transmission and the DLNA-server can access the same storage and work together. Since jails are separate systems in the server-OS itself, they cannot by default access other parts of your system.

To add the storage, go to Jails, click the plus next to the plugin, open the “Storage” tab and click “Add storage”. You’ll then have to enter the source and destination addresses. 

The source is the storage or dataset you created in the first place. If you did not create datasets before, you either have to do this now or create normal directories as sources with mkdir on the server.
The destinations are directories in the jails that get mapped to the storages outside the jails.
If the destination addresses in the jails do not exist, tick the “Create directory”-box.
To manually create the directories, enter the jail, then you can create directories with the following command:
mkdir -p /media/downloads

Then enter the following command the get the permissions right:
chmod -R 777 /media/downloads

The following part is really tricky as Transmission, Couchpotato and Sick Beard behave very differently with the directories they download data to. I had to edited the following configuration multiple times, so be sure to stay up to date.
  1. Transmission (bit_1): You need the torrent-directory, where Transmission looks for torrents and the download-directory where it downloads the data to.
    - Download-Source: /mnt/media/downloads
    - Download-Destination: /media/downloads
    
    - Torrent-Source: /mnt/media/torrentfiles
    - Torrent-Destination: /media/torrentfiles
    
    - Series-Source: /mnt/media/series
    - Series-Destination: /media/series
    
    - Movie-Source: /mnt/media/movies
    - Movie-Destination: /media/movies
     
  2. Couchpotato: You need the downloads-directory where transmission puts its data into; you’ll also need the movies-directory, where couchpotato moves the downloaded and renamed movies to.
    - Download-Source: /mnt/media/downloads
    - Download-Destination: /media/downloads
    
    - Movie-Source: /mnt/media/movies
    - Movie-Destination: /media/movies
     
  3. Sickbeard: You need the series-directory where Sickbeard puts its data into; you’ll also need the torrents-directory, where Sickbeard puts the torrent file for Transmission to download them.
    - Series-Source: /mnt/media/series
    - Series-Destination: /media/series
    
    - Torrent-Source: /mnt/media/torrentfiles
    - Torrent-Destination: /media/torrentfiles
    
    - Download-Source: /mnt/media/downloads
    - Download-Destination: /media/downloads
     
  4. MiniDLNA/Plex: You’ll need every directory where files are located that you want to play using DLNA, e.g. movies and series.
    - Movie/Series/Music-Source: /mnt/media/{movies|series|music}
    - Movie/Series/Music-Destination: /media/{movies|series|music}
    

Configuring the plugins

Now that you have added the storage to the plugins, you can finally start them. Go to the Plugins-page and click the red OFF-button of all plugins. After that, they should be listed as on, except for miniDLNA, which we’ll have to configure first, but not now.

You can find the IP-adresses of the plugins here:
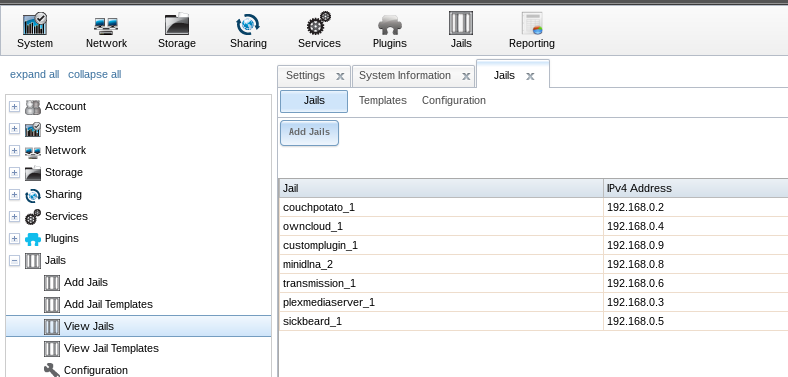
freenas_ip_addresses

Transmission

The “watch”-directory where Transmission looks for torrent-files is normally:

/usr/pbi/transmission-amd64/etc/transmission/Downloads

That’s 50 characters and if you add the jail-directory to it, it exceeds Freenas’ directory-length limit of 88 characters, so you have to change this. Open up the Transmission-settings in the Plugins-tab of Freenas and edit the “Watch Directory” to “/media/torrentfiles” and the Download-Directory to “/media/downloads”.
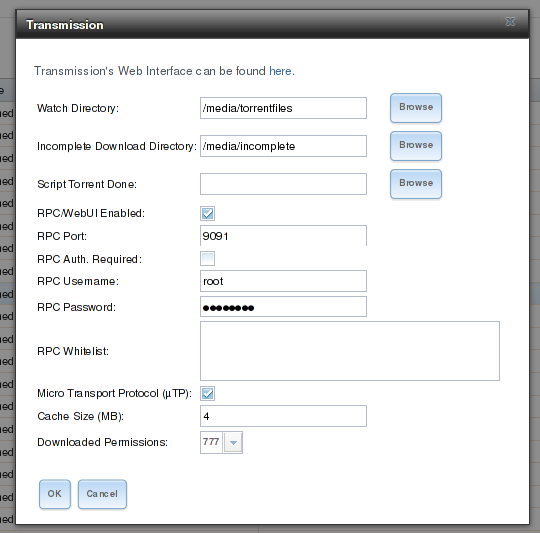
freenas_transmission_settings

Next open the transmission-address in your browser. You’ll see the main interface of Transmission. Click the screwdriver icon in the down left corner to edit the settings. There you’ll see the “download to” option. There should be “/media/downloads” now, too.
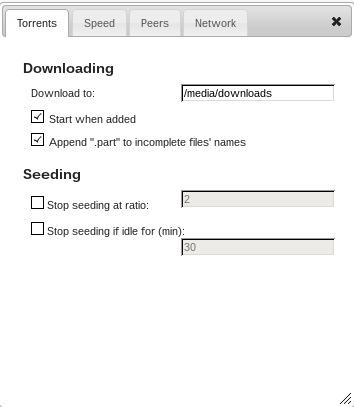
transmission_settings

Now we’ll have to connect to the jail of transmission to manually edit a configuration file. Connect via SSH into your Freenas and connect to the jail as described in the chapter “Entering the jails”. Then you’ll have to edit the file, by entering this on the commandline:

edit /usr/pbi/transmission-amd64/etc/transmission/home/settings.json

But first, stop the plugin or else the settings will be overwritten. In the file, scroll down to the end where you can see the configuration-point called “umask”. Replace the “18” with a “0”. Save the file by pressing “escape”, then “leave the editor” and then “save changes”. After that start the plugin.

UPDATE:


HolyK in the Freenas-forums mentioned a great front end for the remote transmission server, transgui. You can find it here or in your favorite package manager. It’s a nice replacement for the rather featureless web front end of transmission. It’s available for Linux and even Windows.
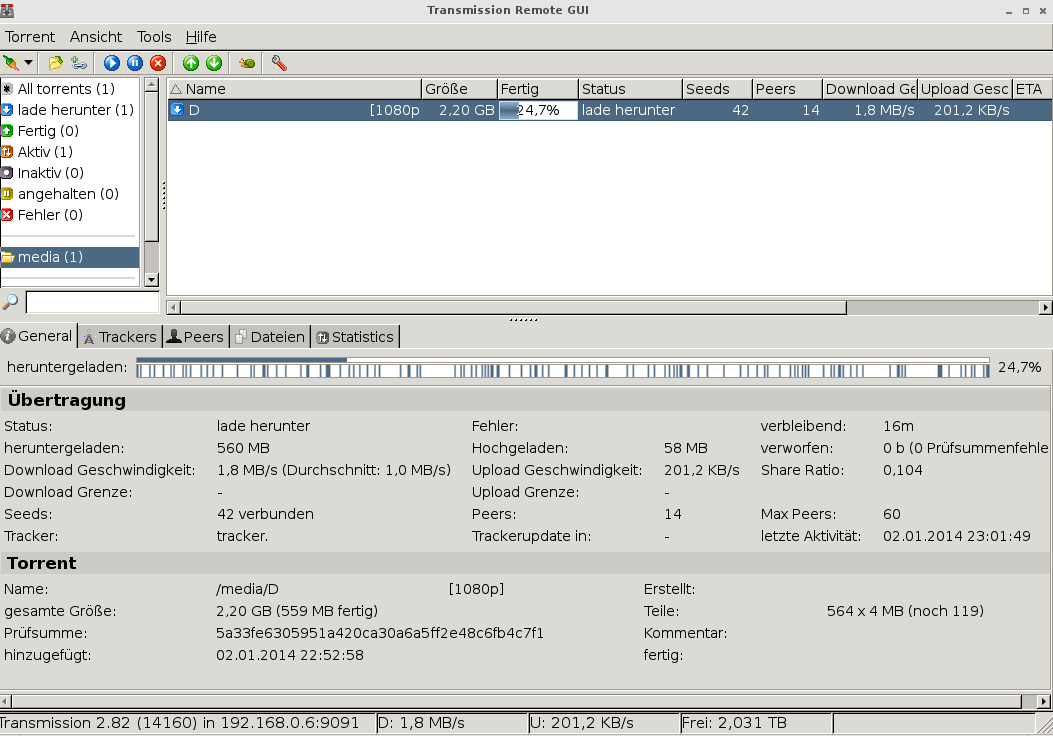
Transmission GUI

After you installed it, point it to the IP address of your transmission-server and then you can see the movies downloading and even add torrent- or magnet-links so they will be downloaded to you Freenas.

Couchpotato

Open the couchpotato-address in your browser. You’ll be greeted with the install wizard. Scroll down to advance in the wizard. Define a user name and password in the General section if you’d like and leave the port to 5050.

In the downloaders section choose Transmission. As host enter the address of your Transmission jail (you can find the address in the jail-section of Freenas). Set the “Directory” to the “Transmission-Destination” you set earlier.
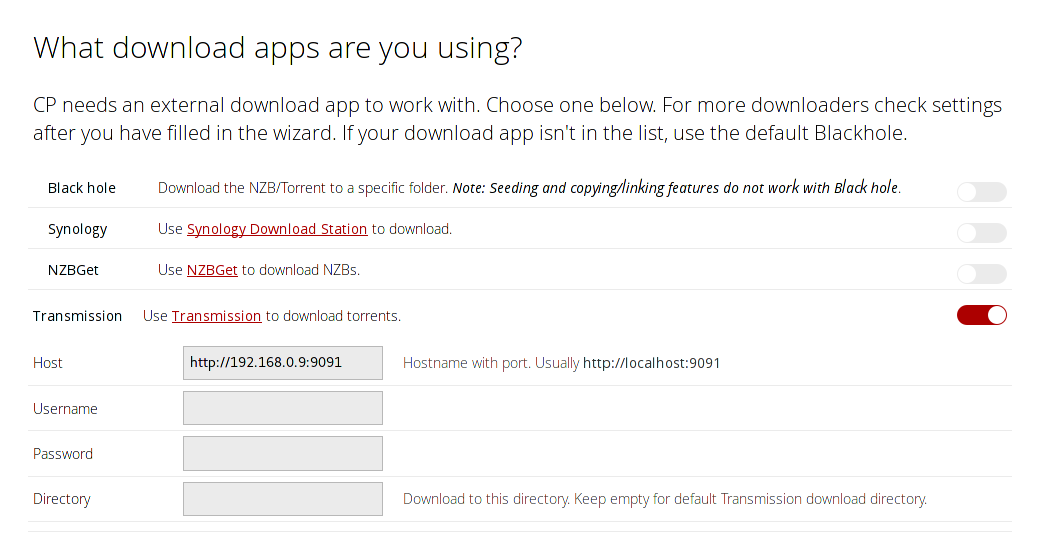
couchpotato_transmission_settings

Scroll further down to “Move & rename the movies after downloading?” (skip the “Are you registered at any of these sites?”-part).

In the “from”-folder set the same folder you just used for the Transmission-directory. The “to”-directory is where the renamed movies will be stored. Set it to the “movie-source” configured in the chapter “Adding storage to the jails”. Tick the “Cleanup”-box so leftover files will be removed after renaming the movies.
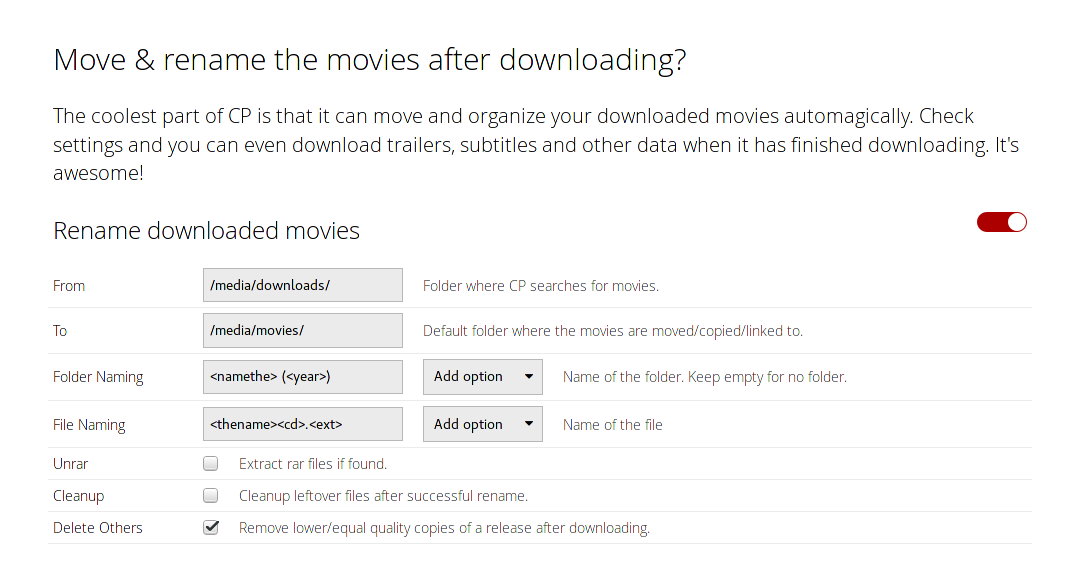
couchpotato_rename_settings

After that, scroll further down and click the huge green button and you’re done with the wizard.
On the main page of couchpotato, click the screw-icon in the upper right to get to the configuration-page. There are many things to tweak here, but I’m not going into detail about them. Right now you have to open the “General” Tab, click on “Show advanced settings” and then enter “0777” in the fields “Folder CHMOD” and “File CHMOD” as shown below.

If you do not do this, you probably will be getting an error-message later in Transmission, when downloading files (the download stops at around 4MB)!
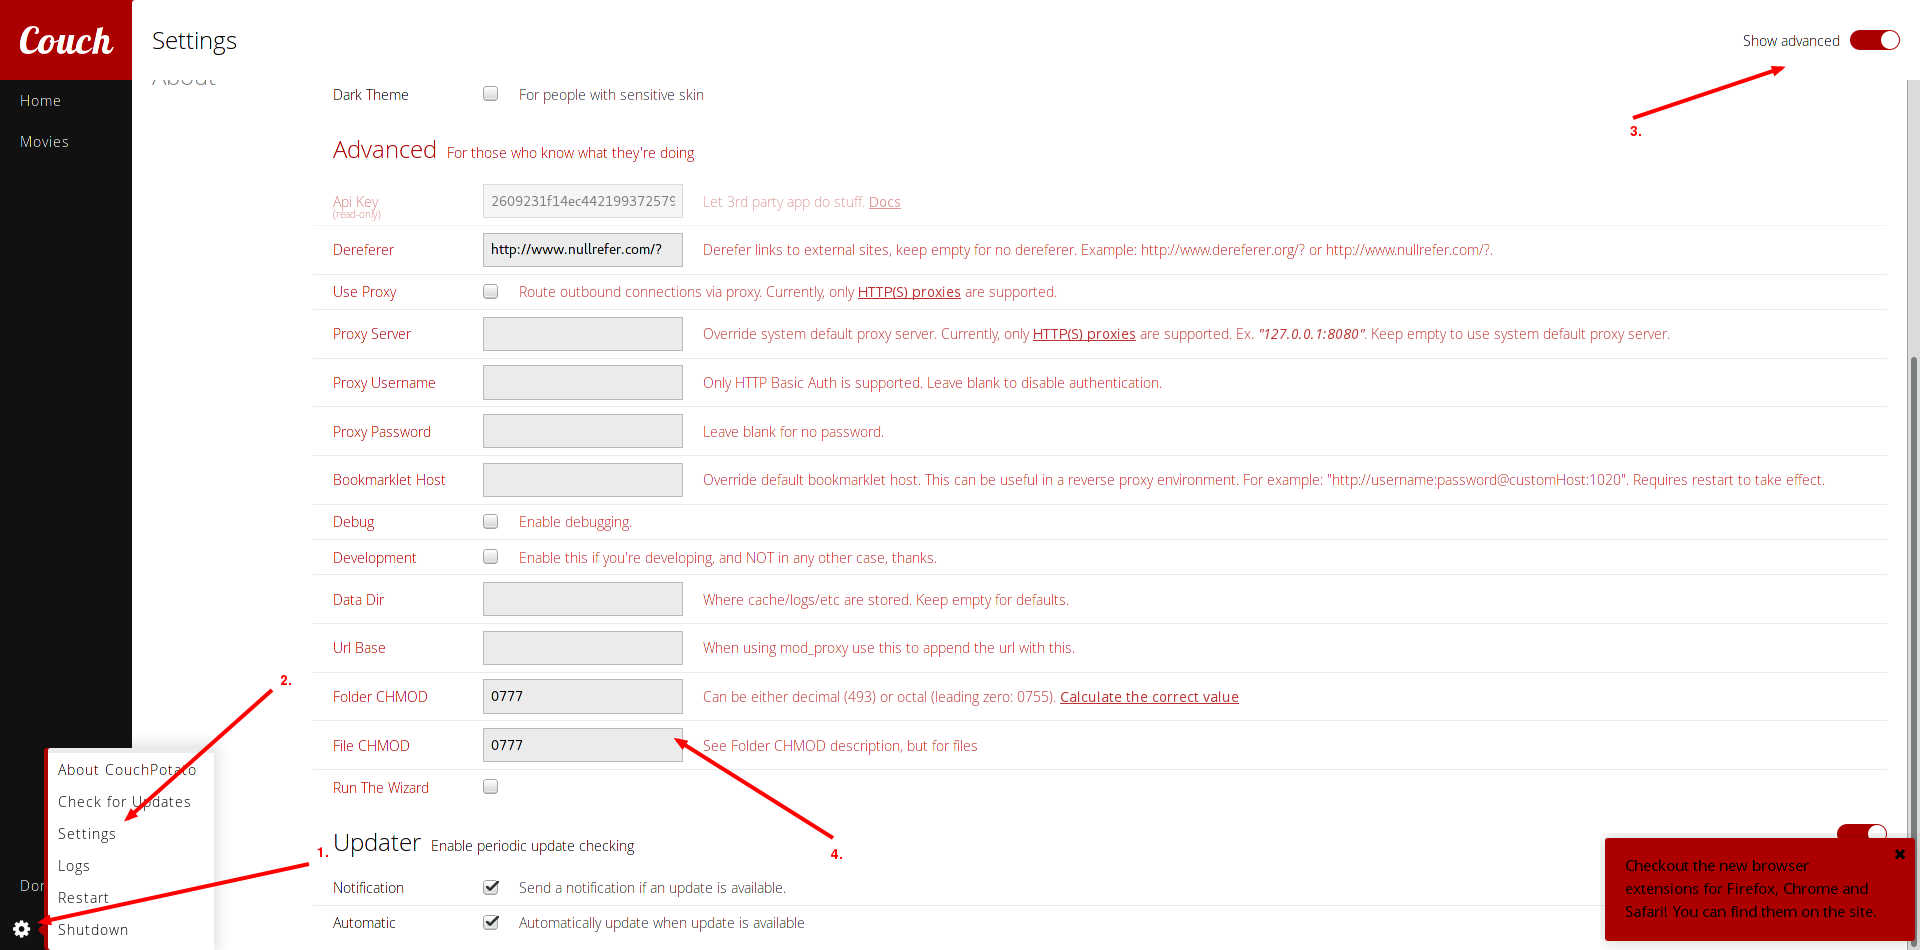
couchpotato_advanced_settings_chmod

Sickbeard

Install Sickbeard as usual and open the web interface. Since I currently only load movies with (free) torrents, there are some settings to make.

Open up the “Search Settings” tab in the config-tab.

Disable the search for NZBs and enable the search for torrents. In the Torrent Black Hole” enter the Torrent-Destination “/media/torrentfiles” you configured in the jail-storage and save the changes. It should look like this:
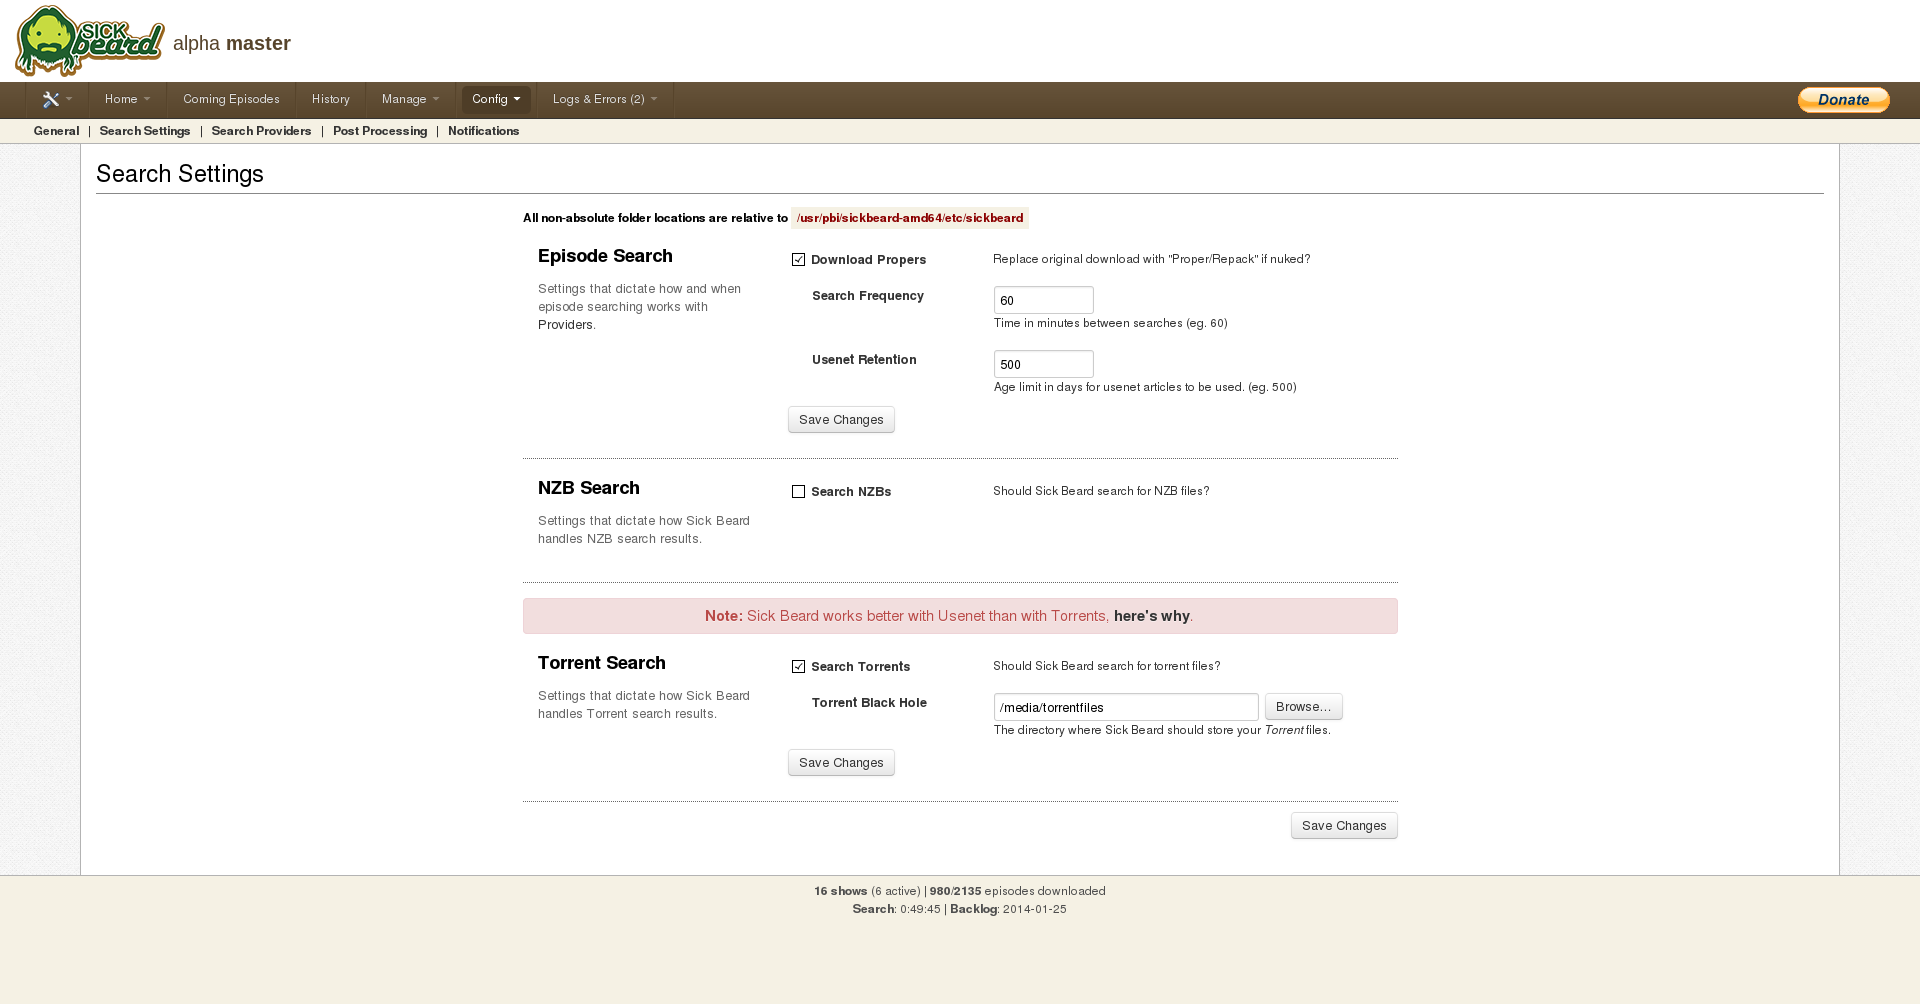
sickbeard_search_settings

Then go to the “Search Providers” tab. There, check the box for “EZRSS” as it is the only free torrent search for series. If you are a member of any other torrent sites listed there, check the boxes for them and enter your credentials for this site. Again save the changes.

Next, go to the “Post Processing” settings.

In the “TV Download Dir”, enter your Series-Destination “/media/downloads” and check the “Scan and Process”-box. You can also edit additional settings on this page but they are not important right now. In the end your settings should probably look like this:
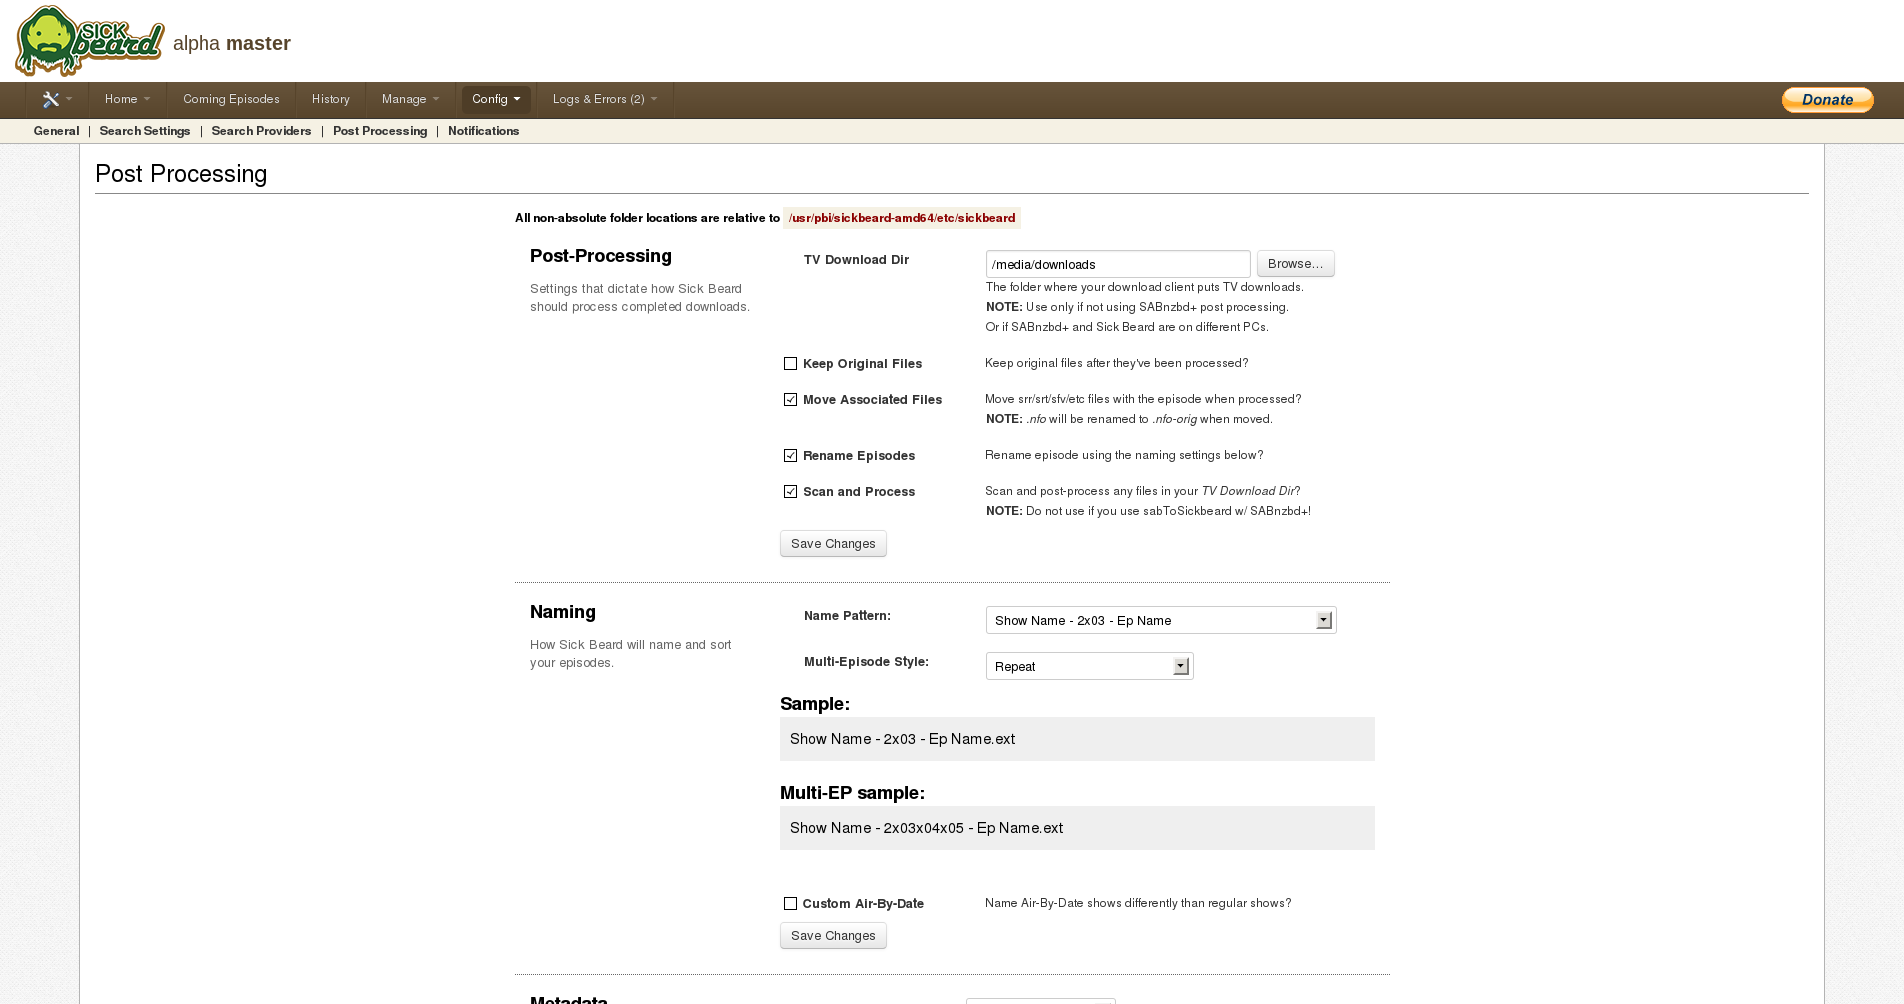
sickbeard_post_process_settings

If you’re done, you can add new or existing shows and let them download!

DLNA

Now you have the choice to either use MiniDLNA or the Plex MediaServer. If you want a nice interface to manage you music and movies, use Plex. If you only need a DLNA-server, use MiniDLNA as it is easy to configure. I’ll describe the installation and configuration for both.

MiniDLNA

Open the Freenas-front end, go to plugins and open the MiniDLNA-configuration. There, set the name of the MiniDLNA-server to anything you like and the Media-directory to the destination set in chapter “Adding storage to the jails”. Leave the other options as they are.
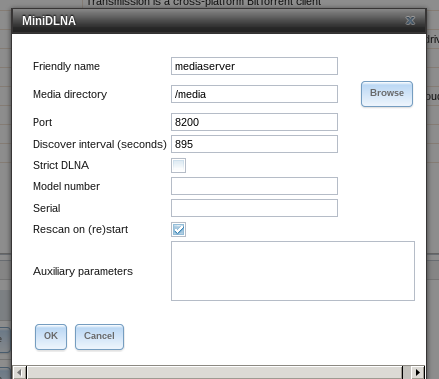
minidlna_settings

The DLNA-server will only scan for new files in its directory on restart, so if you are adding a movie and do not restart the DLNA-server, it won’t be available for streaming. To work around this issue, use the fix described here. After rebooting the DLNA-server should now scan for new files every 5 minutes.

Plex MediaServer

After installing the plugin, open the address of the Plexserver and you’ll be greeted with the End User License Agreement. Agree to it and jump to the “Get Started”-section. You can skip the register as it’s not needed. Leave the settings in “Basic Setup” as they are and go to the next step. There, you can add your music and movie-directories. Click on “add section”, then on “Movies” and insert into the second box your movies-directory. It should look like this:
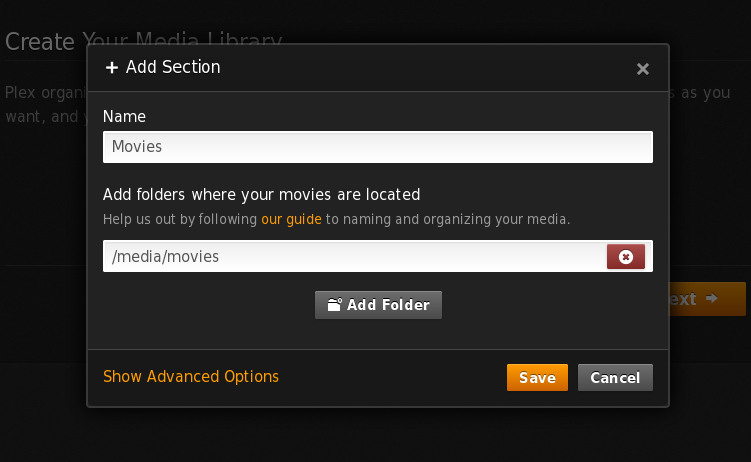
freenas_plex_add_movies

Do this for your music and series, too.

If you have everything added, jump to the next section. There you can add some channels to use with Plex. I skipped them. Click “Next” and “Done” and your are it..done! Now you should see the dashboard of Plex filling with your movies and music.

DLNA is enabled by default, so you don’t have to do anything in this regard.

Conclusion

Now you are able to download movies with couchpotato and transmission and once they’re downloaded, they are automatically available on you DLNA-server for further streaming.