Dec 14, 2014

How To install and configure HyperV manager on Win7 machine

If I am using HyperV - Core edition as hyper visor then what options are available to manage VM from remote ?

How are you going to manage it from your desktop PC? You do not want to have to use Remote Desktop Protocol (RDP) to connect to the server and launch the Hyper-V manager, every time that you want to administer Hyper-V. Thus, you need the Hyper-V tools for remote management up and running whenever you need them.

What about if i am not using domain environment. (what permission required to authenticate both machine which each other).

So what will my scenario prerequisite:

A client computer that is running Windows 7, and that is connected to the same network where the virtualization server is connected (both computers in a workgroup or both in a domain).

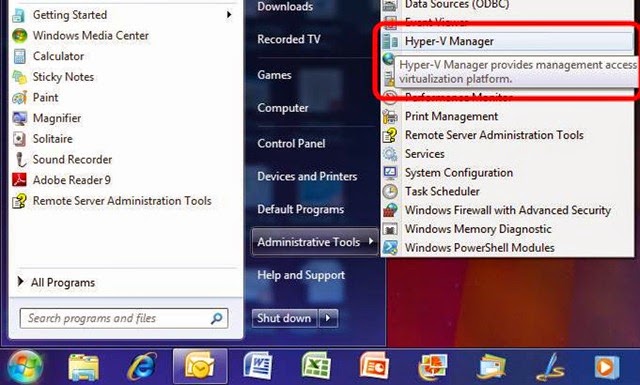
You can install Hyper-V Manager on a Window 7 machine , and from that computer, you can manage the virtual machines that are running on your virtualization server. The user experience is the same as that of Hyper-V Manager running on the virtualization server.

Download the Remote Server Administration Tools (Windows 7 Professional or Ultimate only)

On your Windows 7 Download the correct version of the tool from
http://www.microsoft.com/download/en/details.aspx?displaylang=en&id=7887

There is a 32 bit (Windows6.1-KB958830-x86-RefreshPkg.msu) version and a 64 bit (Windows6.1-KB958830-x64-RefreshPkg.msu)

Install the application.

Create the same administrator user on your Windows 7 and Hyper-V node

On windows 7 create an administrator user: Start > Control Panel > Add or Remove user accounts.

On hyper-v create the same user with the same password

Open the Hyper-V Server Configuration by typing sconfig.cmd in the command prompt

Read more @Expert-Exchange

Running Hyper-V on Windows 7 Client

Run Hyper-V on Windows 7? Unpossible!

Ok, so I lured everyone in with a provocative title, and I can’t exactly deliver – there is no way as far as I know to directly run Hyper-V on any client version of Windows 7. But there’s an important bit of software that has an obscure name that can really help you out.

The caveat is, you need a machine that’s free and supports hardware virtualization (i.e. AMD-V or VT-x). Not all machines support it, and a lot of them need some BIOS fiddling to make it work properly.

Hyper-V Server 2008 R2 costs exactly zero dollars

Nobody knows about this, and I don’t know why it’s not more popular – Microsoft gives away the Server Core Hyper-V SKU. For free. No dollars. Go over here and download it. Set this up on a machine and it should drop you at a command prompt – that’s all there is to Server Core, just a cmd prompt; that’s all you need for Hyper-V though.

Remote Server Administration Tools for Windows 7

A lot of people think that you need to have Windows Server installed to be able to administer other servers – otherwise you don’t have the MMC snap-ins, so people resort to TSing into their boxes to administer them. Ever since Vista, we’ve made a package called the Remote Server Administration Tools (RSAT), which brings all of the snap-ins like the Active Directory admin page, the DNS page, everything that’s on Server – only on Vista / Win7.

This won’t magically make your Windows 7 box be able to be a Domain Controller though, you’ll only be able to connect to other machines. However, this includes all of the Hyper-V client components – you’ll be able to view the console, manage/add machines, etc. Here’s the only trick though, the installer is kind of goofy – installing the package only adds the entry in the Add Optional Features list. Then, you have to actually choose what to install.

Combine these two, and you’ve got Hyper-V on Win7 for free

Just like the heading says, if you combine these two, you’ve got Hyper-V for free. Yahtzee! Combine this with disk2vhd, and you can get rid of a bunch of test machines and move them to VMs. Move VHDs using the SMB admin shares, like \\mycoolbox\C$\Users\Public\Documents\Hyper-V Disks

How-To Install Hyper-V Manager on Windows 7

Download and install the RSAT tools for Windows 7 from here: http://www.microsoft.com/downloads/details.aspx?FamilyID=7D2F6AD7-656B-4313-A005-4E344E43997D&displaylang=en. Install either the 32-bit or 64-bit depending on what version of Windows 7 you’re using.

Next, go to Start - Control Panel and click on Programs.


Next, you’ll see an option to Turn Window features on or off. Click on this option.


Under Remote Server Administration Tools - Role Administration Tools, find the option for Hyper-V Tools, check the checkbox and click OK. You can now type Hyper-V Manager at the Start Menu


You can now type Hyper-V Manager at the Start menu or go to Start - Administrative Tools -Hyper-V Manager.


Dec 13, 2014

How to configure OpenFiler v2.3 iSCSI Storage for use with VMware ESX

Until recently I had been running my ESX VM’s on local disk. This is mostly due to not having enough time to get some shared storage up and running.

I however was determined to get something up and running for my ESX lab so that I can play around with some of ESX’s more powerful, and interesting, features such as DRS, HA and VMotion.

As with most of you money is a serious consideration so as I am not in a position to implement a fibre attached SAN solution – though this would be nice. The next best option is iSCSI. I am running both VMware ESX 3.5 and ESXi 3.5 in my lab and both provide iSCSI functionality by default to connect through to an iSCSI target.

There are a handful of good free (free is always good :) ) iSCSI software that can be downloaded. Some are standalone installs, others come in the form of virtual appliances and some both.

Here is a list of those that I know of (there will no doubt be many more):
I decided to give OpenFiler a go – as I’d heard good things about the latest release, v2.3. Here’s a link to a really good document on the OpenFiler site that details the underlying

Read more @techhead

How To setup a Diskless Swap System

This is a simple guide to setting up your computer with solid state swap devices, a much faster method of memory management(i.e. your computer runs lots faster during paging operations).

Hardware Requirements

A) Minimum 4 USB2.0 memory storage devices of identical make and model of at lest 512MB in size. (I can get a 2G stick down the street for less then 10$)
B) A motherboard with USB2.0 ports properly configured in BIOS. (A hub should be alright but I have not tested for that... yet)

Procedure

1.) Open a text file with gedit for recording device information.
2.) Open a Terminal(Applications->Accessories->Terminal) and enter

Code:

tail -f /var/log/messages
3.) Now insert the usb device and you should see something like the following...

Read more at linuxforum