Dec 18, 2014

How-To Diskless AoE – 04 Putting the necessary files of grub4dos on TFTP Root folder

After download the grub4dos package from the project website. Open it and extract the files grldr and menu.lst and put on  your  tftp-root folder.


* – watch video in HD.

Task 1 – Extract two files


Task 2 – Your tftp-root folder should be like this, with this two files (+ ipxe.iso will see later):


Proceed on the How-to to the next Step 5

How-To Diskless AoE – 03 Instaling and configuring TFTP Server on Server

Choose your TFTP Server from the suggestions.

Im using a TFTP Server from SolarWinds, its completly freeware and works fine.  To explain configuration im using this package. But as you know, you can done with other.

Installing

Task 1  - <INSTALL>


Task 2  -  <NEXT>


Task 3  - <NEXT>

Task 4  - waiting…


Task 5  - <FINISH>


Task 6  - Click on Start Windows button and find SolarWinds TFTP menu program group. Open the program.


Task 7  - Menu “File” -> “Configure”


Task 8  - Configure like image, and choose your own tftp-root folder.

Proceed on How-To to next Step 4 - Putting the necessary files ( grub4dos )

How-To Diskless AoE – 02 Instaling and configuring DHCP Server on Server

* – watch video in HD, click on Youtube

Im using a DHCP from Uwe.Ruttkamp. The explain configuration im using this package. But as you know, you can done with other. Just put the option bootfilename string as ‘glrdr‘. ( alternative download link: glrdr )

Its very simple and have with a nice Wizard. To start click on ‘dhcpwiz.exe‘


Task  1:  Just click in <Next>;


Task  2: Select your internal network interface;


Task  3: If you want to use the TFTP from this package, mark TFTP option and choose a folder. Note: on the root path folder put the file ‘grldr‘ and ‘menu.lst‘. If NOT just Click in <NEXT>;


Task 4: Write the string ‘grldr’ on bootfile option and your internal domain. Click in <NEXT>;


Task 5: Mark overwrite and click on “Write INI file” and <NEXT>;
 
Task 6: Start the Service. and <FINISH>;

Done

If you want to use other package for TFTP continue to the step 3, if NOT skip to Step 4.

How-To Diskless AoE – 01 Overview of the Solution

This How-To enable a Windows based solution that uses AoE technology to bring an entirely new range of solutions, flexibility and cost reductions to businesses. The feature of AoE is a server based network where software applications and programs are held on the server, and runs on Client PCs (Diskless Node). Therefore, Client PCs do not require a hard disk anymore. Centralizing operating system data by deploying AoE enables storage virtualization at the level of the local hard drive, and allows extremely fast server and desktop deployment. This makes AoE Diskless an ideal network management software which is suitable for all kinds of networked environment industries such as Education Institutions, Training Centers, Offices, Cybercafé, Karaoke, and can also be used in cluster computing.

Until today, administrators or technical support staffs are still having frustrations when it comes to troubleshooting and maintaining a group of networked PCs. The majority of problems faced by administrator or technical support staff in a networking environment are:-
  • Programs/Applications/Games/Windows Updates to all PCs
  • Maintain different PC specification
  • Efficiency and Troubleshooting of PCs
  • Identifying faulty hardware and replacements
  • Hard disk limitation and upgrades
  • Virus attacks and Virus removal
  • Operating System Backup / Restoration
  • Windows / Files Protection
  • Freeze/Unfreeze PCs when doing updates (Recovery system)
Listed below are some quick facts if you use this How-To:

COST SAVING IN:
  • Investment for hard disk and future hard disk upgrade
  • Monthly electricity bill, go Green
  • Recovery software / hardware
  • Backup / cloning software and other update software
  • Antivirus / Anti Trojan software
  • Faulty hard disks replacements
TIME SAVING IN:
  • Programs/Applications/Games/Windows Update to all PCs
  • PC maintenance enabling easy manage on multiple branches remotely
  • Virus attacks and Virus removal
  • Windows / Files Protection
  • Maintaining different specification PCs
  • Operating System Backup / Restoration
  • Freeze/Unfreeze (Recovery system)
SUPPORT:
  • Different Client PC specification with different drivers (Motherboard / Display / Sound / etc)
  • Multi Restore Points
  • Multi Sync between Servers
  • Multiple Images – Multiple Window. (Example: 10PC using English Windows + 10PC Malay Windows + 10PC Chinese Windows)
What is AoE ?

ATA over Ethernet (AoE) is an open standards based protocol that allows direct network access to disk drives by client hosts. Using disk storage arrays that support AoE shared storage networks (SAN) can be built that leverage the power of “Raw” Layer 2 Ethernet.
  • AoE has been native in the Linux kernel since 2005
  • AoE delivers a simple, high performance, low cost alternative to iSCSI and FibreChannel for networked block storage by eliminating the processing overhead of TCP/IP.
  • Layer 2 Protocol which encapsulates ATA (the command set used by most commodity disk) in Ethernet Frames – An Ethernet request which has in it, give me block ‘00’ from disk ‘01’ on shelf ‘1’.
Protocol

AoE is a stateless protocol which consists of request messages sent to the AoE server and reply messages returned to the client host.

Messages have two formats:
  • ATA Message
  • Config/Query Messages
AoE utilizes the standard Ethernet MAC header for IEEE 802.3 Ethernet frames and has a registered Ethernet type of 0x88A2.

Legacy Fibre Channel and iSCSI protocols consist of several complex software layers see the diagram below. These layers force users through mandatory SAN point-to-point connection configuration procedures for each network path for all storage LUNs. Ethernet SAN is a connectionless protocol that connects servers and storage directly across layer 2 Ethernet. It does not require TCP/IP or user configured multi-path IO (MPIO) software. The use of layer 2 Ethernet represents a simpler approach for SAN.

grub4dos

GRUB4DOS is an universal boot loader based on GNU GRUB. It can boot off DOS/LINUX, or via Windows boot manager/syslinux/lilo, or from MBR/CD. It also has builtin BIOS disk emulation, ATAPI CDROM driver, etc.


Grub4DOS is a boot manager that can be easily installed to a flashdrive or hard drive (internal or external). It allows booting multiple operating systems directly as well as booting into bootable partitions.

grub4dos is a boot loader system. We will use this software to make a boot menu for PXE Boot.

Website of grub4dos: http://sourceforge.net/projects/grub4dos/

Download required file: grub4dos-0.4.4.zip

Alternative Download Blog Link: grub4dos-0.4.4.zip

How-To Boot Windows Diskless with AoE instead iSCSI

1.] Preparing Windows to Boot Diskless with VirtualBox/Vmare Workstation/ESX
  • Install Windows 7/8/2003/2008 on a Virtual Machine ( create a disk type .vhd with fixed size )
  • open a cmd as administrator and type two commands:
  • C:>bcdedit  -set  TESTSIGNING ON
    C:>bcdedit -set loadoptions DDISABLE_INTEGRITY_CHECKS
    
  • reboot the /virtual machine
  • Download and Install WinAoE Driver as Storage Controller
  • Download and Install CCBoot Client without options
  • Shutdown Virtual Machine
2.] On Server
  • Install a DHCP Server with option bootfilename grldr
  • Install a TFTP Server and set tftp-root folder
  • Download grub4dos and extract 'grldr' and 'menu.lst' files to the tftp-root folder
  • Edit menu.lst file only with this content:
  • title === MENU BOOTS ===
    ()
    title
    ()
    title Windows 7 Diskless
    map --mem (pd)/ipxe.iso (0xff)
    map --hook
    chainloader (0xff)
    
  • Create a text file 'conf.ipxe' with this content:
  • #!ipxe
    dhcp net0
    set keep-san 1
    sanboot aoe:e0.0
    
  • Download ipxe.iso and with UltraISO, open the ipxe.iso with UltraISO and edit ISOLINUX.CFG with this content:
  • SAY iPXE ISO boot image
    TIMEOUT 30
    DEFAULT ipxe.lkrn
    LABEL ipxe.lkrn
    KERNEL ipxe.krn
    INITRD conf.ipxe
    
  • Update the ISOLINUX.CFG on UltraISO with new content
  • Drag the file 'conf.ipxe' to inside UltraISO and save the file.
  • Put ipxe.iso on the tftp-root folder
  • Start DHCP Server
  • Start TFTP Server
  • Download and install WinPCAP and vBlade Target System ( AoE ) and export the target of .vhd.
  • Open vblade from Icon on Program Group
  • First find the Device Name of your Network Card with bogus caracters (xxx).
  • vblade -b 65 0 0 xxx “d:path_to_you_vhdwindows.vhd”
  • after copy and paste the Device{value}
  • vblade -b 65 0 0 “Device{value}” “d:path_to_you_vhdwindows.vhd”  enter 
  • Ready ! Boot one machine by LAN Boot, or create a VirtualBox/Vmware Virtual Machine without Disks !
  • You can boot a lot of Machines creating a specific ipxe.iso for each one, dont forget to edit 'conf.ipxe' with diferent targets ( e0.0, e0.1, e0.01), create respective ipxe-e0.0.iso for each workstation, add the menu.lst entry too for each ipxe-e0.x.iso, export each .vhd with vblade changing slots ( 0 1 , 0 2 etc..)
via http://windowsdisklessaoe.wordpress.com

Dec 14, 2014

How To install and configure HyperV manager on Win7 machine

If I am using HyperV - Core edition as hyper visor then what options are available to manage VM from remote ?

How are you going to manage it from your desktop PC? You do not want to have to use Remote Desktop Protocol (RDP) to connect to the server and launch the Hyper-V manager, every time that you want to administer Hyper-V. Thus, you need the Hyper-V tools for remote management up and running whenever you need them.

What about if i am not using domain environment. (what permission required to authenticate both machine which each other).

So what will my scenario prerequisite:

A client computer that is running Windows 7, and that is connected to the same network where the virtualization server is connected (both computers in a workgroup or both in a domain).

You can install Hyper-V Manager on a Window 7 machine , and from that computer, you can manage the virtual machines that are running on your virtualization server. The user experience is the same as that of Hyper-V Manager running on the virtualization server.

Download the Remote Server Administration Tools (Windows 7 Professional or Ultimate only)

On your Windows 7 Download the correct version of the tool from
http://www.microsoft.com/download/en/details.aspx?displaylang=en&id=7887

There is a 32 bit (Windows6.1-KB958830-x86-RefreshPkg.msu) version and a 64 bit (Windows6.1-KB958830-x64-RefreshPkg.msu)

Install the application.

Create the same administrator user on your Windows 7 and Hyper-V node

On windows 7 create an administrator user: Start > Control Panel > Add or Remove user accounts.

On hyper-v create the same user with the same password

Open the Hyper-V Server Configuration by typing sconfig.cmd in the command prompt

Read more @Expert-Exchange

Running Hyper-V on Windows 7 Client

Run Hyper-V on Windows 7? Unpossible!

Ok, so I lured everyone in with a provocative title, and I can’t exactly deliver – there is no way as far as I know to directly run Hyper-V on any client version of Windows 7. But there’s an important bit of software that has an obscure name that can really help you out.

The caveat is, you need a machine that’s free and supports hardware virtualization (i.e. AMD-V or VT-x). Not all machines support it, and a lot of them need some BIOS fiddling to make it work properly.

Hyper-V Server 2008 R2 costs exactly zero dollars

Nobody knows about this, and I don’t know why it’s not more popular – Microsoft gives away the Server Core Hyper-V SKU. For free. No dollars. Go over here and download it. Set this up on a machine and it should drop you at a command prompt – that’s all there is to Server Core, just a cmd prompt; that’s all you need for Hyper-V though.

Remote Server Administration Tools for Windows 7

A lot of people think that you need to have Windows Server installed to be able to administer other servers – otherwise you don’t have the MMC snap-ins, so people resort to TSing into their boxes to administer them. Ever since Vista, we’ve made a package called the Remote Server Administration Tools (RSAT), which brings all of the snap-ins like the Active Directory admin page, the DNS page, everything that’s on Server – only on Vista / Win7.

This won’t magically make your Windows 7 box be able to be a Domain Controller though, you’ll only be able to connect to other machines. However, this includes all of the Hyper-V client components – you’ll be able to view the console, manage/add machines, etc. Here’s the only trick though, the installer is kind of goofy – installing the package only adds the entry in the Add Optional Features list. Then, you have to actually choose what to install.

Combine these two, and you’ve got Hyper-V on Win7 for free

Just like the heading says, if you combine these two, you’ve got Hyper-V for free. Yahtzee! Combine this with disk2vhd, and you can get rid of a bunch of test machines and move them to VMs. Move VHDs using the SMB admin shares, like \\mycoolbox\C$\Users\Public\Documents\Hyper-V Disks

How-To Install Hyper-V Manager on Windows 7

Download and install the RSAT tools for Windows 7 from here: http://www.microsoft.com/downloads/details.aspx?FamilyID=7D2F6AD7-656B-4313-A005-4E344E43997D&displaylang=en. Install either the 32-bit or 64-bit depending on what version of Windows 7 you’re using.

Next, go to Start - Control Panel and click on Programs.


Next, you’ll see an option to Turn Window features on or off. Click on this option.


Under Remote Server Administration Tools - Role Administration Tools, find the option for Hyper-V Tools, check the checkbox and click OK. You can now type Hyper-V Manager at the Start Menu


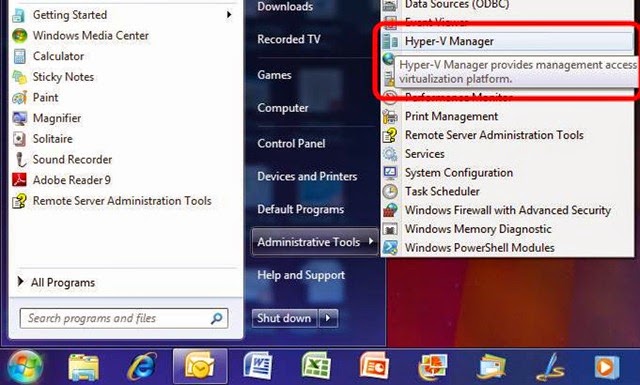
You can now type Hyper-V Manager at the Start menu or go to Start - Administrative Tools -Hyper-V Manager.


Dec 13, 2014

How to configure OpenFiler v2.3 iSCSI Storage for use with VMware ESX

Until recently I had been running my ESX VM’s on local disk. This is mostly due to not having enough time to get some shared storage up and running.

I however was determined to get something up and running for my ESX lab so that I can play around with some of ESX’s more powerful, and interesting, features such as DRS, HA and VMotion.

As with most of you money is a serious consideration so as I am not in a position to implement a fibre attached SAN solution – though this would be nice. The next best option is iSCSI. I am running both VMware ESX 3.5 and ESXi 3.5 in my lab and both provide iSCSI functionality by default to connect through to an iSCSI target.

There are a handful of good free (free is always good :) ) iSCSI software that can be downloaded. Some are standalone installs, others come in the form of virtual appliances and some both.

Here is a list of those that I know of (there will no doubt be many more):
I decided to give OpenFiler a go – as I’d heard good things about the latest release, v2.3. Here’s a link to a really good document on the OpenFiler site that details the underlying

Read more @techhead

How To setup a Diskless Swap System

This is a simple guide to setting up your computer with solid state swap devices, a much faster method of memory management(i.e. your computer runs lots faster during paging operations).

Hardware Requirements

A) Minimum 4 USB2.0 memory storage devices of identical make and model of at lest 512MB in size. (I can get a 2G stick down the street for less then 10$)
B) A motherboard with USB2.0 ports properly configured in BIOS. (A hub should be alright but I have not tested for that... yet)

Procedure

1.) Open a text file with gedit for recording device information.
2.) Open a Terminal(Applications->Accessories->Terminal) and enter

Code:

tail -f /var/log/messages
3.) Now insert the usb device and you should see something like the following...

Read more at linuxforum

SAN vs NAS vs iSCSI Comparison

List of Diskless Booting Software


List of Diskless Booting Software for iCafe and LANshop

CCBoot by YoungSoft ( Comercial ) - iSCSI based

iShareDisk ( Free ) - iSCSI based

RichTech Diskless by RichTech ( Comercial ) - iSCSI based

Serva Diskless Installation System ( Comercial ) - iSCSI based

OBM Diskless by OBM ( Comercial ) – iSCSI based

EMS358 by EMS ( Chinese, comercial )

Depth Internet Diskless System ( Chinese, comercial )

KeyDone Diskless ( Comercial )

NxD Diskless ( Comercial ) Free

WinTarget AoE Server ( Free 1 connection / Comercial )

DDS Diskless Solution for Cybercafe | MichaelSoft

Orb Diskless

SanDeploy

Diskless Remote Boot in Linux (DRBL)

Q. Q. Diskless Solutions | links

Using FreeNAS 8 to Create an iSCSI Target for Windows 7

iSCSI (Internet Small Computer System Interface) is a low level network protocol which allows a client machine (known as the Initiator) to control storage on a server (known as the Target). High level network file systems like CIFS (Common Internet File System), which is used by Windows to map network drives, let the server (and its underlying operating system) handle all the low level access to the network accessible storage. The Windows client doesn’t know anything about the sectors, tracks and heads of the remote storage. It simply asks for data from a file which is then sent by the server.


With iSCSI the control is low level. So low level in fact, that the disk needs to be partitioned and formatted by the Initiator. When the Initiator wants some data from the network storage it sends the low level commands to read and write data from the different sectors of the disk. The results of those operations are returned by the Target over the network to the Initiator. If you are thinking that iSCSI sounds a lot like SCSI, the disk interface often used on server, then you are right. SCSI sends low level commands down a cable to control a hard disk. iSCSI sends SCSI like commands over the network to control a hard disk connected to the iSCSI server.

FreeNAS 8 can act as an iSCSI Target and can allow a remote Initiator to control a whole hard disk or present a file (created on the existing storage) as if it was a hard disk. For this tutorial I will assume you have a FreeNAS system installed with at least one volume configured. For more information on installing FreeNAS and setting up volumes see my previous tutorial here: Build a Simple NAS Setup with FreeNAS 8.

Configure iSCSI Target

To configure the iSCSI service, click Services on the toolbar below the FreeNAS logo and then click the small wrench icon next to iSCSI. Click Portals on the menu bar at the top of the iSCSI tab. Click Add Portal. Accept the default 0.0.0.0:3260 and click OK.


Click Authorized Initiator and then “Add Authorized Initiator”. Accept the defaults of ALL and ALL by clicking on OK.


The next step is to create an extent. This will be the hard disk presented to the Initiator. In fact, it is a file on the FreeNAS server which will act as a virtual hard disk. The size of the file created will determine the size of the iSCSI hard disk.

Click Extents and Add Extent. Add an Extent Name (eg. extent1). Then add a full pathname for the file extent in the Path to the extent field. Click Browse to find your storage (eg. /mnt/store) and then add a filename to the end (eg. /mnt/store/extent1).

Now enter a size for the extent which is in bytes. 10GB is 10,737,418,240 bytes, 100GB is 107,374,182,400 bytes and so on. (Note: You mustn’t enter the commas). Click OK.


When an iSCSI Initiator connects to an iSCSI server it connects to a Target. To create a Target click Targets and Add Target. Enter a Target Name (eg. target1), select Disk from the Type drop down menu. Select 1 for the Portal Group ID and the Initiator Group ID and click OK.


Finally the Target needs to be associated with the Extent so that when the iSCSI Initiator connects to the target it uses the corresponding extent. Click Associated Targets and Add Extent to Target. Select target1 from the Target drop down list and extent1 from the Extent drop down list. Click OK.


To enable the iSCSI service, click Services and click the iSCSI Off switch to make it go from “Off” to “On.”

Connecting from Windows 7

The iSCSI Target is now all configured. iSCSI Initiator software is available for most platforms including Mac OS X and Linux. Windows Vista and Windows 7 has it built-in to the OS. Windows XP and Windows 2003 server users can download the Microsoft iSCSI Software Initiator from Microsoft Downloads.

In Windows 7, click the Start Menu icon and type iSCSI in the search box. Click iSCSI Initiator. In the Quick Connect section enter the IP address of the FreeNAS server in the “Target:” field and click Quick Connect


The “Quick Connect” dialog will appear listing a discovered target. The name of the target will be the same as the name set in the “Target Global Configuration” section of the iSCSI tab on the FreeNAS server (eg. iqn.2011-03.example.org.istgt). Click Done.

On the iSCSI Initator Properies window click the discovered target (eg. iqn.2011-03.example.org.istgt:target1) and click Connect. Wait for the “Connect To Target” dialog and click OK.


Windows is now connected to the iSCSI drive (which is really a file based extent on the FreeNAS server). To use the drive start the Disk Management program by typing diskmgmt.msc in the search box of the Start Menu and click diskmgmt.msc.

The first time the Disk Management program starts it will detect the uninitialized iSCSI drive and prepare to initialize it. Click OK.


The disk will then become available for formatting etc. To format it, right click on the Unallocated partition and click New Simple Volume… Go through the “New Simple Volume Wizard” accepting the defaults. Note you may want to assign a different drive letter other than the one suggested by Windows.

Once the format is complete the drive will appear just like any other hard drive in Windows Explorer.


Conclusion

FreeNAS 8 can act as an iSCSI Target for several iSCSI devices with the only limit being storage space available. Assuming your FreeNAS server has the memory and CPU resources available and that your network can support the throughput, FreeNAS offers an easy way to deploy iSCSI on your home or business network.

Will SAS and SATA replace SCSI technology?

It's actually a bit more complicated than SATA and SAS replacing SCSI. Traditional parallel SCSI is a tried-and-true disk interface that's been around for decades. SCSI currently offers very fast burst data transfers of 320 megabytes per second (MBps) using today's 16-bit Ultra320 SCSI interface.

SCSI also offers features such as Tagged Command Queueing (TCQ), to improve I/O performance. SCSI hard drives are noted for their reliability, and it's possible to daisy-chain up to 15 devices per SCSI adapter channel over short distances. These features have made SCSI a good choice for performance-oriented desktops and workstations, all the way up to enterprise-class servers -- even to this day.

SAS drives follow the SCSI command set and carry many of the same characteristics of reliability and performance found in SCSI drives, but they employ a 300 MBps serial version of the SCSI interface. Although this is a bit slower than SCSI at 320 MBps, a SAS interface can support up to 128 devices over longer distances than Ultra320 and can be expanded to 16,000 devices on a channel. SAS adoption still has a long way to go in the enterprise. SAS drives offer the same reliability and the same 10,000-15,000 rpm rotational speeds that SCSI drives do.

SATA drives forego some of that performance and reliability of SCSI and SAS drives in favor of sheer storage capacity and lower cost. For example, SATA drives have now reached 1 TB. SATA has been embraced where maximum storage capacity is needed, such as disk backups and archiving. SATA currently offers point-to-point connections up to 300 MBps, which easily exceeds the traditional 150 MBps parallel ATA interface.

So while SCSI works fine, traditional SCSI is reaching the end of its practical service life. A 320 MBps parallel SCSI interface won't go much faster at the distances of today's SCSI cables. By comparison, SATA drives should reach 600 MBps in the near future, and SAS drives have a roadmap out to 1200 MBps. SATA drives can also run on the SAS interface, so these drives can be mixed in the same storage system. The potential for expandability and data transfer performance is just overwhelming SCSI.

But SCSI isn't going away any time soon. You'll see SCSI linger on small to midsized servers for a few years. As the hardware is updated, SCSI will be systematically replaced by SAS/SATA disk arrays for faster speed and superior connectivity.

My Diskless Server : MSI MS-S0651 Quad LAN 10 SATA

The MSI MS-S0651 is the only rug server motherboard that I have found to have four (4) NICs, yes that is true it have quad network interface controller card power by Intel 82574L Gigabit Ethernet. Apart from 4X LAN it is also equip with ten (10) SATA of which 6 SATA is 3.0 and 4 SATA is 2.0 good enough to boost my Diskless Server. CCBoot 3.0 is much favorable for this Mobo serving 30 to 70 clients if the hardware is much together with the specifications.


The most significant that MS-S0651 can do the job is when all four (4) Intel 82574L Gigabit Ethernet controllers are aggregated, it can be Team together and this can give roughly 4Gbps to eliminate the bottleneck when the BattleLAN gamers are onboard.

Hardware overview


Specifications

CPU
  • Single Intel® Core i3/ i5/ i7, Pentium G, Celeron G series
Core Chipset
  • Intel H77 chipset
Memory Support
  • 4 x DDR3 DIMM slots
  • Support DDR3 1066/1333/1600 MHz Unbuffered non-ECC Memory
  • Supports Max. 32GB
  • Ivy Bridge supports up to 1600 MHz
Slot
  • 1 x PCI Expressx16 slot
  • 2 x PCI Expressx1 slot
Storage Interface
  • SATA
    • 2 x SATA 6Gb/s ports by Intel H77 chipset (SATA1-2)
    • 4 x SATA 3Gb/s ports by Intel H77 chipset (SATA 3-6)
    • 4 x SATA 6Gb/s ports by ASMEDIA ASM1061 chipset (SATA7-10)
  • RAID
    • -SATA1-6 support Intel Rapid Storage Technology (RAID 0/1/5/10)
Input / Output Connectors
  • Rear I/O Port
    • 4 USB 2.0 ports
    • 2 USB 2.0 ports
    • 1 Serial port
    • 1 D-sub VGA port
    • 4 Gigabit LAN Jacks
  • On-Board Connector
    • 1 SPI Flash ROM pinheader
    • 1 Serial port
    • 1 TPM [omjeader
    • 2 front panel pinheader
    • 1 PS/2 Keyboard/mouse pinheader
    • 1 8-pin power connector
    • 1 24-pin power connector
    • 4 system fan connector
    • 1 CPU fan connector
    • 2 USB 2.0 pinheader
    • 1 USB 3.0 pinheader
    • 1 chassis intrusion pinheader
    • 1 clear CMOS pinheader
LAN Interface
  • Support 4x Intel 82574L Gigabit Ethernet controllers
Hardware monitor controller
  • N/A
Board Size
  • 30.5cm x 24.5cm (ATX)

Dec 12, 2014

HP ProLiant DL380p Gen8 Server Review

As StorageReview expands our enterprise test lab, we're finding a greater need for additional latest generation servers (like the HP D380p Gen8); not just from a storage perspective, but from a more global enterprise environment simulation perspective as well. As we test larger arrays and faster interconnects, we need platforms like the HP DL380p to be able to deliver the workload payload required to these arrays and related equipment. Additionally, as PCIe storage matures, the latest application accelerators rely on third-generation PCIe for maximum throughput. Lastly, there's a compatibility element we're adding to enterprise testing, ensuring we can provide results across a variety of compute platforms. To that end HP has sent us their eighth-generation (Gen8) DL380p ProLiant, a mainstream 2U server that we're using in-lab for a variety of testing scenarios.
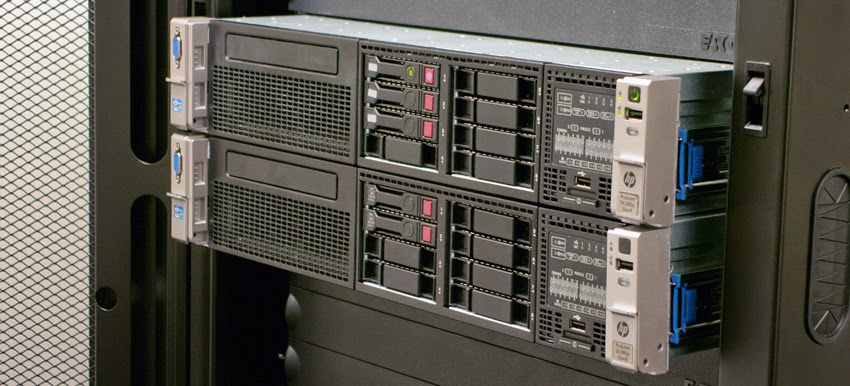

While some may wonder about the relevancy of reviewing servers on a storage website, it's important to realize how vital the compute platform is to storage performance, both directly and indirectly. When testing the latest PCIe Application Accelerators for example, for maximum throughput, it's critical to make sure compute servers are ready in areas ranging from hardware compatibility, performance scaling and saturation, to even often overlooked elements like how a server manages cooling.

Case in point, most 2U servers use riser boards for PCIe expansion, and knowing what drives those slots is just as important as the slots themselves. If one 16-lane PCIe slot is being shared for three slots, those may under-perform compared to a solution that uses two 16-lane PCIe slots to share between three riser slots. We also have an eye toward how well manufacturers make use of the cramped real-estate inside 1U and 2U servers, as all are not created equal. Items in this category can vary from everything from cable management to how many features are integrated versus requiring add-on cards, leaving PCIe expansion entirely open to the end-user instead of utilizing those slots for RAID cards or additional LAN NICs. Even the way server vendors handle the traditional SATA/SAS bays can be vastly different which could be the difference between an ideal server/storage relationship and one that is less desirable.

The HP ProLiant DL380p Gen8 Server series is comprised of 2U, 2-socket compute servers that feature a Smart Array P420i RAID controller with up to 2GB Flash Backed Write Cache (FBWC), up to five PCIe 3.0 expansion slots and one PCIe 2.0 expansion slot, and extensive built-in management capabilities. Our server accepts small form factor (SFF) 2.5-inch SAS, SATA, or SSD drives, while other configurations of the ProLiant DL380p Gen8 servers accepting large form factor (LFF) 3.5-inch drives are also available.

Our HP ProLiant DL380p Gen8 Specifications:
  • Intel Xeon E5-2640 (6 core, 2.50 GHz, 15MB, 95W)
  • Windows Server 2008 R2 SP1 64-Bit
  • Intel C600 Chipset
  • Memory - 64GB (8 x 8GB) 1333Mhz DDR3 Registered RDIMMs
    • 768 GB (24 DIMMs x 32G 2R) Max
  • PCI-Express Slots
    • 1 x PCIe 3.0 x16
    • 1 x PCIe 3.0 x8
    • 1 x PCIe 2.0 x8 (x4 electric)
  • Ethernet - 1Gb 331FLR Ethernet Adapter 4 Ports
  • Boot Drive - 600GB 10,000RPM SAS x 2 (RAID1)
  • Storage Bays - 8 x 2.5" SAS/SATA hot swap
    • Smart Array P420i Controller
  • I/O Ports
    • 7 x USB 2.0 (2 front, 4 rear and 1 internal)
    • 2 x VGA connector (front/rear)
    • Internal SD-Card slot
  • Management
    • HP Insight Control Environment
    • HP iLO 4; hardware-based power capping
  • Form Factor - 2P/2U Rack
  • Power
    • 460W Common Slot Platinum Hot Plug
  • HP Standard Limited Warranty - 3 Years Parts and on-site Labor, Next Business Day
  • Full HP ProLiant DL380p Specifications
Hardware Options

The DL380p Gen8 series features configurations with up to two Intel Xeon E5-2600 family processors, up to five PCI-Express 3.0 expansion slots and one PCI-Express 2.0 slot (three with single CPU, six with dual CPU). The standard riser configuration per CPU includes one x16 PCIe 3.0 slot, one x8 PCIe 3.0 slot, and one x8 PCIe 2.0 slot. HP offers different configuration options, with an optional riser that supports two x16 PCIe 3.0 slots. The unit can also support up to two 150W single-width graphics cards in a two processor, two riser configuration with an additional power feed.


Each Intel Xeon E5-2600 processor socket contains four memory channels that support three DIMMs each for a total of 12 DIMMs per installed processor or a grand total of 24 DIMMs per server. ProLiant DL380p Gen8 supports HP SmartMemory RDIMMs, UDIMMs, and LRDIMMs up to 128GB capacity at 1600MHz or 768GB maximum capacity.


HP FlexibleLOM provides bandwidth options (1G and 10G) and network fabric (Ethernet, FCoE, InfiniBand), with an upgrade path to 20G and 40G when the technology becomes available. HP ProLiant DL380p Gen8 provides a dedicated iLO port and the iLO Management Engine including Intelligent Provisioning, Agentless Management, Active Health System, and embedded Remote Support. This layout allows users to manage the DL380p, without taking over a port from the other four 1GbE offered on-board.

Monitoring and Management

HP Active Health System provides health and configuration logging with HP’s Agentless Management for hardware monitoring and alerts. Automated Energy Optimization analyzes and responds to the ProLiant DL380p Gen8’s array of internal temperature sensors and can signal self-identification location and inventory to HP Insight Control. The HP ProLiant DL380p Gen8 is Energy Star qualified and supports HP's Common Slot power supplies allow for commonality of power supplies across HP solutions. If you configure a ProLiant DL380p Gen8 with HP Platinum Plus common-slot power supplies, the power system can communicate with the company’s Intelligent PDU series to enable redundant supplies to be plugged into redundant power distribution units.

HP also offers three interoperable management solutions for the ProLiant DL380p Gen 8: Insight Control, Matrix Operating Environment, and iLo. HP Insight Control provides infrastructure management to deploy, migrate, monitor, remote control, and optimize infrastructure through a single management console. Versions of Insight Control are available for Linux and Windows central management servers. The HP Matrix Operating Environment (Matrix OE) infrastructure management solution includes automated provisioning, optimization, and recovery management capabilities for HP CloudSystem Matrix, HP’s private cloud and Infrastructure as a Service (IaaS) platform.
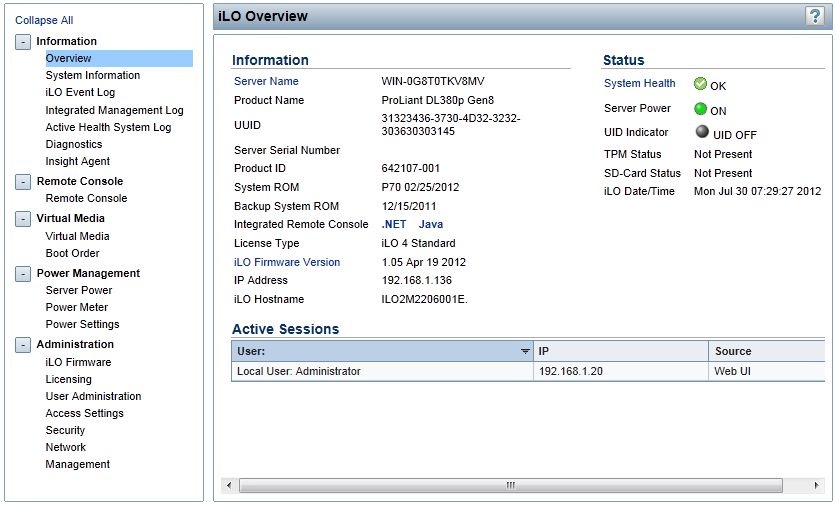

HP iLO management processors virtualize system controls for server setup, health monitoring, power and thermal control, and remote administration. HP iLO functions without additional software installation regardless of the servers' state of operation. Basic system board management functions, diagnostics, and essential Lights-Out functionality ships standard across all HP ProLiant Gen8 rack, tower and blade servers. Advanced functionality, such as graphical remote console, multi-user collaboration, and video record/playback can be activated with optional iLO Advanced or iLO Advanced for BladeSystem licenses.


Some of the primary features enabled with advanced iLO functionality include remote console support beyond BIOS access or advanced power monitoring capabilities to see how much power the server is drawing over a given period of time. In our case our system shipped with basic iLO support, which gave us the ability to remotely power on or off the system or provided remote console support (which ended as soon as the OS started to boot). Depending on the installation, many users can probably get by without the advanced features, but when tying the server into large scale-out environments, the advanced iLo featureset can really streamline remote management.

Design and Build

Our DL380p Gen8 review model came with a Sliding-Rack Rail Kit and an ambidextrous Cable Management Arm. The rail kit system offers tool-free installation for racks with square or round mounting holes and features an adjustment range of 24-36 inches and quick release levers. Installation into telco racks requires a third-party option kit. The sliding-rack and cable management arm work together, allowing IT to service the DL380p by sliding it out of the rack without disconnecting any cables from the server. Buyers opting for a more basic approach can still buy the DL380p without rails, or with a basic non-sliding friction mount.


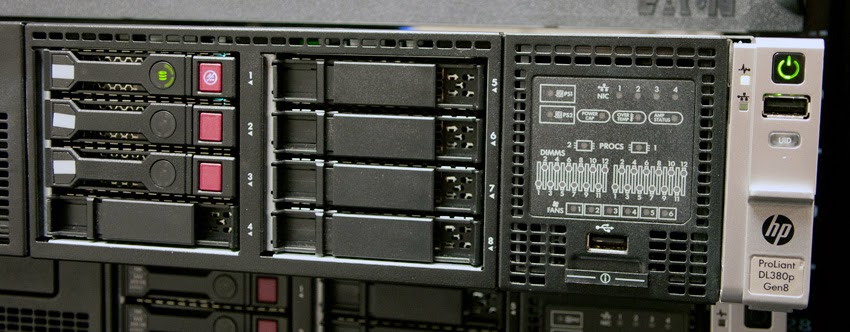
The front of the DL380p features one VGA out and two USB ports. Our unit features eight small form factor (SFF) SAS hot-plug drive bays. There is space for an optional optical drive at to the left of the hot plug bays. With a quick glance of the status LEDs on the front, users can diagnose server failures or make sure everything is running smoothly. If no failures have occurred, the system health LEDs are green. If a failure has occurred, but a redundant feature has enabled the system to continue running, the LED will be amber. If the failure is critical and causes shutdown, the LED illuminates red. If the issue is serviceable without removing the server hood, the External Health LED illuminates. If the hood must be removed, the Internal Health LED illuminates.

The level of detail that HP put into the DL380p is fairly impressive at times, with items as simple as drive trays getting all the bells and whistles. The drive tray includes rotating disk activity LEDs, indicators to tell you when a drive is powered on, and even when not to eject a drive. At times when it seems that all hard drives or SSDs get simple blinking activity LEDs, HP goes the extra mile to provide users with as much information as they can absorb just by looking at the front of the server.


Connectivity is handled from both the front and rear of the DL380p. VGA and USB ports are found on both sides of the server for easy management, although both VGA ports can't be used simultaneously. Additional ports such as a serial interface, and more USB ports can be found on the back of the server along with FlexibleLOM ports (four 1GbE in our configuration) and the iLO LAN connector. To get the ProLiant DL380p Gen8 server up and running immediately, HP ships these servers standard with a 6-foot C-14 to C13 power cord for use with a PDU.
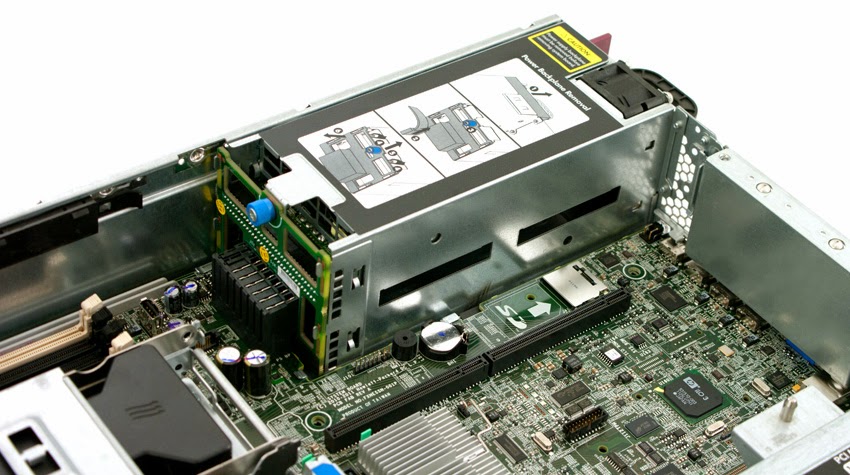

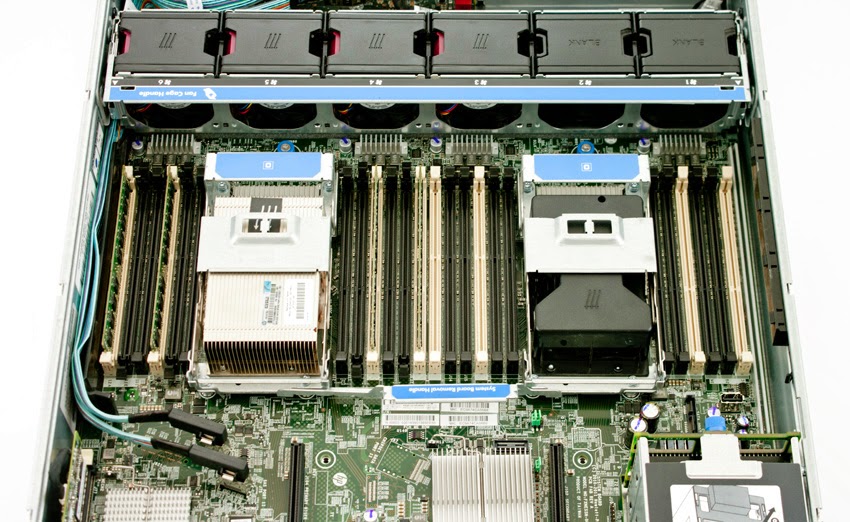
Internally, HP put substantial effort into making the ProLiant DL380p Gen8 easy to service while packing the most features they could into the small 2U form-factor. The first thing buyers will notice is the cabling, or lack thereof, inside the server chassis. Many of the basic features are routed on the motherboard itself, including what tends to be cluttered power cabling. Other tightly-integrated items including the on-board FlexibleLOM 4-port 1GbE NIC and the Smart Array P420i RAID controller, adding network and drive connectivity without taking over any PCIe slots. In a sense this allows buyers to have their cake and eat it too, packing the DL380p with almost every feature and still leaving room for fast PCIe application accelerators or high-speed aftermarket networking interconnects such as 10/40GbE or 56Gb/s InfiniBand.
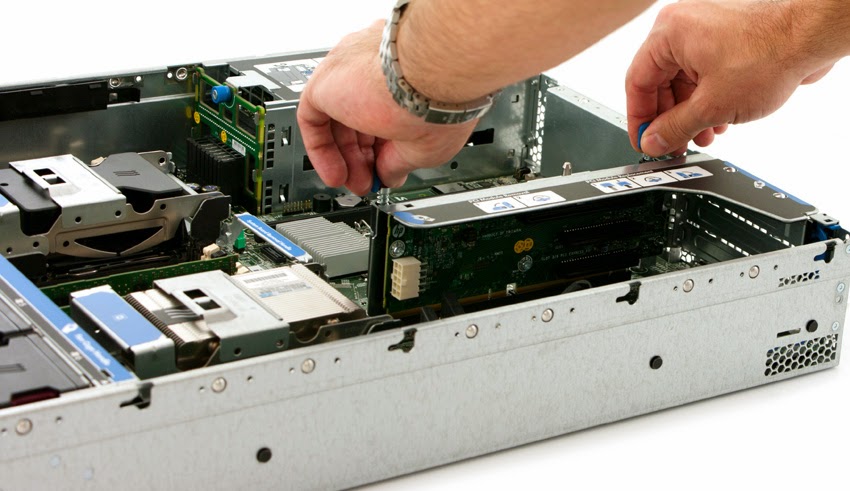

When it comes time to install new hardware or quickly replace faulty buyers or their IT departments will enjoy the tool-free serviceable sections of the DL380p. No matter if you are swapping out system memory, replacing a processor, or even installing a new PCIe add-on card, you don't need to break out a screwdriver. HP also includes a full hardware diagram on the inside of the system cover, making it easy to identify components when it comes time to replacing them.

Cooling

Inside most server chassis, cooling and cable management can go hand in hand. While you can overcome some issues with brute force cooling, a more graceful approach is to remove intrusive cabling that can disrupt proper airflow for efficient and quiet cooling. HP went to great lengths integrating most cables found in servers, including power cabling, or went with flat cables tucked against one side for data connections. You can see this with the on-board Smart Array P420i RAID controller that connects to the front drive bay with flat mini-SAS cables.


While keeping a server cool is just one task to accomplish inside a server, making sure it works and is easily field-serviceable are two distinct items. All fans on the HP DL380p held in with quick-connects, and can be swapped out by removing the top lid in seconds.

On the cooling side of things, the DL380p does a great job of providing dedicated airflow for all the components inside the server chassis, including add-on PCIe solutions. Through the BIOS, users can change the amount of cooling needed, including overriding all automatic cooling options to force max airflow if the need arises. If that's the case, make sure no loose paperwork is around, as it will surely be sucked to the front bezel from the tornado of airflow. In our testing with PCIe Application Accelerators installed and stressed, stock cooling, or slightly increased cooling was enough to keep everything operating smoothly.

Power Efficiency

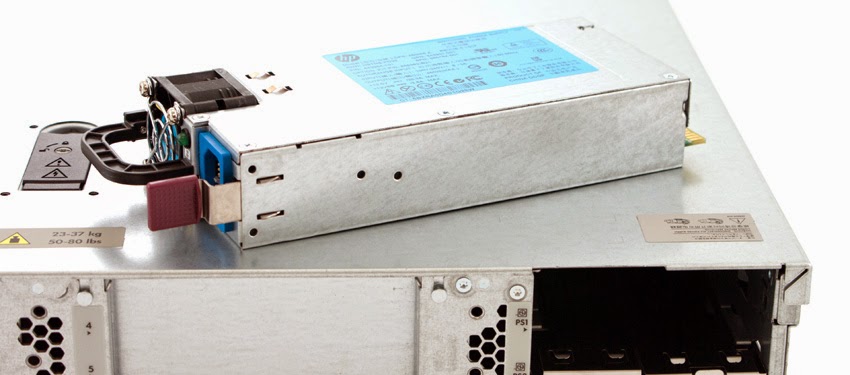
HP is making a big push into higher efficiency servers that can be seen across the board with a greater push for lower power-draw components. The ProLiant DL380p includes a high-efficiency power supply, our model is equipped with the 94% efficient Common Slot Platinum PSU.


Less power is wasted as heat in the AC to DC conversion process, which means that for every 100 watts you send your power supply, 94 watts reaches the server, instead of 75 watts or less with older models.

Conclusion

We've logged hands on time with just about every major server brand, and even some not so major brands. The one thing that resonates with the HP Gen8 ProLiants is just how tightly they're put together. The interior layouts are clean, cabling is tucked away (or completely integrated with the motherboard) and thoughtfully done and even the PCIe riser boards support the latest generation PCIe storage cards. From a storage perspective, the latter is certainly key, if an enterprise is going to invest in the latest and greatest storage technology, the server better support the expected throughput.

While this first part of our HP ProLiant DL380p review gives a comprehensive overview of the system itself, part two will incorporate performance and compatibility testing with a wide array of storage products. While most SATA and SAS drives will perform roughly the same in any system, the latest PCIe storage solutions have a way of separating the men from the boys in the server world. Stay tuned for our second review installment that will cover these storage concerns and other key areas such as multi-OS performance variability.

Availability

HP ProLiantDL380p Gen8 Servers start $2,569 and are available now.

MSI MS-9A58 Quad LAN Review

MSI IPC launches MS-9A58 industrial system, a compact and fanless embedded IPC powered by an Intel® Atom™ D525 processor with DDR3 support and integrated display interface. It enables much better power savings, while providing top performance and rich I/O capability.


MS-9A58 is powered by the latest Intel® Atom™ D525 dual core processors with DD3 memory up to 4GB for D525. With integrated graphics and memory controllers, these processors deliver graphics core rendering speeds from 200 to 400 MHz while maintaining excellent power efficiency. In addition to higher speeds and less power consumption. The Intel® GMA 3150 graphics engine is built into the chipset to provide fast graphics performance, high visual quality, and flexible display options without the need for a separate graphics card. With a compact mini-ITX system size, system developers get the freedom to design small embedded applications.


MS-9A58 supports 4 Intel 82574L Gb LAN Ports, including one pair of single latch support auto-bypass function. For the storage application, it supports 2 SATA ports. To satisfy increasing demands of connecting more peripheral devices, MS-9A58 is equipped with abundant I/O design, includes one RS-232 and one RS-232/422/485 serial ports with auto-flow control, two COM ports and 6 USB 2.0 ports. Expansion capabilities include two PCI slots, one PCIex1 slot and one mini-PCIe slot. For the internet demand, MS-9A58 comes with a module that has a built-in WiFi 802.11b/g/n module function. MS-9A58 supports ATX and wide range DC 12V / 19V / 24V inputs as the different BOM option.


Key Features:
1. Intel® Pineview D525 Dual Core CPU
2. DDR3 SoDIMM for better memory supply
3. 2 SATA Ports for Storage Application
4. 4 Intel 82574L Gb LAN Ports, including one pair of single latch support auto-bypass function
5. Built-in WiFi 802.11b/g/n module function
6. Wide Range Voltage Input for DC Sku (12/19/24V)
7. Support DirectX10, Shadier Model 4.0 and Intel® Clear Video Technology

With a compact mini-ITX size, MS-9A58 is designed with rich I/O functionality and has the new levels of performance and graphics for the demand in network security applications, such as small business VPN (Virtual Private Network ), VoIP (Voice over Internet Protocol ), SAN (Storage Area Network) and NAS (Network Attached Storage).

The MSI MS-9A58 Quad LAN is really best for embedded system like OpenWrt, pfSense, MonoWall, SmoothWall, DD-Wrt, ZeroShell not to mention other Linux network security OS. Home file server is also applicable such as FreeNAS and SimplyNAS.

CCBoot 3.0 : Server Hardware Requirements

Here is the recommended server hardware for diskless boot with CCBoot.

1.] CPU: Intel or AMD Processor 4 Core or more.
2.] Motherboard: Server motherboard that supports 8GB or more RAM, 6 or more SATA Ports.
3.] RAM: 8GB DDR3 or more.
4.] Hard Disk:At first, we introduce some items.
Image disk: the hard disk that stores the client OS boot data. We call it as "image".
Game disk: the hard disks that store the game data.
Writeback disk: the hard disks that store the client write data. In diskless booting, all data are read and wrote from server. So we need writeback disk to save the client's write data. Other products are also named it as "write cache".

1) One SATA HDD is used for server OS (C:\) and image disk(D:\); some users put image file into SSD disk. It's not necessary. We have RAM cache for image. All image data will be loaded from RAM cache at last. So put image file into SSD disk is not necessary.

2) Two SATA HDD are set up on RAID0 for Game Disk.
We recommend to use Win2008 disk manager to setup RAID0 instead of hardware RAID in BIOS. We recommend to set SATA mode as AHCI in BIOS. Because AHCI is better for writeback disks' write performance. For more information, please refer to AHCI on wiki. In the BIOS, SATA mode can only be one of AHCI and RAID. If we set it as AHCI, the RAID function of the motherboard will be invalid. So we use Win2008 disk manager to setup RAID0. The performance is same as hardware RAID0. Note: If you skip RAID0, the read speed of the game may become slow. But if the clients are less than 50 with SSD cache, it is OK to skip RAID0.

3) One SSD disk for SSD cache. (120G+)

4) Two SATA/SAS/SSD HDD is used for client write-back disk. We do NOT recommend to use RAID for write-back disks. If one disk is broken, we can use the other one. If using RAID for writeback disk, one disk broken will cause all clients stop. On the other hand, CCBoot can do balance for writeback disk. Two disks write performance is better than one RAID disk. Using SSD as writeback disk is better than SATA. SSD has good IOPS. The street said the writing activities are harmful for the lifetime of SSD. In our experience, one SSD for writeback disk can be used for three years at least. It's enough and worth.

Conclusion: You need to prepare 6 HDDs for the server normally. They are 5 SATA HDDs and 1 SSD HDD. 1 SATA for system OS, 2 SATA for game disks, 2 SATA for writeback disks and 1 SSD for cache.

For 25 - 30 client PCs, server should have 8G DDR3 RAM and two writeback disks.
For 30 - 70 client PCs, server should have 16G DDR3 RAM and two writeback disks.
For 70 - 100 client PCs, server should have 32G DDR3 RAM and two writeback disks.
For 100+ client PCs, we recommend to use 2 or more Servers with load balance.
Network: 1000Mb Ethernet or 2 * 1000 Mb Ethernet team network. We recommend Intel and Realtek 1000M Series.