Jan 18, 2014

Streamyx Certified DSL Modem

Below are the list of Streamyx certified DSL Modems and their corresponding vendors.

ADSL2 MODEM-TESTED WITH ALL DSLAM/RDSLAM/RTDSLAM & MSAN
MODEL
INTERFACE
FIRMWARE VERSION
D-LINK DSL-520B
Ethernet Router
3.10L.01.A2pB022g.d20e
D-LINK DSL-2542B
Ethernet 4-port Ethernet Router
V1.00B01T01.GE.20070703
D-LINK DSL-2740B
Ethernet 4-port Ethernet+ Wireless Router
EU_DSL-2740B_3.06L.04V_0.11_M.A2pB021c.d17m
RIGER TC-505GL
4 ethernet port, 1 uplink dsl
v.1.022-15j
EchoLife HG520B
Ethernet 4-port Wireless Router
3.10.14.0-1.0.7.0
Riger DB120
Ethernet 4-port Ethernet Router
3.08L.01.A2pB022c.d20d
BiPAC 5200 R4
Ethernet 4-port WirelessG
2.11.38.0(RE0.C29)3.10.5.0
BiPAC 5112S
Ethernet 1-port
2.7.0.38(UE0.B1C)3.5.18.0
Hurricane 5200
Ethernet 1-port
1.3.9-Std 1.3
ZyXEL P-660HW-T1 v2
Ethernet 4-port with wireless
V.3.40 (AZX.0)
ZyXEL P-660R-T1 v2
Ethernet 1-port
V.3.40 (AGJ.3)
SMC7901WBRA1
Ethernet 1-port with wireless
1.3.9
D-Link DSL 2600-u
Ethernet 1-port with wireless
3.12L.01.A2pB023k.d20k_rc2
Prolink Hurricane 5301G
Ethernet 1-port with wireless
1.3.9-Std G1.7T
ZyXEL P-660W-T1 v2
Ethernet 1-port with wireless
3.5.18.8_A_TC
Innacomm D2100
Ethernet 1-port
1.3.9
Innacomm W3100
Ethernet 1-port with wireless
1.3.9
WIC  Cisco SHDSL Card
SHDSL Card for router
12.4(15)T6
SMC7901BRA4
Ethernet 1-port
1.3.9
SMC7901WBRA1
Ethernet 1-port with wireless
1.3.9
3Com ADSL 0231A50Y Card
adsl card one port
CMW520-R1718-SI
3Com SHDSL 0231A63H Card
adsl card one port
CMW520-R1718-SI
3Com SHDSL 0231A54D
adsl card one port
CMW520-R1718-SI
Riger DB 120-WL
Ethernet 4-port + Wireless Router
3.12L.S_02.A2pB023k.d20k_rc2
BiPAC 8500
Ethernet 4-port
Helium 210-80 Shdsl (orion) ver.1.00
WAG54G2
Ethernet 4-port with wireless
V1.00.17
WAG160Nv2
Ethernet 4-port with wireless
V2.00.11
Riger DB 108-WL
Ethernet 1-port + Wireless Router
DB108-WL ver.C1 C2
DSL1000EW
Ethernet 4-port with wireless
212.66.1
Baudtec
Ethernet 1-port + Wireless Router
RTK V2.1.1
DSL-2640B
Ethernet 4-port with wireless
GE_1.07
TM6841G
Ethernet 4-port with wireless
DMT FwVer: 3.12.2.0_A_TC
W3400V
Ethernet 4-port with wireless
W3400V-4.02L.03-TM
TC-505GL
Shdsl modem
G.bis,v 1.023-6
DB102
Ethernet 1-port
TM-58-DB102
WAG120N
Ethernet 4-port with wireless
V1.00.13
Riger AR-5211
Ethernet 4-port
A011-306CHT-C02_R02
Belkin Basic F7D1401v1
Ethernet 4-port Wireless Modem Router
1.00.31 (Mar 11 2010 08:28:53)
Belkin Share F7D3402v1
Ethernet 4-port Wireless Modem Router
1.00.39 (Apr 13 2010)
Belkin Surf F7D2401v1
Ethernet 4-port Wireless Modem Router
1.00.31 (Mar 11 2010 08:32:28)
ASUS DSL-N11
Ethernet 4-port Wireless Modem Router
V0.00.17
Planet ADW-4401
Ethernet 4-port Wireless Router
V2.1.2 
Thomson TG784n
Ethernet 4-port Wireless & VoIP Gateway
8.4.H.A
Kasda KW5816
Ethernet 4-port Wireless Modem Router
4.02L.03.A2pB025c1.d21j2
Innacomm W3400V - upgrade wireless software
Ethernet 4-port with wireless
W3400V-4.02L.03-TM
ZyXel P-660HN-T1A
Ethernet 4-port Wireless Modem Router
3.12.8.6_TC3086
ASUS DSL-N10
Ethernet 4-port Wireless Modem Router
1.0.0.8
ZTE ZXV10 W300 Series
Ethernet 4-port Wireless Modem Router
W300V1.0.0a_ZRD_OV
One50 Multi-Service Access Router
Ethernet 4-port Wireless Router
ONEOS10-ADVIP-V4.2R6E13
Aztech DSL5005EN
Ethernet 4-port Wireless Modem Router
243.106.1.012
ASUS DSL-N12U
Ethernet 4-port Wireless Modem Router
V9008


Source tm.com.my

TM ADSL RIGER DB120-WL Default Username Password

Telekom Malaysia (TM) has just released new Streamyx ADSL modem for the subscribers the RIGER DB120-WL, a cloned by RIGER acquired from China the leading mass production country. Below is a quick information about this residential gateway device, if you happen to have this ADSL modem router wireless access point then you are also like me who's looking for the default username and password.

Product description:


DB120-WL is a 4-port wireless ADSL Modem, which can provide access to the Internet on Broadband mode, plus 4-port switch function. It integrates functions of Wifi Access Point and ADSL Router. Downstream up to 8Mbps (ADSL) and 24Mbps (ADSL2+), upstream is 1Mbps, its 10/100Mbps Ethernet LAN connectivity, integrated wireless AP and WAN interfaces provide users the flexibility of Internet connection. The equipment can be deployed in companies, hotels, cafes, airports, stations, financial institutions or at home.


This is the login page of the ADSL RIGER DB120-WL, the default username is tmadmin while the password is must be like this Adm@XXXX (XXXX last 4 digit of your modem mac address). 

Download Specification
Manual

Login : tmadmin
Password : Adm@XXXX

The last four (4) digit MAC address of your modem can be found at the back you the device. Hope this will help you people who are Streamyx users. Enjoy!


Please do not be surprised the RIGER DB120-WL has many cloned or being repainted by other suppliers.

Jan 17, 2014

pfSense Multi Wan Load Balancing

Here's How-To balance a Multi WAN in PFSense?

Go to System tab and select Routing option .Select gateway tab and hit on + positive sign .A page open here select first Wan interface ,inter ISPR name and add gateway address and add description as you like then save and apply changes.

Add same for second Wan interface.

Go to System tab and select Routing option .Select gateway tab and hit on + positive sign. A page open here select first Wan interface ,inter ISPR name and add gateway address and add description as you like then save and apply changes.

Note : don't select any one as a default in a balancing and failover condition.

  1. Add interface
  2. Add ISPR name
  3. Add ISPR gateway IP
  4. Add description
  5. Save Setting
  6. Apply

Add three groups here.
One for Loadbalancing(add same tier for both interface)

One for Wan one failover(add different tiers for both interface like as add first one gateway on tier 1 and second one gateway on 2 tier)

One for Wan two failover(add different tiers for both interface like as add first one gateway on tier 2 and second one gateway on 1 tier)


Next Step…… Go on routing option and select Groups, hit on = positive sign then a window appeared .Give a specific group name, add both Wan gateway Tier add here.

Note: If we select same Tier on both wan gateways it means Routing work as a load balancing.
If select different Tiers it mean Routing work as a fail over Condition.

Link Priority
The priority selected here defines in what order fail over and balancing of links will be done. Multiple links of the same priority will balance connections until all links in the priority will be exhausted. If all links in a priority level are exhausted we will use the next available link(s) in the next priority level.

After that add description and save then apply setting.

Now the next step is to down Firewall tab and select Rule option.
In a firewall rule option select the LAN interface.Only one default added here that show on top.

Add three Firewall rules for accurate balancing.
First one rule for balancing
Second one for Wan 1 failover
Third one for Wan 2 failover

That rules have same setting but only one thing necessary that is gateway change.
In a first rule add gateway as "bothgateway".
In a second rule add gateway as "Wan 1 failover".
In a third rule add gateway as "Wan 2 failover".

You can see on a print screen


First Rule(Gateway)


Second Rule(Gateway)


Third Rule(Gateway)


All these setting are relevant to load balancing.

How-To pfSense and TM Unifi as PPPoE Server

This is to show you how to enable pfSense 2.x and use TMNet’s Unifi.

Important to note that inorder to “dial” into Unifi, you must fire the PPPoE through a VLAN and those are VLAN 500 for your regular internet browsing and VLAN 600 for your Video. This guide is to setup basic internet using pfSense.

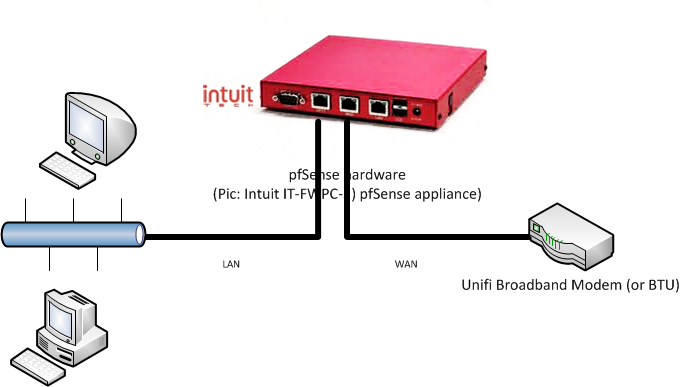
Assuming you are using at least 2 interfaces, the LAN (in this guide, eth0), which all your local networks (or regular users) are connected, the other interface is WAN (in this guide, eth 1) which will be the one that will dial into Unifi.


Your LAN can be easily configured to any IP which you wish your users to connect to. This will typically be the gateway IP address for your users. The interface we will discuss here is the WAN interface.

So summary of the steps to get it working;
  • Define the WAN interface as null (or none)
  • Setup VLAN 500 and tie it to the WAN interface or eth1
  • Setup PPPoE inside VLAN interface
1) Defining WAN interface as null.
Simply go to WAN interface and set it up as none. Save it. Setup like below


2) Define a new interface:
On pfSense’s main menu, click on Interfaces and click on (assign). Click on VLANs. Select WAN (or eth1) as the parent interface. Inside VLAN tag, enter 500. Put a nice description, like VLAN-TMUnifi there if you so wish. Click on save.


3) Setup PPPoE on the VLANned interface:
Now, click on Interfaces again, click on (assign). Click on the + to add a new interface and select the newly created VLAN-TMUnifi. Notice the interface name that was created for you like OPT1 or OPT2. Click on interfaces again, select (and in this example), OPT1. Click to enable the interface. Under type, select PPPoE. Scroll down to the username and password part. Enter your username and password respectively.

You can also rename your interface as for example, from OPT1 to UNIFPPP (for example):


Before you click on save, make sure you select, Block private and bogon networks. They should not pass through this interface (unlike interface LAN). Now, once you’ve save, click on the blue S icon on the top right of the page. If all config such as username and password is correct, you should see the interface come up like below:

If you have problems, click on, Status, click on System Log files then click on PPP. Any issues or errors will be shown there.

Once done, you need to setup gateways and routing correctly in order to route traffic over this new interface you just created and dialed.


You should set it up as default unless you have other gateways and such. Otherwise, setting it as default will quickly allow you to browse.

Well that’s it, also of course don’t forget to setup an allow rule from interface LAN to any (to begin with) and allow that connection. If you need to allow incoming connections, select the UNIFPPP interface instead of WAN and setup your inbound rules there.

Enjoy pfSense and the speed of Unifi!

Via pfSense Forum

Jan 16, 2014

Flashing And Upgrading Chinese MP4 Player Firmware

If your are not an audiophile and don't care much about audio/video quality, cheap chinese MP3/MP4 players are just for you, these devices are quite popular and just get the job done, since there is no quality control over these devices they do not last long, one of the most common problems faced with these portable players is the issue of firmware software corruption, I encountered a similar problem with my friends PMP which refused to start getting stuck at loading screen, the only solution was to flash the firmware but the problem was unavailability of any information and tools to get the job done, after long research and flashing the firmware I was able to successfully recover the MP4 player to working condition.

Here is an step-by-step tutorial on how to identify your MP4 player, download its firmware and flash it using appropriate tools :


WARNING : This procedure can render your device dead, so do not try if your player is working fine.

The most important step of the whole process is to correctly identify your device CONTROL CHIP and CPU, using wrong firmware or flashing tool may cause damage to your device, unscrew and open your device and write down all chip id's and motherboard numbers you see, you can also try the EasyChips - firmware identification utility but it did not worked for me.


You will now need to download the correct firmware and flashing utility for your device, visit sites below and search for your control chip and cpu to download the firmware and flashing utility, you can also post on user-forums to get help identifying the firmware :
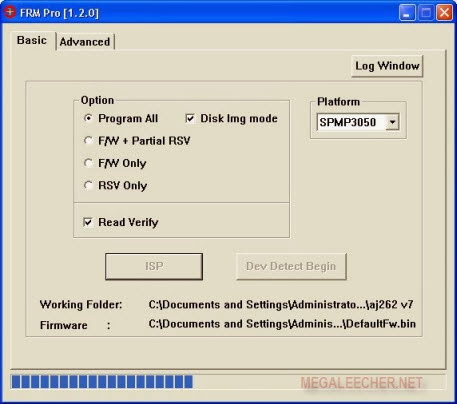
In my case the chipset was Sunplus AJ262-V7 and the utility needed to flash it was FRM Pro.
Once identified you need to connect your device to computer via USB in camera mode (Press A + OK button and plugin USB cord on player), for Windows to identify this mode you will need camera drivers you need to point Windows Found New Hardware Wizard to Driver folder downloaded with the FRM Pro utility above, this will install the first camera driver, for correct identification by flashing utility you need to install a second camera driver - open Windows Hardware Manager and install unidentified camera device drivers by pointing the driver wizard to Driver folder used earlier.

Now install and launch FSM Pro flashing utility and follow these instructions to install the new firmware.


Let the process finish, this will take a while, do not disconnect or interrupt the process until you see a success message in log window.


Unplug your PMP from computer and it should be working now.

Jan 15, 2014

New firmware for Mp4 Chinese player

Its technically not a new firmware because there are no enhancements. But it change the look of the player. You get a new user interface like the iphone style. You get a new opening and closing animation etc.


See the picture to see what the new interface looks like.

Warning it will only work on the player that look similar to the one in the picture.

For others who want to change their mp4 player firmware here is are some software you will need.

Download S1fwx to extract your firmware on to your computer

its a dos program just extract it and click extract.bat and let it run and when asked give the driver letter of your mp4 player. and it will download a file called dump.bin which is your mp4 players firmware.

It should take like 30 seconds or so.

Download S1res to edit your firmware

Once you download the firmware you can open the file in this program and edit the firmware by adding your own pictures or text etc.

Then using the mp3 player utilities upgrade tool update the player firmware.

The upgrade takes only 30 seconds or so. Be sure not to update the wrong firmware. Good luck

Download the New mp4 firmware here

How to: extract firmware of your player using the S1fwx tool

Here are the instructions on how to extract the firmware of your MP3/MP4 player using the S1fwx tool.

Note: This is NOT fully supported for 9.x.x firmwares as it is not able to extract your firmware fully. Please make sure your player's firmware version is 3.x.x for this to work properly.

The S1fwx tool can be downloaded here. This will only work for ACTIONS chipset players (ones that play .AMV video files).

1. Connect the player to your computer with the USB cable. Make sure your computer detects the player and a drive letter is allocated to your player from My Computer.

2. Download the S1fwx tool here. There is no installation required, just extract it to a folder.

3. Go the the folder that you extracted the S1fwx files.

4. Double click on the "extract.bat" file.

5. Press [enter] to let the software scan for your drive.

6. You will see the following screen below. Check the line that says "detected drives" and confirm that it's the same drive as your MPx player.


7. Press the drive letter that corresponds to your MPx player that is detected by the program. In this example, it's letter

8. After you press the drive letter of your player, you will see th following screen:


9. The S1fwx program will now read the flash:


10. Once the S1fwx program finishes extracting the firmware, you will see the following:


Press the [enter] button to close it.

11. Then the "unsafe removal of device" message comes up.


Press the [OK] button.

12. Go back to the folder that the S1fwx program is stored and you will now see a "dump.bin"
file stored there.


13. Now run the "repair.bat" file to prepare the file so it can be uploaded back into your player.


NOTE: If you do not run the "repair" on the your "dump.bin" file after extracting it using the S1fwx tool, then you will get ERRORS when trying to upload it to your player.

14. Go back to the folder that the S1fwx program is stored and you will now see another new file, "dump.bi$". The "dump.bi$" file was the original "dump.bin" file from step #12. The NEW "dump.bin" file is now repaired and ready to be modified and uploaded back into your player.


15. This new dump.bin is the backup of the firmware for your player, so keep it in a safe place. The dump.bi$ is not needed.

16. Once you have extracted your firmware, you can read this Knowledge Base - How to: Modify your firmware using s1res tool to modify the firmware with your own images.

MKVtools 3

OK. With the release of MKVtools 3, this is where it starts to get confusing, especially for users of previous versions of MKVtools. That version has been split into three new applications, all version 3. (See here for a list of the new apps and the reason for the split).

This is a new and improved version of MKVtools, which will focus on what the original version of MKVtools was not very good at - the creation and editing of MKV files. It will not, however, create MP4 or AVI files. As the name might imply, MK4tools is a graphical interface for a variety of tools useful for processing video files.

If you have found yourself here looking for MKVtools to convert videos to either MP4 or AVI videos, then you should download either M4tools or AVItools, not MKVtools. If you are a user of the original version of MKVtools and are looking for updates, see here.

Features:
  • Convert from a variety of video file formats like MKV, MP4, OGM and AVI into MKV videos..
  • Can convert most videos without having to re-encode the video track and/or the audio track, so processing takes minutes instead of hours and no quality is lost.
  • Simplified, intuitive user interface that takes the guess work out of processing MKV videos.
  • Ability to convert various surround sound audio to 5.1 AC3 or 5.1 AAC.
  • Intuitively select desired video, audio and/or subtitle tracks to process, with the ability to verify the selections using video preview.
  • Define presets for one step automated encoding and track selections settings.
  • Burn (i.e., hard code) subtitle tracks into the video, or mux (soft subtitles) from internal tracks or from external subtitle files commonly found on the internet.
  • Control the font, size and positioning of the embedded subtitles.
  • Split MKV videos into segments of a specified file size or by start/end time.
  • Turn off an MKV video's header removal compression to allow more compatibility with playback and editing.
  • Join MKV videos.
  • Extract the selected tracks from MKV videos as individual video and/or audio files.
  • Add jobs to a queue either individually or in batches via drag and drop so you can process multiple files overnight (registered copies only).
  • Apply one setting to a group of files for easy batch creations (registered copies only).
  • Enter a "Watch Mode" for which MKVtools will process all videos place in a defined folder (registered copies only).
System Requirements

MKVtools is Intel-only and requires Mac OS X 10.7.x or later. It has been tested on a MacBook Pro and a Mac Pro with no known issues.

MP4Tools

MP4tools is the part of the VIDEOtoolbox Suite of Applications used for the creation and editing of MP4 videos. It was primarily designed for processing videos files for use in hardware capable of playing MP4 or M4V videos, such as the iPhone, iPad, Apple TV and PS3. As the name might imply, MP4tools is a graphical interface for a variety of tools useful for processing video files.

Features:
  • Convert from a variety of video file formats like MKV, MP4, OGM and AVI into MP4 videos.
  • Can convert most videos without having to re-encode the video track and/or the audio track, so processing takes minutes instead of hours and no quality is lost.
  • Simplified, intuitive user interface that takes the guess work out of processing MP4 videos.
  • Ability to convert various surround sound audio to 5.1 AC3 or 5.1 AAC.
  • Intuitively select desired video, audio and/or subtitle tracks to process, with the ability to verify the selections using video preview.
  • Use presets for one step encoding for playback on common hardware such as the iPhone and Apple TV.
  • Define presets for one step automated encoding and track selections settings
  • Burn (i.e., hard code) subtitle tracks into the video, or mux (soft subtitles) from internal tracks or from external subtitle files commonly found on the internet.
  • Control the font, size and positioning of the embedded subtitles.
  • Split MP4 videos into segments of a specified file size or by start/end time.
  • Adjust the Pixel Aspect Ratio of MP4 videos.
  • Join MP4 videos.
  • Extract the selected tracks from MP4 videos as individual video and/or audio files.
  • Add jobs to a queue either individually or in batches via drag and drop so you can process multiple files overnight (registered copies only).
  • Apply one setting to a group of files for easy batch creations (registered copies only).
  • Enter a "Watch Mode" for which MP4tools will process all videos place in a defined folder (registered copies only).
System Requirements

MP4tools is Intel-only and requires Mac OS X 10.7.x or later. It has been tested on a MacBook Pro and a Mac Pro with no known issues.

AVItools

AVItools is the part of the VIDEOtoolbox Suite of Applications used for the creation and editing of AVI videos. It was primarily designed for processing videos files for use in DivX enabled DVD players, though the AVI videos it creates are also playable on hardware like the PS3 and Xbox 360. As the name might imply, AVItools is a graphical interface for a variety of tools useful for processing video files.

Features:
  • Simplified and intuitive user interface that simplifies the processing of AVI videos.
  • Convert from a variety of video file formats like MKV, MP4, OGM and AVI into AVI videos.
  • Ability to convert various surround sound audio to 5.1 AC3.
  • Intuitively select desired video, audio and/or subtitle tracks to process, with the ability to verify the selections using video preview.
  • Define presets for one step automated encoding and track selections settings for playback on common hardware.
  • Burn (i.e., hard code) subtitle tracks into the video from internal tracks or from external subtitle files commonly found on the internet.
  • Control the font, size and positioning of the embedded subtitles.
  • Split AVI videos into segments of a specified file size or by start/end time.
  • Join AVI videos.
  • Extract the selected tracks from AVI videos as individual video and/or audio files.
  • Add jobs to a queue either individually or in batches via drag and drop so you can process multiple files overnight (registered copies only).
  • Apply one setting to a group of files for easy batch creations (registered copies only).
  • Enter a "Watch Mode" for which AVItools will process all videos place in a defined folder (registered copies only).
System Requirements

AVItools is Intel-only and requires Mac OS X 10.7.x or later. It has been tested on a MacBook Pro and a Mac Pro with no known issues.

CompuApps OnBelay 2.0

Powerful solution for Data Backup, Data Recovery & Formatting for Flash Media.
CompuApps Inc., leader in Data Management solutions, is the pioneers of Flash media maintenance and recovery tools. Our new, improved version OnBelay V2 further strengthens the capabilities of the retrieving valuable data from the Flash media.


What's New in OnBelay V2?

New and improved support for enhanced recovery technologies for FAT and FAT32 File systems.

Inside Info Never before known information about your digital photographs. This information provides details on when the picture was taken, the Model and Make of the Digital Camera used, etc.

Product Description:

CompuApps, Inc is pleased to announce the release of OnBelay V2, a revolutionary recovery solution.

OnBelay V2 features innovative media recovery algorithms & advanced digital media recovery technology. We use patent pending algorithms to dig deep into the media to recover lost files.

CompuApps OnBelay V2 (Digital Photo and Data files Recovery Edition with Backup, Restore and Format options) is useful for Photographers, News agencies, Journalists, Security Specialists, Physicians, Corporations or individuals who use a Digital Camera or Camcorder, Notebook, Palmtop, PDA, Cellular phone, Digital Recorder, Portable Medical Equipment, Data Logger etc.

12 Solutions in 1 Product:
  • Backup
  • Duplicate
  • Digital Image Recovery
  • Professional RAW Digital Image Recovery
  • Digital Movie/Video Recovery
  • Digital Audio Recovery
  • Digital Data Recovery
  • Formatting*
  • Low-level recovery for SmartMedia, xD and Memory Stick*
  • Low-level backup for SmartMedia, xD and Memory Stick*
  • Low-level formatting for SmartMedia, xD and Memory Stick*
  • Panoramic Mode formatting support for SmartMedia*
* Requires CompuApps Recovery Pro V2 or any supported devices.

Safe And Easy: OnBelay can backup, duplicate, recover files & format Cards from many types of flash media that have been lost due to system or battery failure, format or deletion or corruption caused by hardware or software malfunction.

OnBelay for everyone: OnBelay is simple to use (designed for novice and expert) and can help recover your data using just a few clicks.

Risk Free: CompuApps OnBelay V2 (Digital Photo and Data files Recovery Edition with Backup, Restore and Format options) is risk free since it does not modify or write back to recovery media; it rescues your data and writes to a different location specified.

Download CompuApps OnBelay 2.0 here

VaioSoft Recovery Manager 1.5

This program restores valuable content. Recovery Manager can backup, duplicate, recover files, & format cards from many types of flash media that have been lost due to system or battery failure, format or deletion or corruption caused by hardware or software malfunction. Recovery Manager software can recover data from Digital film cards such as CompactFlash, SmartMedia, Memory Stick, MultiMediaCard (MMC), Secure Digital card (SD), IBM Microdrive, ATA PC card, Hard drives, ZIP, & Jazz drives. Digital Image Recovery.


It provides backup, duplicate, image recovery, audio and video recovery, formatting, and low-level recovery options for SmartMedia and MemoryStick cards. It supports removable devices connected to your IDE, PCMCIA, USB, FireWire, parallel and SCSI ports. It also supports recovering RAW files.

Download VaioSoft Recovery Manager 1.5 here

Understanding Flash Memory Cards

Removable Flash Memory Cards

There are a few reasons to use flash memory instead of a hard disk:
  • It has no moving parts, so it's noiseless.
  • It allows faster access.
  • It's smaller in size and lighter.
So why don't we just use flash memory for everything? Because the cost per megabyte for a hard disk is drastically cheaper, and the capacity is substantially more.

The solid-state floppy-disk card (SSFDC), better known as SmartMedia, was originally developed by Toshiba. SmartMedia cards are available in capacities ranging from 2 MB to 128 MB. The card itself is quite small, approximately 45 mm long, 37 mm wide and less than 1 mm thick.

As shown below, SmartMedia cards are extremely simple. A plane electrode is connected to the flash-memory chip by bonding wires. The flash-memory chip, plane electrode and bonding wires are embedded in a resin using a technique called over-molded thin package (OMTP). This allows everything to be integrated into a single package without the need for soldering.

The OMTP module is glued to a base card to create the actual card. Power and data is carried by the electrode to the Flash-memory chip when the card is inserted into a device. A notched corner indicates the power requirements of the SmartMedia card. Looking at the card with the electrode facing up, if the notch is on the left side, the card needs 5 volts. If the notch is on the right side, it requires 3.3 volts.

SmartMedia cards erase, write and read memory in small blocks (256- or 512-byte increments). This approach means that they are capable of fast, reliable performance while allowing you to specify which data you wish to keep.They are less rugged than other forms of removable solid-state storage, so you should be very careful when handling and storing them. Because of newer, smaller cards with bigger storage capacities, such as xD-Picture Cards and Secure Digital cards, Toshiba has essentially discontinued the production of SmartMedia cards, so they're now difficult to find.

CompactFlash cards were developed by Sandisk in 1994, and they're different from SmartMedia cards in two important ways:
  • They're thicker.
  • They utilize a controller chip.
CompactFlash consists of a small circuit board with flash-memory chips and a dedicated controller chip, all encased in a rugged shell that is thicker than a SmartMedia card. CompactFlash cards are 43 mm wide and 36 mm long, and come in two thicknesses: Type I cards are 3.3 mm thick, and Type II cards are 5.5 mm thick.

CompactFlash cards support dual voltage and will operate at either 3.3 volts or 5 volts.


The increased thickness of the card allows for greater storage capacity than SmartMedia cards. CompactFlash sizes range from 8 MB to as much as 100GB. The onboard controller can increase performance, particularly in devices that have slow processors. The case and controller chip add size, weight and complexity to the CompactFlash card when compared to the SmartMedia card.

Flash Memory Stick Formats

Types of Flash Memory Sticks

There are a number of Flash memory card formats listed on this page, under their common standard or specification name.


The devices listed on this page are removable flash cards as opposed to simple Flash Memory devices [IC's] which are listed on another page.

The Flash Memory cards listed here differ in physical size and transfer speed. In most cases the size as little impact on storage space, as more memory devices reduced in size to fit available spaces. How ever the protocol or number of transfer pins does play a major role in data transfer rate. Transfer rates may vary widely between the different Flash Memory Cards, and may also vary as the different revisions are released.

Refer to each link for a more detailed description of the interface card [Flash Card].

CompactFlash Card A Mass Storage removable Flash Memory card operates like an ATA drive using Flash memory devices about 1/3 the size of a Type II PC Card.

DataFlash Card Mass Storage removable Flash Memory card. One of a number of removable Flash Memory cards.

e-MMC, Embedded MultiMediaCard [eMMC] uses reduced voltages and a different package size than MultiMedia-Card. eMMC is defined by JESD84-A44. The mechanical standard [JESD84-C43] defines a 153 and 169 BGA and 10 interface lines; Clock [CLK], Command [CMD] and 8 data lines [DAT 7:0].

Memory Stick Flash is another flash memory card format type. The Memory Stick size is 50 mm x 21 mm x 2.8 mm.

Memory Stick Pro Duo - Same as Multimedia Card listed below

microSD Card

MiniSD Card - Memory Stick Micro {developed by Sony and ScanDisk}

MMC - Same as Multimedia Card listed below.

MSMicro - Memory Stick Micro {developed by Sony and ScanDisk}

Multimedia Card {Multimedia Card [MMC] is another flash memory card format type. The device size is 32 mm x 24 mm x 1.4 mm}

M2 - Memory Stick Micro {developed by Sony and ScanDisk}

PC Card is one of a number of different card formats from PCMCIA which may differ in size and speed.

Reduced Size Multimedia Card Reduced Size Multimedia Card [RS-MMC] is another flash memory card format type, the smaller version of MMC. The device size is 24 mm x 16 mm x 1.4 mm

SD Card [Secure Digital] Card. A stamp-sized flash memory card which is removable. The Dimensions are 32 mm [height] x 24 mm [width] x 2.1 mm [thick] for an SD Card.
While the miniSD Card is only 21.5 mm [height] x 20 mm [width] x 1.4 mm [thick]. There is also a MicroSD card format.

SDIO Card [Secure Digital I/O] Card. A stamp-sized flash memory card which is removable.
The Dimensions are 32 mm [height] x 24 mm [width] x 2.1 mm [thick] for an SD Card.

Secure Digital Card SD Card. A stamp-sized flash memory card which is removable. The Dimensions are 32 mm [height] x 24 mm [width] x 2.1 mm [thick] for an SD Card. While the miniSD Card is only 21.5 mm [height] x 20 mm [width] x 1.4 mm [thick].

SmartMedia is a flash memory card format type. The device size is 45 mm x 37 mm x 0.76 mm.
SmartMedia cards operate using either 3.3 volt or 5 volt supplies.

SpringBoard - modules are another style of removable flash memory card, in addition to being used for other functions like modems.
The SpringBoard module was developed by Handspring, but are no longer manufactured by Handspring.
The SpringBoard modules were developed for Handheld computers [palm computer].

SSFDC Bus [Solid State Floppy Disk Card], is a Removable NAND-type small flash memory card [45mm x 37mm x 0.76mm].
Developed by Toshiba Corp. SSFDC is the old name for SmartMedia.

SxS [S-by-S] a flash memory card standard based on ExpressCard.
SxS was developed by Sony and Scandisk, used with Sony camcorders.
SxS has a transfer speed of 800 megabits per seconds.
SxS uses the ExpressCard 3/4 format; width: 34mm, height: 5mm, length: 75mm

UFS Bus {The Universal Flash Storage card is an external Flash card with a planned speed of 3Gbps (per lane).
The release date for the UFS specification is set for mid 2010.}

USB Bus The Universal Serial Bus provides two-way communication between the PC and peripheral devices, over a Differential serial interface cable. A Slow-Speed mode of 1.5Mbps is used for devices such as mice. Full-Speed mode is used by most devices and allows a transfer rate of 12Mbps. High-Speed mode [defined by USB 2.0] allows rates of 480Mbps.
Page gives a description, connector pin out and Equipment Manufacturer links.

xD Picture Card - [eXtreme Digital] Flash Memory card from Fujifilm for digital cameras introduced in 2002.

This format may not be available on Personal Computers. The card size is 20mm x 25mm x 1.7mm

SmartMedia Card Pinout Assignment

SmartMedia Description and Pin Out


SmartMedia is another type of Removable NAND-type small flash memory card format. The SmartMedia device size is 45 mm x 37 mm x 0.76 mm [thick]. SmartMedia cards operate using either 3.3 volt or 5 volt. Solid State Floppy Disk Card [SSFDC] is the old name for SmartMedia, which was changed in 1996. SSFDC was Developed by Toshiba Corp. Current SmartMedia storage format include 16-Mbit, 32-Mbit, and 64-Mbit NAND-type flash memory chips. The SmartMedia card does not use a connector, instead it uses a contact area as shown in the graphic below.

The graphic also defines the pinout or pin locations.


SmartMedia Pinout
Pin # Pin Name Signal Function
1 Vss Ground
2 CLE Command Latch Enable
3 ALE Address Latch Enable
4 WE Write Enable
5 WP Write Protect
6 I/O1 I/O Data Line 1
7 I/O2 I/O Data Line 2
8 I/O3 I/O Data Line 3
9 I/O4 I/O Data Line 4
10 Vss Ground
11 Vss Ground
12 Vcc 3.3v +/- 0.3 volts
13 I/O5 I/O Data Line 5
14 I/O6 I/O Data Line 6
15 I/O7 I/O Data Line 7
16 I/O8 I/O Data Line 8
17 PD Vcc Power Detect Vcc
18 GND (optional on 32Mbit) Ground Level Input
19 RY/BY Ready / Busy (Open Drain)
20 RE Read Enable
21 CE Chip Enable
22 Vcc Voltage Supply

When the card notch is on the left side the card uses 5 volts, when it's on the right side the card uses 3.3v +/- 0.3 volts. The graphic below provides a comparison of the different Removable memory Card standards. Many of the different Memory Card standards have descriptions listed on this web site. The different standards based on card size are provided. Refer to the Personal Computer Buses page for more information for different memory types, as listed here.


Refer here for a list of different Flash Memory Stick Formats.