Showing posts sorted by date for query firmware. Sort by relevance Show all posts

Sep 21, 2018

PLDT HOME Fibr Multi-WAN

In February 2007 it was my very first time going out the country to work abroad for operation and maintenance in one of the International Airport in the  Kingdom of Saudi Arabia, I left my previous work in one of the famous University in my hometown. During that time the only fastest Internet broadband connection that you can get for residential was the twin copper wire that carries two carrier in a single physical line,  one for voice such as home phone and the other is data for the Internet. In contrast to my beloved Philippines the Digital Subscriber Loop (DSL) at that time is very expensive, I remember I have three (3)  Internet Cafe whom I work for part time job in 2001 till 2005 and one of the NetCafe only afford a dial-up Internet connection, but during those period of time Netscape is the fave browser and mIrc is the best messenger among all who we used to hang on the net everyday from morning until midnight.


So I experimented my company dial-up internet account whenever I am on the NetCafe during night time to see how it works, so there it goes, it works that credentials. From that moment in time every night time  I hang on my NetCafe I have a free dial-up internet connection. I did the same thing in Saudi Telecom but this time its a Asynchronous Digital Subscriber Line during my three years work period contract and it works because the technology infrastructure used by DSL is same as the dial-up connection the Plain Old Telephone Service (POTS), whereas DSL uses Public Telephone Switch Network (PTSN) is just an upgrade version of POTS using same carrier twin copper wire single physical line.

In the mid of 2009 I got an offered to pursue my MS degree in Electronic and Communications Engineering in Kuala Lumpur to one of the well known International University of that Asia Tiger States, so I did grabbed the opportunity and started new series of being a university student again. The mud city just started their Fiber Optic roll out over the busy town, and my Kondominium were I reside don't offer the Fiber Optic service because its a high rise building and we are on the 11th floor. That's how they pronounce it Kondominium not Condominium, this tall building is equip with xDSL communication infra own by the government the Telekom Malaysia. The good things about Very High Speed Digital Subscriber Line (VDSL) it offers a triple play, you have the voice internet and the video just like the Fiber To The Home (FTTH) the physical connection is twin copper wire of the PTSN whereas FTTH a Passive Optical Network (PON).


I am really eager on experimenting such things like this and I proved that it works as what I have done and mention on my previous case study. In this experiment on Telekom Malaysia xDSL its not only a single connection but multiple logical internet connections. I have a TP-Link WR-TL740N v1.2 reflashed it with OpenWRT firmware Attitude Adjustment 12.09 loaded it with Multi-WAN package and it works I tested up to twelve (12) WANs.

If it works on Saudi Telecom and Telekom Malaysia I thing it would be impossible if it will not work on PLDT or neither to GLOBE Telecom Infrastructure. But this time we are on the PON infra, whether or not the Philippines Giant Telco will of course not right away garbage their vintage SmartBro Canopy equipment  that they still keep on using the authentication technique for P1 wireless CPE an upgrade of SmartBro family brand whom we all know the long term MacDo free internet connection that GLOBE Telco also rival it.

On this case study I am still using my legacy Wireless Access Point (WAP) router WR-TL740N v1.2 it has one WAN port and four LAN ports no modem built but with WiFi BNG 150N Lite. The Processor is 350Mhz MIPS with 4MBit flash and 32MBit of RAM, reflashed with the third party Linux embedded firmware OpenWRT Attitude Adjustment 12.09 and of course the Multi-WAN package.


My final test proves that there is no difference whether the Telecommunication Infrastructure between POTS, PTSN and PON are same regardless to whatever the authentication technique are being implemented they will behave in the same passion, this is just on my observation. I was very unfortunate my dear Professor in that university is a Shifu in Fiberless Optical Communication which is opposite to my field of interest during that time of my study. This case study still unknown issue to the academe, perhaps already known but not yet been publish, not a threat but widely vulnerable.

Aug 27, 2018

PLDT Fiberhome Super Admin Account

As I have mention on my previous post on how to make available the "Admin Account Unavailable" that there is no need anymore to alter the 1.xml and 2.xml for the PLDT Fibr ONU AN5506-XX-XX web GUI accessible via http://192.168.1.1/fh, gaining to the web page menu setting is either by using the PLDT Fiberhome Super Admin account default username and password or thru Serial console communication port. Yes, its more complicated on the console com port because it is a Command Line Interface (CLI) unlike the fiberhomesuperadmin you are on the Graphical User Interface once you login you can just click it, to enable or disable the "Web Admin Switch" that's how easy and user friendly interface it is.


All ONU/ONT products of Wahun Fiberhome Technologies are ship with three(3) credentials, these two(2) default username and password management account remain unchanged to where ever country and ISP it will be used, but the other Administrator account such as "adminpldt" username and the password is customized by the ISP like PLDT Fibr HOME brand. The ISP Products branded with “FiberHome” have been exported to over 90 countries and regions worldwide including the Philippines. If you can not find in you ISP country the expose admin account perhaps you can Google it you may find answer at 3BB, PTCL, VietTel or maybe in Brazil, use google translate the friendly and so helpful to provide the context interpretation into your desire languages.


I am providing a screenshot again to make it probe that the "Web Admin Switch" are existing on the Management menu once you are log in as the Fiberhome Super Admin account, the username as I have said will remain unchanged as "fiberhomesuperadmin" its small caps this is case sensitive while the password is also remain unchanged as by default. But then how to access the Fiberhome Super Admin account if you do not know the default password even you have already Google the user manual of your Fiberhome ONU AN5506-XX-XX, its in a pdf format. Answer, the Serial Communication console port is there available and very accessible, you can even wipe out the entire filesystem, backup your config, likewise the firmware you can even copy via winSCP without pains.


You can try BinWalk its a powerful tool for firmware you can unpack, repack, edit, read and write even modify the cfg and the web. So many free HEXeditor that you can be use for editing not to mention the rest. The architect of this Wahun Fiberhome ONU/ONT I salute so brilliant, if just take a closer look of the internal OS and filesystem of the AN5506-XX-XXX. Just imagined it has two boots and a twin filesystem in case the first get fails the other will automatically take over.

Aug 23, 2018

PLDT Fibr AN5506 Admin Account Unavailable

It is really frustrating every time you want to do something like tuning up your ONU/ONT for the sake of your network security, gaining access to your home wireless access point, or even worst if someone can just step into your AN5506-XX-XXX without your knowing and install malicious backdoor onto it. There are so many silent *bots out there hanging around for lease and the most often victims are those residential gateway like us who owns this kind of lousy PLDT Fibr ONU/ONT equipment.

What even worst is when you are limited to access your own device supplied by your Internet Service Provider like PLDT who is monopolizing every inch of this so called Internet of Things. I am one of you who also face the same problem who's Optical Network Unit is being lock down  by Philippine Long Distance Telephone Company every time I open my web GUI I stuck on "Admin Account Unavailable".F8ck!


"You are prohibited to open the rest of the menus and settings of your own ONU/ONT because you have zero knowledge". Imagined that you have to beg for "adminpldt username and password account" for you to safeguard your entity, what the heck?  Just recently, now you must have to sign for a waiver if you want to have the admipldt account privilege otherwise when you get BRICK your PLDT Fiberhome AN5506-XX-XXX you have to pay for the replacement even if this ONU/ONT can just be reflashed by inserting a USB pendrive on its USB ports for firmware recovery. DAMN!

Try to make a call 171 to get help and your call get acknowledge after 35 minutes, yes thirty five minutes your ears will be swollen listening to the Interactive Voice Response System of my beloved PLDT. You will then be given a Ticket, for how long your issue will be solve? you have to wait until the Technical Engineering team can solve it. You still have an option is either to hire a Shifu from Symbianize or a Guru at GitHub. If you can find these two people on the said forum then you have to do it by yourself, dug into Google the biggest library on the globe hoping you can find hint for your problem.

After digging for about four months I just found some clues, I realize that there is no need to alter the 1.xml to 2.xml for you to get the adminpldt full access to navigate all the Menus and Settings. Its only the PLDT Fiberhome Super Admin account have the right key to make the adminpldt account available.


The PLDT FiberhomeSuperAdmin account can do this job, on the Management Menu you find this if you have login as fiberhomesuperadmin username at http://192.168/1/1/fh. Imagined they can just remotely switch the adminpldt account either to enable or disable it at any time any where they want it via web GUI or thru Telnet. There is more on this Menu Setting you can also find the OMCI Debug Switch and Telnet Switch if you desire to activate it or deactivate it. They can leave it for sometime open or give you an access for only three(3) days as they have given permission to those who are Netizens in GitHub forum.

If the PLDT Network Engineering Team will read this post surely they will inform their superior to immediately a mass patch this mole found on Wahun Fiberhome AN5506-XX-XXX products. This will be another headache to the PLDT concerning gaining access to the Fiberhome ONU/ONT device. Don't worry even though you can not have the privilege of FiberhomeSuperAdmin account to gain the full access setting of the web GUI, the Serial port is waiting for you its more than the privilege of fiberhomesuperadmin.

Disclaimer, this is not a tutorial this is provided as it is. I wish to have more time to write up more about PLDT FiberhomeSuperAdmin account. The Telnet Switch and the OMCI Debug Switch.

Aug 21, 2018

PLDT Fiberhome AN5506-04-FA RP2627

Today is not a surprise that once you open your PLDT Fiberhome AN5506-04-FA web GUI you have a lousy Menu settings on your ONU/ONT, the software version is updating upon upgrade are not stopping. As I open my ONU web GUI the version as I have expected will be updated again from my previous updated RP2616 now its RP2627. I login as an ordinary user account I can see nothing have change though the PLDT Engineering Team made this upgrade remotely. I usually try occasionally to login also the username adminpldt and password 6GFJdY4aAuUKJjdtSn7dC2x but not to expect that I can open this adminpldt account, because I know it always prompt me to the unavailable admin account.


When I saw my software version have change from my previous RP2616 to RP2627, I tried open the adminpldt account with the password mention above, oh Lo! It logs me in it didn't prompt me the unavailable admin account. I logout again and try to login with the same username and password. Yes it goes on and logs me in, are they forgetting something after they updates my ONU/ONT AN5506-04-FA or this is just a backlog?


As you can see on the screenshot above, its the PLDT Fiberhome AN550-04-FA web GUI status device information. I am still looking for this R:P2627 updates if what did the PLDT Engineering Team revised  inside this ONU/ONU firmware. I guess its nothing new, they just hide the parameter on the *.xml and the *.asp files so the Netizen like me have nothing to click on the pages of the PLDT Fiberhome ONU.

Here's the rest of the adminpldt account web GUI features and settings. If you take a look closely on this Menus nothing have been redo except those previous clickable apps are now mysteriously disable by default and no longer be enabled even how much clicks and apply you are going to do.


Firebug and Web Developer are still among the best css tool inspector if you want to investigate their dirty lefties program on this forbidden web pages. There is also a good way to totally penetrate this nullified access is using the Serial console, USB-to-TLL or UART microcontroller can also be use to get the access on the console port so cheap nowadays this device and can be purchase online for a few penny.


Yes this PLDT Fiberhome AN5506-04-FA ONU has a nice four pin header on the board right next to the SOC Integrated Circuit which is easily to be identified by just using a multi-metter to determined its TX and RX so you can see and read the logs. Going inside the console port you need a username ad password of course, but don't worry Wahun Fiberhome products such AN5506-XX-XXX default password can be found on the user manual just Google it. Once you are IN, then retrieving all the data inside can easily to be copied with the SCP if you do not want to mess with your USB pendrive.


On the shell your privileged  is you are the root so you can modify, read and write to any file or the filesystem, even erase it entirely so be careful before doing anything else you MUST backup the entire system in the case of disaster may occur you are safe, you may be able to upload the entire image back to the ONU, otherwise if you get BRICK you are good bye PLDT will not replace you AN5506-XX-XX.


The PLDT Fiberhome AN5506-XX-XXX is easy to be deBRICK there are bunch of way to reflash the firmware, unlike P1 CPE and HUAWEI. If you need help on your device ofcourse I can help you but I am not available at all times, I am also a busy person. I want to post on my next article by disecting this all Main Menu into their sub-Menus.


Aug 5, 2018

How To Backup Fiberhome AN5506-04-FA MTD

First and foremost before doing the backup of the ONU/ONT Fiberhome AN5506-04-FA make sure you are the owner of the device, secondly you responsible for the damage you have done, doing this is a risky and you might be able to brick the equipment if mishandled incorrectly. As a precaution, preferably you have a spare ONU/ONT on your hand in the case of disaster you might not disrupt your internet connection.

How do we backup the ONU/ONT Fiberhome AN5506-04-FA mtd aka firmware?


There are two available terminal that we can gain access on AN5506-04-FA one is via Telnet terminal and the other is via Serial communication port. These two accessible console is also applicable to the other Fiberhome ONU/ONT AN5506-XX-XXX series if you want to explore your own device to prevent your Internet Fiber ONU device being remotely updated upon updated its firmware for you not to have the vast features configuration and all the other setting being hidden by your greedy ISP. To begin with, lets check if the port of Telnet is open we can use NMAP to verify it or other similar port scanner that may give us same result. If the Telnet port is close then we do not have other choice but to open the top cover of the ONU/ONT AN5506-04-FA because Serial Console header is residing on the surface of the board.


What we need for serial communication for us to be able to communicate with AN5506-04-FA Serial Console is a serial com port, or any USB-to-Serial converter device. Then a HyperTerminal, you can also use Putty,you might want to be comfy Hercules will do or any other application alike will serve for data communication between two digital devices. Once you are plugged in then the console terminal is ready. Communication baud rate is 115200 8n1, if everything is properly hooked up, once we fire up the power ON you should see the U-Boot message just started like this.

U-Boot 2010.03-svn671412 (May 27 2017 - 09:37:39)

DRAM:  128 MB
Boot From NAND Flash
CHIP ID = 51152100
NAND:  Special Nand id table Version 1.23
Nand ID: 0xC2 0xF1 0x80 0x95 0x02 0x00 0x00 0x00
Nand(Hardware): Block:128KB Page:2KB Chip:128MB*1 OOB:64B ECC:4Bytes
128 MiB
env0 ok ~~~~~~~~~~~
In:    serial
Out:   serial
Err:   serial
hi_lsw_init
hi_lsw_init_t
MEM_MODE = MEM!
tmp_cmd a =kk=112 mem=240M console=ttyAMA1,115200 root=/dev/mtdblock5 rootfstype=jffs2 mtdparts=hinand:128k(startcode),1M(u-bootA),1M(u-bootB),1M(envA),1M(envB),18M(kernel_rootfsA),18M(app_binA),20M(app_exA),18M(kernel_rootfsB),18M(app_binB),20M(app_exB),12160k(cfg)
kernel_rootfs_mtd_offset = 0x420000
Hit enter to stop autoboot:  2

This is just the first boot, let the system to goes on to the second boot until you see the message like this and then it will tell you to Press Ctrl+C to stop auto setup in 3 seconds, from 2sec to 0sec you must be quick.

CFE adapter module install successfully ...!

CFE hw_adpter_l3 module install successfully ...!

CFE module install successfully ...!
dapter multicast module install successfully, version: Jul 12 2017 10:28:18

 CFE_FH_MARK module install successfully ...!
initialize.sh...

Press Ctrl + C to stop auto setup 0

You are now in the root directory

~ #
Once you type the following Linux command like this cat /proc/mtd then you will see now the list of all MTDs.

~ # cat /proc/mtd
dev:    size   erasesize  name
mtd0: 00020000 00020000 "startcode"
mtd1: 00100000 00020000 "u-bootA"
mtd2: 00100000 00020000 "u-bootB"
mtd3: 00100000 00020000 "envA"
mtd4: 00100000 00020000 "envB"
mtd5: 01200000 00020000 "kernel_rootfsA"
mtd6: 01200000 00020000 "app_binA"
mtd7: 01400000 00020000 "app_exA"
mtd8: 01200000 00020000 "kernel_rootfsB"
mtd9: 01200000 00020000 "app_binB"
mtd10: 01400000 00020000 "app_exB"
mtd11: 00be0000 00020000 "cfg"

Your USB pen drive or Flash drive must be formatted in FAT32 by default in any Microsoft Windows OS. After formatting it eject then plugged it onto the USB port of the AN5506-04-FA device. It will then pop you a message like this.


usb 1-2: new high speed USB device using hiusb-ehci and address 3
scsi1 : usb-storage 1-2:1.0
scsi 1:0:0:0: Direct-Access     TOSHIBA  TransMemory      1.00 PQ: 0 ANSI: 4
sd 1:0:0:0: [sda] 7574304 512-byte logical blocks: (3.87 GB/3.61 GiB)
sd 1:0:0:0: Attached scsi generic sg0 type 0
sd 1:0:0:0: [sda] Write Protect is off
sd 1:0:0:0: [sda] Assuming drive cache: write through
 sda: sda1
sd 1:0:0:0: [sda] Assuming drive cache: write through
sd 1:0:0:0: [sda] Attached SCSI removable disk
fat
open /dev/console successed.
usb led 0  off
usb led 1  on

Verify with the df  Linux command. It will show you the list of all devices in the system.

~ # df
Filesystem           1K-blocks      Used Available Use% Mounted on
/dev/root                18432      9864      8568  54% /
tmpfs                   119696         4    119692   0% /dev
none                    524288         0    524288   0% /tmp
none                    524288         4    524284   0% /var
/dev/mtdblock11          12160       856     11304   7% /fhcfg
/dev/mtdblock6           18432      5796     12636  31% /fh/bin
/dev/mtdblock7           20480     16564      3916  81% /fh/extend
/dev/sda1              3777936    215868   3562068   6% /dev/shm/usb/media/sda1

The USB flash drive is detected as sda1 device (/dev/sda1) and the mount point is located at (/dev/shm/usb/media/sda1), now we have to unmount the USB pen drive device first by not unplugging from the USB port of the AN5506-04-FA. Then mount again the USB flash drive with this following Linux command.


umount /dev/sda1

mount /dev/sda1 /dev/shm/usb/media/sda1

We are ready now for backing up all the MTDs of Fiberhome ONU/ONT AN5506-04-FA, we'll make first folder on the USB drive with this command.


mkdir /dev/shm/usb/media/sda1/backup


Now use these following Linux commands for back up the list of all the AN5506-04-FA MTDs.


~ # dd if=/dev/mtd0 of=/dev/shm/usb/media/sda1/backup/startcode.bin

256+0 records in
256+0 records out
131072 bytes (128.0KB) copied, 0.018642 seconds, 6.7MB/s


~ # dd if=/dev/mtd1 of=/dev/shm/usb/media/sda1/backup/u-bootA.bin

2048+0 records in
2048+0 records out
1048576 bytes (1.0MB) copied, 0.147251 seconds, 6.8MB/s

~ # dd if=/dev/mtd2 of=/dev/shm/usb/media/sda1/backup/u-bootB.bin

2048+0 records in
2048+0 records out
1048576 bytes (1.0MB) copied, 0.146912 seconds, 6.8MB/s

~ # dd if=/dev/mtd3 of=/dev/shm/usb/media/sda1/backup/envA.bin

2048+0 records in
2048+0 records out
1048576 bytes (1.0MB) copied, 0.147150 seconds, 6.8MB/s

~ # dd if=/dev/mtd4 of=/dev/shm/usb/media/sda1/backup/envB.bin

2048+0 records in
2048+0 records out
1048576 bytes (1.0MB) copied, 0.146535 seconds, 6.8MB/s

~ # dd if=/dev/mtd5 of=/dev/shm/usb/media/sda1/backup/kernel_rootfsA.bin

36864+0 records in
36864+0 records out
18874368 bytes (18.0MB) copied, 2.636288 seconds, 6.8MB/s

~ # dd if=/dev/mtd6 of=/dev/shm/usb/media/sda1/backup/app_binA.bin

36864+0 records in
36864+0 records out
18874368 bytes (18.0MB) copied, 3.495190 seconds, 5.1MB/s

~ # dd if=/dev/mtd7 of=/dev/shm/usb/media/sda1/backup/app_exA.bin

40960+0 records in
40960+0 records out
20971520 bytes (20.0MB) copied, 2.980738 seconds, 6.7MB/s

~ # dd if=/dev/mtd8 of=/dev/shm/usb/media/sda1/backup/kernel_rootfsB.bin

36864+0 records in
36864+0 records out
18874368 bytes (18.0MB) copied, 5.694926 seconds, 3.2MB/s

~ # dd if=/dev/mtd9 of=/dev/shm/usb/media/sda1/backup/app_binB.bin

36864+0 records in
36864+0 records out
18874368 bytes (18.0MB) copied, 2.767045 seconds, 6.5MB/s

~ # dd if=/dev/mtd10 of=/dev/shm/usb/media/sda1/backup/app_exB.bin

40960+0 records in
40960+0 records out
20971520 bytes (20.0MB) copied, 2.995862 seconds, 6.7MB/s

~ # dd if=/dev/mtd11 of=/dev/shm/usb/media/sda1/backup/cfg.bin

24320+0 records in
24320+0 records out
12451840 bytes (11.9MB) copied, 1.870105 seconds, 6.3MB/s

Now we are done, we able to backup all the MTDs of Fiberhome ONU An5506-04-FA. Soonest I post an article on How-To upload the MTD int the device incase you bricked you equipment you can repair it by you own.

Aug 1, 2018

How To Change MAC Address on Embeded System

I have just purchased an ONU/ONT Fiberhome AN5506-01-A at AliExpress a well known online store in Asia region. I decided to buy it because of my Fiber Internet Service Provider is locking down all their Optical Network Unit aka Optical Network Terminal which only allow their subscriber to a limited privileges to the CPE device settings and configurations. My ISP are updating their device remotely via OMCI and not through TR069, the updates or the ONU firmware upgrade is done without your knowing to whether it is online or offline it can be done. Exactly the updates upon updates is done prior without noticed the so called firmware!


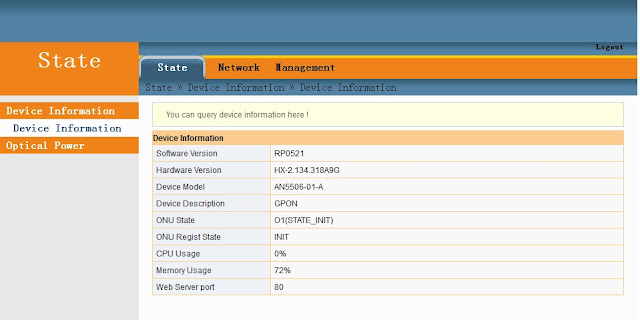
My problem is that the ONU AN5506-01-A came in to me is with the Software Version RP0521 and the Hardware Version is HX-2.134.318A9G, this stock firmware also has a limited basic configuration settings. Meaning some of the Menus and sub-menus are being omitted, you can not set the WAN to Bridge Mode on the web Graphical User Interface (GUI) its explicitly as Router mode only. Another thing is that the LAN menu or the setting is missing from the GUI, you can not modify your desired IP configuration, enabling and disabling DHCP server and relay are out of the context. Most of all its NOT a plug and play electronics equipment.

Why do I need to change the MAC Addresses?

Unlike xDSL internet connection, your ISP will just ask you what username and password you wish or they just provide you the username and the password for you such as yourname@isp and your password, most often you can even choose your desired password as you wish for it. Then choosing and buying your own personal wireless modem router from low to mid or high class residential gateway is just on your finger nail because the device is a plug and play after you input the given username and password given by your ISP its now connected to the internet.

Now here we go, I took the fiber patch cord from my ONU/ONT ISP and then plug it to my new Fiberhome AN5506-01-A the LOS LED turns off from blinking Red, and the PON LED now don't stop from blinking Yellow. Obviously the PON LED means that the ONU is not connected to the network or to the OLT it needs an authentication, once the ONU is connected the PON LED lit will be steady in yellow color.

To get the AN5506-01-A to be connected to the OLT of my ISP we need to copy first the PON MAC address of the ONU/ONT and Serial Number of it that was provided by the ISP and replicate to the new ONU/ONT AN5506-01-A.

How do we change the PON MAC Address of the Fiberhome AN5506-01-A?

The ONU/ONT Fiberhome An5506-01-A is a ARM Linux Embeded system, going to the web GUI there is no way of changing the PON MAC Address. The chances of spoofing the Passive Optical Network MAC address is in the Linux environment, we can log in via Telnet and we can get access to its Command Line Interface (CLI), after reviewing the commands it is very reluctant to clone the MAC address. Another option is thru Serial communication port, this is a terminal also a CLI were we can get help from Busybox.

To change the PON MAC Address of AN5506-01-A heres the command.

First find the physical MAC address of your ONU/ONT device by running this following command :

# ifconfig -a | grep HWaddr
pie0  Link encap:Ethernet HWaddr 00:1A:2B:3C:4D:5E

The hexadecimal numbers in blue denote my AN5506-01-A ONU/ONT PON MAC address.

Next, type this following commands.

# ifconfig pie0 down
# ifconfig pie0 hw ether 00:A1:B2:C3:D4:E5
# ifconfig pie0 up
# ifconfig pie0 |grep HWaddr

To check again if the PON MAC Address have been change already just repeat this following command.

# ifconfig -a | grep HWaddr
pie0  Link encap:Ethernet HWaddr 00:A1:B2:C3:D4:E5

This is just a temporary solution, once the machine is being rebooting it will just go back to its original MAC address.

The final option we can do is still via Serial port but now it would be thru U-Boot Linux environment. Power ON the ONU/ONT
then you will see U-Boot started you must be quick in 3 seconds it will continue to boot to the second level of booting. You have to hit any key in 3 seconds.


U-Boot 2010.03-svn462977 (Mar 09 2016 - 17:03:30)

DRAM:  16 MB
Boot From SPI Flash
CHIP ID = 51161110
NAND:  SFC ID: 0x0
SFC : cs0 unrecognized JEDEC id 00000000, extended id 00000000
SFC ID: 0xef4018
SFC: cs1 W25Q128BV (16384 Kbytes)
SFC: Detected W25Q128BV with page size 65536, total 16777216 bytes
SFC: sfc_read flash offset 0x40000, len 0x20000, memory buf 0x81560008
In:    serial
Out:   serial
Err:   serial
Hit any key to stop autoboot:  2

Here's the following command in U-boot.

# setenv ponmac 00:A1:B2:C3:D4:E5

# saveenv

saveenv command means saving the environment variables. This will save permanently to the SPI FLASH storage.

Saving Environment to SPI Flash...
Erasing SPI flash...SFC: erase offset 0x40000, len 0x20000
erase cs 1
Writing to SPI flash...SFC: sfc_write flash to 0x40000, len 0x20000, memory buf 0x81560008
Erasing SPI flash...SFC: erase offset 0x60000, len 0x20000
erase cs 1
Writing to SPI flash...SFC: sfc_write flash to 0x60000, len 0x20000, memory buf 0x81560008
done

You must see something like this log messages.

Finally you can now use your ONU/ONT AN5506-01-A, just input the Serial Number of your device the OLT of your ISP provider will now give the authority to be connected to the system.

Oct 31, 2017

For TP Routing: Modify firmware size, unlock U-boot partitions, add Fullflash partitions

TP-Link TL-WR703N factory default has only 4MB of flash and 32MB RAM, if you want to play with the OP is simply powerless, so I changed the 8M Flash and 64M RAM.

First, modify the firmware size

OpenWrt in the compile time will be based on each model profile to generate the firmware, if the generated firmware integrated too much software and more than 4MB it will be error, you will find that the firmware can not be generated.

Specific symptoms See my last Post start compiling and compiling openwrt.

Compilation passed, but did not find the firmware in ./openwrt/bin/ , turned up the compile output prompt, and found a similar

  1. [mktplinkfw] kernel length aligned to 914864
  2. [mktplinkfw] *** error: images are too big
  3. make[3]: [install] Error 255 (ignored)
Here's how to modify the default firmware size of the TP series router


Actually very simple, find the target/linux/ar71xx/image/Makefile, search for the model you want to modify, such as 703N, find the relevant 703N parameters

Then change the tplink-4mlzma to tplink-8mlzma on the line, and then

  1. define Device/tl-wr703n-v1
  2. $(Device/tplink-8mlzma)
  3. BOARDNAME := TL-WR703N
  4. DEVICE_PROFILE := TLWR703
  5. TPLINK_HWID := 0x07030101
  6. CONSOLE := ttyATH0,115200
  7. endef

After you save the exit, you can compile the 8M firmware for tl-wr703n.

Note: Some outdated tutorials on the web say that you also need to modify tools/firmware-utils/src/mktplinkfw.c after I test, the latest source code inside this file is not about 703N and other router parameters, you do not need to modify.


II. Unlocking u-boot Partitions

The horse has the hoof, the person has the slip, does not have to die u-boot how dares the confidence to play the OP? Here we will talk about U-boot, U-boot is the embedded Linux system boot, equivalent to the computer BIOS. The traditional u-boot is only responsible for booting the firmware, once the firmware does not start, then the entire router is brick, there is a TTL is also easy, no one can only on the programmer. But there is not dead u-boot, in fact, with the Web Brush Machine interface U-boot, MA Ma no longer have to worry about my machine into bricks, completely without the demolition machine can save bricks. Want to know their own Google, recommended Enshan hackpascal breed, and brush into U-boot tutorial , I do not discuss how to use u-boot, mainly brush into the u-boot will encounter

  1. could not open mtd device u-boot ,can't open device for writing

This is because OpenWrt is locked by default, unless it is unlocked when the firmware is compiled. U-boot

Locate /target/linux/ar71xx/files/drivers/mtd/tplinkpart.c, search for U-boot, find

  1. parts[0].name = "u-boot";
  2. parts[0].offset = 0;
  3. parts[0].size = offset;
  4. parts[0].mask_flags = MTD_WRITEABLE;
Then remove parts[0].mask_flags = MTD_WRITEABLE; This line will be recompiled.

WARM hint: TP series Brush finished breed must change the MAC address for a valid value, otherwise wireless will hang!

III. Add Fullflash partitions

Now the bricks can be saved, but save back the data are all gone, but also start the configuration, want to think all big ah, the good habit of nurturance is to fall roar! Add Fulllash partitions so that you can back up the entire programmer firmware with the DD command, and there is no such thing as an art loss.
Same as /target/linux/ar71xx/files/drivers/mtd/tplinkpart.c to add the following code

  1. parts[5].name = "fullflash";
  2. parts[5].offset = 0;
  3. parts[5].size = master->size;

As shown in the figure


After recompiling and brushing, you can see the Fullflash partition.

View partitions with cat /proc/mtd

Effect as shown


You can then simply back up the programmer firmware through the dd if=/dev/mtd6 of=/tmp/fullflash.bin !

5aimiku

Oct 19, 2015

PLDT HomeBro Ultera Huawei B2268s 4G LTE Admin Unlock Finally

Finally, the PLDT HomeBro Ultera aka Huawei B2268s 4G LTE wireless broadband CPE now revealed on how to unlock the Admin account to the fullest. As we all know someone will always leak to the public no matter how they conceal it those good guys out there will make first some penny of this tricks before it will be share to the newbies like me. Here's the prerequisite before you can to proceed on unlocking your Huawei B2268s LTE 4G ODU, first of all make sure that your device ODU Firmware Version is V100R001C35SP100B021 and the Module Firmware Version is V100R001C35SP100B021 then you can now do-it-yourself. Note it will void your device warranty so always be careful and presence of mind.


What you need is a Firefox browser any version then go to Tools then click Add-ons, Add-ons Manager prompt you and you must install the Web Developer plugins. Once done download Putty utility for telnet, also download this MS doc B2268s pedik Full Admin Access its a rar file then extract it password is sarilingsikapkopoyan71 just copy and paste it once the winrar ask you for the password to be extracted.

Procedure

Step 1.
  • Log-in as homebro for the username and password
  • Press Crtl + Shift + K
  • Paste script
  • Press ENTER
  • Click "OK"
  • Wait for "All done" then click "OK"
Step 2.
  • Open putty
  • log-in
  • Type "chpasswd" and press ENTER
  • Type "admin:admin"and press ENTER
  • Press Crtl + D (two times)
  • Log-in on Web GUI (admin / admin)
  • Change Password DONE
Alternative you can download and extract this script B2268s Step 2 by KevinBongcawel.rar just double click the run.bat file, I have to credit it to KevinBongcawel. Once done, you can now Login as admin for the username and pedik for the password after that you may now change the password to your desired key.


This only proves that the PLDT HomeBro Ultera Huawei B2268s 4G LTE wireless broadband CPE is now in your full control, you can now tweak and fine tune what ever you want to your device. I have to say thanks Pedik the one who offer and share this stuff to the public article and images are credits to him. Enjoy!

Sep 9, 2015

Huawei B2268S 4G TD-LTE Wireless CPE

HUAWEI B2268S 4G LTE TD-LTE CPE Wireless Gateway

This is a newer version of the popular HUAWEI B2268 LTE CPE (Customer Premises Equipment). Previously it was B593u-12. The new B2268S has a maximum download speed of 150 Mbps and in addition to penta-band TDD, it supports TDD 3500, 2600 and 2300 MHz as well. The B2268S is a 4G wireless gateway that supersedes B522s-41 / B593s-42 / E323s-41 / B593s-58 / B222s-40 / B222s-41 / B222s-42 / B222s-42a. As sales of these models will be stopped on June 30, 2014. It is ideal for SOHO and small business with its versatile connectivity options and services such as VoIP, telephone and fax, USB printers, USB hard drive and other office equipment. It is also suitable for home entertainment and information exchange.


Penta-Band LTE-TD Band 42 / Band 43 3500MHz, Band 38 2600MHz and Band 40 2300MHz up to 150Mbps download and 50Mbps upload speed.

SPECIFICATIONS

Model - B2268S

Frequency (4G)
*LTE TDD Band 42 / Band 43 3500 MHz
*LTE TDD Band 38 2600 MHz
*LTE TDD Band 40 2300 MHz

LTE Category - Category 4
Bandwidth - 20MHz/10MHz
Speed (4G) - 150Mbps download; 50Mbps upload
MIMO - TM 1/2/3/7

SIM Slot - 1 x Standard Size SIM slot

Wi-Fi - 802.11b/g/n; Encryption WEP, WPA and WPA2
*Supports up to 32 devices.

External Antenna - 2 x SMA connectors

LAN - 2 x Auto-sensing Ethernet RJ45 interface

Telephone -1 x Phone jack RJ11 interface

USB - 1 x USB 2.0 host port

Dimensions - 300 x 250 x 50 mm

Weight - 500g (excluding the charger)

Web Management Page - http://192.168.15.1
*default password admin/password123, in English language.

Other Features

*Firewall, Enhanced VoIP
*TR069 remote management, HTTP online upgrade
*QoS, USB share
*UPnP, IPv6, DLNA
*VPS, VLAN(option function)
*L2/L3 VPN(L2TPv2, GRE), SNMP
*Dual APN (User Defined / Auto APN)

WHAT'S INCLUDED IN THE PACKAGE

*HUAWEI B2268S 4G TD-LTE Gateway ODU Antenna
*HUAWEI B2268S 4G TD-LTE IDU Modem
*Surge Protector with Grounding Kit
*Wall / Pole Metal Brackets and Mounting Kit
*LAN Cable
*100-240V Power Adaptor EU 2-pin or UK 3-pin plug
*Quick Start & Safety Information


HUAWEI B2268S 4G LTE QUICK START MANUAL PDF
HUAWEI B2268S 4G LTE SPECIFICATIONS PDF


The Huawei B2268S 4G TD-LTE Wireless CPE is already available in the Philippines at PLDT/SMART Telco it is advertise as PLDT Home BRO’s ULTERA the new 4G wireless broadband internet among one of the major wireless ISP in the country.


The Huawei B2268S 4G TD-LTE device PLDT Home BRO’s ULTERA stock firmware though it is just new released the nation No.1 Free Internet Forum said that this 4G CPE is already exploited, as we always expect the Pinoy Henyo are always finding its way to make a hole at he backdoor. I must confirm it soon to update my guest, commenter and my avid reader.

Sep 7, 2015

HUAWEI B593s-931 LTE CPE Unlock Firmware


Today I have just successfully unlock my HUAWEI B593s-931 LTE CPE, the firmware attached here is for old and new version if you wanted to openline your Globe 4G wireless modem router so that you can use it on the other 4G network such PLDT/Smart Telco network.


Download firmware HUAWEI B593s-931_unlock.BIN here

Download firmware HUAWEI B593s-931debrand.BIN here

Download firmware HUAWEI B593s-931debrand_for_nov.BIN here

Sep 2, 2015

Maxis-Fibre-Internet OpenWrt Custom Router TL-WR740N IPTV

First thing to do is need to reflash the TP-Link TL-WR740N with the third party OpenWrt firwmare, in my case I have downloaded the Attitude Adjustment 12.09, after the reflashing, it will automatically prompted you the Login page and you are ask and required make your password for Linux OpenWrt the wireless router.

Second thing to take note is that TP-LINK TL-WR740N physical ports or WAN/LAN ports will varies the name assignment ports on the OpenWrt logical (internal) ports.


As we can see from the screenshot below from left the WAN port is blue, then LAN ports 1-4 is yellow  respectively.


On the other hand, inside the OpenWrt Switch it would be labeled in different way as to that physical ports that we seen above picture.


The WR740N Switch once it is already brushed with the OpenWrt firmware its logical or  internal Switch, the WAN port now is equivalent to CPU ports as the above shows, then LAN port1 is Switch port2, LAN port2 is Switch port3, LAN port3 is Switch port4 and finally the LAN port4 is Switch port1.

Next thing to do is will configure the Switch ports to the desired VLAN tagging, we will assign VLAN621 and VLAN823 for the Internet and for the IPTV. You can add another VLAN later on if you wish to configure for the ATA VoIP the VLAN822 or VLAN821.


We set the VLAN1 to state "OFF" all the Switch ports from CPU to ports 1-4, then create VLAN621 for the Internet, CPU and Port1 to state "TAGGED" and the rest will be "OFF". Followed by creating  VLAN823 for the IPTV, Switch port CPU and Port1 to state "TAGGED" then "UNTAGGED" on Port2 the rest of the Ports will be remain in "OFF" state.

You can copy and paste my /etc/config/network below just edit it with your desired config settings.
root@OpenWrt:~# cat /etc/config/network

config interface 'loopback'
option ifname 'lo'
option proto 'static'
option ipaddr '127.0.0.1'
option netmask '255.0.0.0'

config interface 'lan'
option type 'bridge'
option proto 'static'
option ipaddr '192.168.254.1'
option _orig_ifname 'eth0 radio0.network1'
option _orig_bridge 'true'
option ifname 'eth0 eth1'
option netmask '255.255.255.240'
option macaddr 'E8:94:F6:01:02:03'

config interface 'wan'
option _orig_ifname 'eth1'
option _orig_bridge 'false'
option proto 'pppoe'
option username '123456@home.maxis.com.my'
option password '1234561'
option ifname 'eth0.621'

config switch
option name 'eth0'
option reset '1'
option enable_vlan '1'

config switch_vlan
option device 'eth0'
option vlan '1'
option vid '1'

config switch_vlan
option device 'eth0'
option vlan '3'
option vid '621'
option ports '0t 1t'

config switch_vlan
option device 'eth0'
option vlan '4'
option vid '823'
option ports '0t 1t 2'

config interface 'IPTV'
option ifname 'eth0.823'
option _orig_ifname 'eth0.823'
option _orig_bridge 'false'
option proto 'static'
option ipaddr '192.168.200.1'
option netmask '255.255.255.0'
As you have notice to my config setting, I have switch or interchange my physical WAN port to LAN port1 while my LAN port1 now is my WAN port. So internally, my logical Switch port now will be CPU=LAN, Port1=WAN, Port2=IPTV.


We need to make DHCP server for the IPTV.


My Firewall settings.


Finally, here's  the status screenshot of my TP-Link TL-WR740N brushed with OpenWrt third party firmware. I have replaced already my MAXIS Technicolor TG784n v3 and now using the TP-Link wireless router.


Enjoy! hope this article will help those fellow Maxis-Fiber-Internet users who are having trouble in setting up their TP-Link TL-WR740N OpenWrt firmware in configuring the VLAN tagging to make work their IPTV and likewise the additional ATA VoIP.

Sep 1, 2015

Maxis-Fibre-Internet Technicolor TG784n Custom DNS Solved

Limited and Unable to Change or Customized DNS Server Set When Using Maxis-Fibre-Internet Broadband on Technicolor TG784n Residential Gateway VoIP Wireless Router.

Symptom:
  1. Have changed the DNS server sets from router's GUI but still unable to use custom DNS server sets for Maxis-Fibre-Internet Broadband Technicolor TG784n Router.
  2. This is because Maxis had hard coded or using their customized firmware for the router. Whatever changes you made for DNS server sets from GUI will not take effect.

Solution:

You've to use telnet/command line to configure the router's DNS set.
Download any free Telnet client from Internet and connect to your gateway.
Popular clients are Putty and Microsoft default Telnet client.
Assuming your default router IP address is 192.168.1.254 if you've never changed this.

1. telnet 192.168.1.254
2. Use "Administrator" for username. It's case sensitive.
3. For password, you've to refer to the access key sticker on your router.
4. Copy and paste the following texts into telnet client.

dns server config state=disabled
dhcp server config state=disabled
dhcp server lease flush
dhcp server pool config name=LAN_private primdns=4.2.2.2 secdns=8.8.8.8
dhcp server config state=enabled
dns client flush
dns client dnsadd addr=4.2.2.2
saveall
exit

5. After this flush your local PC's DNS cache. In windows use ipconfig/flushdns or reboot your PC.
6. You will now be able to access websites blocked by MCMC/SKMM on your Maxis fibre broadband.

Note: Basic knowledge of PC IP addressing/ networking is required for these tasks.