Showing posts sorted by relevance for query firmware. Sort by date Show all posts

Apr 20, 2013

Asus RT-N66U Flashed with TomatoUSB firmware

TomatoUSB is an alternative open source firmware for Broadcom-based routers like the ASUS RT-N66U Black Knight. It is a modification of the famous Tomato Firmware but with built-in support for USB port, wireless-N support. Check out this entry for an overview of the ASUS RT-N66U Black Knight.


Some of the TomatoUSB features are:
  • Very advanced QoS (Quality of Service) configuration
  • Advanced wireless configurations (WDS, wireless client modes, etc)
  • Graphical bandwidth usage monitor
  • Printer server: access USB printer from LAN
  • Media server DLNA
  • Built-in support for USB – 3G, Storage
You can view more information about TomatoUSB here. You can always flash it back to the original firmware by following this guide and specifying the original firmware instead.

Not sure why are you flashing third party firmware?

I am flashing TomatoUSB into my ASUS RT-N66U due to the following:
  • DHCP reservation in the original firmware do not work really well. For some reason, some clients just do not get their reserved IP correctly despite having the correct MAC address
  • DHCP reservation in the original firmware does not give clues what you are reserving for. I felt that besides allowing you to enter the “MAC address” and “IP address”, it should allow you to enter “Hostname/Comments” so that I will know what that line is for
  • Basic implementation of QoS in original firmware. This is subjective, to some, the QoS is just fine but the one in firmware 3.1.0.3.90 keeps assigning lowest priority to the first 3 custom rules. To be fair, this is fixed if you flash up to 3.0.0.3.108
  • No option of defining range of DHCP client list in original firmware. For some reason, it just distributes ALL available IP addresses. For me, I prefer to cut my available IP addresses into 2 blocks – one for static machines/servers and the other for any clients
So are you ready to flash TomatoUSB onto the RT-N66U? If yes, just proceed on.

Warning: Flashing third party firmware will void your warranty! I will not be held responsible if anything goes wrong.

What are the required files?

You will need to have the following:
  • ASUS Firmware Restoration Utility
  • TomatoUSB (Shibby) firmware
Getting the ASUS Firmware Restoration Utility
  1. Open another browser window/tab and navigate to http://support.asus.com/ServiceHome.aspx?SLanguage=en
  2. Search for support for RT-N66U
  3. Select the “download” link
  4. Specify the OS you are using
  5. Download the latest Utility for RT-N66U
  6. Install the package
Getting the TomatoUSB (Shibby) firmware for RT-N66U
  1. Open another browser window/tab and navigate to http://tomato.groov.pl/download/K26RT-N/
  2. Look for the latest build for “RT-N66U”.
  3. Download the firmware (.trx) file. If you do not know which to download, just download the one with “mega” or “BT” in the filename
Great! By now, you should have the ASUS Utility installed and the latest TomatoUSB (Shibby) firmware downloaded. Lets proceed to the next section.

How do I flash the TomatoUSB firmware onto the RT-N66U?

The steps are simple, you will need to:
  • Start the firmware restoration process (using firmware restoration utility in the ASUS Utility package) so that it is searching for router
  • Put the ASUS RT-N66U into firmware restoration mode and quickly start the firmware restoration process
Before you proceed, pull out the power cable to your RT-N66U and have a pen ready to press the reset button (between the USB ports and WAN port)

Preparing for firmware restoration to TomatoUSB (Shibby)
  1. Launch the firmware restoration utility (this is one of the tools in the Utility you installed earlier)
  2. In the firmware restoration utility, browse for the TomatoUSB firmware you have downloaded earlier
  3. Start the firmware flashing and a prompt should appear stating that it is an incompatible firmware. Proceed to the next step.
Putting the RT-N66U into emergency firmware restore mode
  1. Press and hold on to the reset button
  2. While holding down the reset button, plug in the power cable so that the RT-N66U turns on.
  3. Note: Keep holding the reset button until the power led starts to flash (on and off). When power led starts flashing, release the reset button and proceed.
  4. On the firmware restoration utility, agree to the prompt saying that it is a incompatible firmware.
  5. The utility should be scanning for device. Quickly proceed to the next step
  6. Wait until the flashing is complete
  7. Power cycle the router when it is complete
Finally, clearing the NVRAM before you use TomatoUSB

It is always a good practice to clear out the previous settings (in NVRAM) whenever you flash to different firmwares. In this case, it is required to flush out the NVRAM.

You can either flush the NVRAM either through key presses or through web admin.

Clearing NVRAM via key presses
  1. Power off the RT-N66U
  2. Press and hold down the WPS button
  3. While holding the WPS button, plug in the power cable to turn RT-N66U on
  4. Keep holding the WPS button for 30 seconds before releasing
  5. The router should reboot
  6. Congratulations. The NVRAM has been cleared.
Clearing NVRAM via web admin

The TomatoUSB administration web should be at http://192.168.1.1 . If it is not, do a “ipconfig” or “ifconfig” and navigate to the gateway address with your web browser. If you are not able to get an IP address from DHCP, you might want to set your computer’s IP address to 192.168.1.2 (255.255.255.0).

When prompted for a login, the default is:
  • User: root
  • Pass: admin
Once you are in, follow the next step to clear out the previous settings
  1. Navigate to Administration -> Configuration
  2. Under Restore Default Configuration, select “Erase all data in NVRAM memory (thorough)
  3. Click “OK”
  4. Wait for the router to be ready
Your RT-N66U is now running TomatoUSB (Shibby). Have fun exploring and configuring the RT-N66U. Do update me if there are anything wrong with this guide so that I can fix it. Thanks!

Jan 7, 2014

MP3 Player Recovery and Hacking

Loading New Firmware:

The first step to loading new firmware into the MP3 player, or doing a firmware dump from the player, is to set the device into loader mode. In some cases, where the firmware is intact on the device, new firmware can be loaded without setting the device into loader mode.

There are a variety of ways to set the device into loader mode. The most definite, guaranteed to work method is to short a number of the I/O pins of the flash chip with the battery removed, while connecting the player to a free USB port. If the device has two flash chips, the I/O pins on the first chip (closest to the CPU) are the ones to short. While this method should work for pretty much any similar device, it can cause problems, especially if you short the wrong pins.


The safer method for forcing the device into loader mode is to hold down the R/V (recorder mode/volume control) button with the battery removed, while connecting the player to a free USB port.


When the player is plugged into a free USB port while in loader mode, a new device will be detected as "ALi USB 2.0 BOOT LOADER". The LCD and backlight will both not illuminate when this is successful.

Should neither method work in setting the player into loader mode, it is possible that the player itself is damaged, and it may not be possible to recover it.

Useful Software:

Finding software capable of loading firmware to this brand of player was quite challenging, given the similarities between ALi chipset players and S1MP3 players, and that many manufacturers were based in China. This is where the entries on the Polish forums on elektroda.pl were most useful. From rough translations, there were a few software packages that could read and write firmware images to the flash memory.


One such tool is a program called MPTool, which appears to be designed to be used as a factory firmware loader. With minimal documentation available, it is difficult to determine what all the features are used for without risking further damage to the player, however it would appear that the software can be used to change USB vendor and product IDs, reformat the flash memory used for storing MP3s, and changing the inbuilt serial number. This software does not seem to be able to create actual firmware images from scratch, and is not able to dump existing firmware from the device to disk.


A potentially more useful program is the M566x ISP tool. This program is capable of uploading firmware binaries to devices, and is also capable of dumping the current contents of the flash memory to disk. The function of particular interest is the "Save PM" function. This function appears to dump the complete operating system image to disk as a file called PM.bin. At the moment, there is no obvious way of converting this file back to a broken down set of binaries or Cabinet archive as required for loading into a device.

Before you can use the M566x ISP tool to dump firmware images, it is necessary to identify what type of flash memory is used in the player. In most cases this should be printed quite clearly on the flash chip itself, but if it has been rubbed off, or you do not want to open the case of the player, the "Auto ID" button will in most cases identify the type of flash memory used in the player. Clicking "OK" will start the firmware loading process, allowing you to select multiple binary files to be loaded as firmware. If there is a problem with any of these binaries, in most cases it will either crash the program, or cause the write process to fail. This does not seem to destroy the player, but as always be very careful when loading new firmware.


MPTool can be found in many different distributions of firmware updates for ALi chipset MP3 players, and under a wide variety of names. One of the more common names for the MPTool executable is "Factory4.exe". A quick hunt on Google will find many sites with this file, and a zipped barebones copy is available, although this does not include any firmware files. M566xISP (known as the M5661 ISP tool or M566x ISP tool) is considerably harder to find, but can be found within some firmware distributions, most notably within the firmware package of the Z-cyber Zling T-Nax. The tool itself is also available for download below, but again does not include firmware files for any player. If possible, it is best to download these files elsewhere, as the bandwidth of this server is very limited.

Want to help me maintain this server? Donate some BitCoins to: 1FZFrGTAdnQzUD9y5AkvqS6WY18m9vcMyH

MPTool.zip (485k)

M566xISP.zip (1354k)

The Firmware Itself:

In my case, it took many weeks of on-and-off searching to finally find a firmware image that was compatible with my device. Given the number of M566x based MP3 and MP4 devices out there on the market, it is very easy to find firmware images that may seem right, only to load them and find that the display and controls do not work. Eventually, I found a firmware set that did work for my player, a firmware package built for a Typhoon 1GB MP3 player (obviously another rebrand of the same device sold by Egoman and Yuraku). Within the firmware package for this MP3 player is a file called IEOA_FW16.13.11_060617.CAB. This file contains 94 small binary files, the structure of which are discussed in more depth later on.

While this firmware package did work, it did not have the original "Ministry of Sound" introduction screen which I had grown quite fond of. In order to recover it, I needed a copy of the firmware dumped from a working "Ministry of Sound" branded player of similar design, while the flash memory size was largely irrelevant, the device needed to have the same type of LCD and controls.

Fortunately, I was able to acquire a similar player from a friend who had purchased the 2GB version. Using the M566x ISP tool, I saved a copy of the PM from it to disk and loaded it up in a hex editor. Before I continue however, below is a brief discussion of what I have found out about the firmware files used by the loader software.

It would appear that single file firmware images used by MPTool are Microsoft Cabinet archives of a large number of binary files. Each binary filename starts with a number and usually has a limited text description following it, such as 000INIT.BIN, or 005PLAY.BIN. The number would appear to signify what order in which the overall firmware is to be assembled and where in the memory each section of code is to be stored. The name of the binary file itself after the initial three digits seems to be irrelevant other than describing the purpose of each to developers, and is not stored in the overall firmware image when loaded into the player. The M566x ISP tool does not use Cabinet packed archives of these binary files when loading them into a device, rather it allows you to select the individual binary files for loading. Size of each of these binary files seems to play a role, as it is not possible to load a single large binary file, however the size of each of the binary files is able to be varied.

The saved PM.bin file appears to be a concatenated set of each of the binary files, each padded with some extra bytes which are often null.

From the various firmware files I had found and discovered not to work on my player, I noticed that in many cases the basic files such as (in some cases) 000INIT.BIN were very similar, despite the differences in the players, which meant that the original "Ministry of Sound" firmware loaded on the player must have had a similar structure to the Typhoon firmware that worked when loaded onto the player. It was possible to find the "Ministry Of Sound" introduction animation by finding the end and beginning of the surrounding binaries, which in this case were collections of strings. The data between the end of one string binary and the beginning of the next were copied to a new file, where the padding data was removed, then was loaded in with the working firmware image. - source

Nov 30, 2013

MyBro Green Packet DV235T Stock Firmware Update Help

Recently I have posted about SmartBro new product that they wanted to promote the myBro aka "Abot kaya wireless home broadband" the 4G WiMAX wireless internet that uses the Green Packet CPE model DV235T. What I do not know is that this 4G wireless modem router device has been already tweaked silently almost a year done by many forumers and it has just leak this few weeks by SB netizen that stock firmware updates have been compromised and leak the links to Google.

With my curiosity to have also the updates whom I wish to be able to tweak my donated DV235T I'll keep on searching until I stumble upon to the source. There are at least two (2) Green Packet stock firmware for myBro DV235T that has been seeded online one is for free (web_update-3_5G-v2.10.14-g.1.0.5-gp.tar.gz) and the other is you must have to pay (web_update_v2.10.14-g.1.0.4-gp.tar.gz) whom I paid it for U$35 via remote update and the only copy I have is on the Chips itself of Hynix H27U1G8F2BTR since I badly needed it the only option of mine is "take it or leave it".


After my DV235T has been updated remotely here how it looks like, you can check on my other post the details of the Green Packet stock firmware v2.10.14-g.1.0.4-gp. The most interesting here is the Hardware model:WIXFMM-144 and also the Frequency range:2300000KHz~2400000KHz, 2490000KHz~2700000KHz. Make sure before you upgrade to any updates of your device firmware you have a screenshot for your reference and for your comparison. If you go back to the myBro Smart customized firmware v2.10.14-g1.0.7-smart here's how it looks like.


It only shows that Green Packet stock firmware v2.10.14-g.1.0.4-gp is the right firmware updates for the myBro DV-235T 4G WiMAX wireless broadband modem router because it is for Hardware model:WIXFMM-144. In addition, the  Frequency range:2490000KHz~2700000KHz is also being added. 


On the other hand, going here to the free Green Packet stock firmware (web_update-3_5G-v2.10.14-g.1.0.5-gp.tar.gz) you will notice that the updates or firmware is for CPE Hardware model:WIXFMM-129,  likewise taking a look closely to the Frequency range:3300000KHz~3600000KHz obviously the firmware will not suite to the myBro DV235T. It may or may not work perfectly because of mismatch hardware model and firmware updates. As I have tested with the given above firmware the myBro Green Packet DV235T will not bricked  as you can see I have the screenshot of it. There are three (3) issue I have found out using this firmware, one the WiMAX LED signal has strong indicator or very high though if you open you GUI on RSSI is most likely the same dBm with ver.04. Second is the the trade off, your built-in WiFi signal is getting weaker. Third, it can connect but unstable, you will be facing frequent disconnection so there is no used of upgrading to this stock firmware (web_update-3_5G-v2.10.14-g.1.0.5-gp.tar.gz) you will be having a headache definitely.

Since I DO NOT have the stock firmware in me or I can't get any firmware online because of no one is willing to seed it. The only remedy is on the Chips Hynix H27U1G8F2BTR using NAND flasher/programmer (I/you) can copy the raw firmware but can not use it via GUI upgrade only thru TSOP48 write it directly to the NAND Flash memory to be able for you/your myBro aka DV235T work it perfectly with out worries on changing the WAN MAC address, disconnection, WiFi weak signal etc....

Hope this article will help those netizen have upgrade their myBro Green Packet DV235T 4G WiMAX wireless modem router with the wrong firmware.

Mar 9, 2014

TP-LINK WR740N Ver2.1 OpenWrt Revert To Original Firmware

I have been using my TP-LINK WR740N version 2.1 since 2010 for my mini Lab likewise at home with the third party firmware OpenWrt Backfire Trunk. Just recently I wanted to make a simulation for WDS that TP-Link products for their unique non-Standard bridging protocol that capable of doing two jobs i.e. as a bridge and at same time as a wireless access point (WAP). It took me an hour Googling to find on the net on how-to revert the device to it original TP-Link stock firmware.


First I stumble upon on DD-Wrt forum looking for the simplest way on how-to revert the TL-WR740N version2.1 to its original factory stock firmware and I found this.
I bought two TL-WR740N (Hardware v2.1) then I did the firmware update with the following dd-wrt image in this order:

1)http://www.dd-wrt.com/routerdb/de/download/TP-Link/WR740N/2.0/factory-to-ddwrt.bin/3841

2)http://www.dd-wrt.com/routerdb/de/download/TP-Link/WR740N/2.0/tl-wr740n-webflash.bin/3842
I was not lucky enough to get my device work from the above mention because my firmware was OpenWrt.

Another nice article I visited written by goughlui with the same TP-LINK TL-WR740N he did also the experiment both DD-Wrt and OpenWrt firmware but he able to managed to revert it to the original TP-Link stock fimware, unfortunately I fail his procedures didn't work for my device.

I headed back to OpenWrt forum and read the TP-Link WR741N/ND since this is just identical to WR740N, when I follow the how-to's I manage to bring back to its original stock firmware. And here's how I did it.

I assume your TP-LINK WR740N version 2.1 is on third party firmware the OpenWrt.

I use putty to login the device via ssh, just follow the command.

cd /tmp

wget http://everbest.ftpserver.biz/TP-Link/Firmware/WR740N/wr740nv1_en_3_12_4_up(100910).bin

Alternatively if you can not download the stock firmware (wr740nv1_en_3_12_4_up(100910).bin) via wget you can download it to your local drive from official TP-Link website.

Otherwise use the PSCP.EXE utility from your M$ Windows box you can download it from here

PSCP.EXE -scp wr740nv1_en_3_12_4_up(100910).bin root@192.168.1.1:/tmp

The command above will let you send the stock firmware from your local drive that you have downloaded to the TP-Link WR740N OpenWrt third party firmware. Once the file completely uploaded follow the next command below.

cd /tmp

mv wr740nv1_en_3_12_4_up(100910).bin tplink.bin

mtd -r write /tmp/tplink(100910).bin firmware

This is the actual process on the TP-Link WR740N version 2.1

root@OpenWrt:/tmp# mv wr740nv1_en_3_12_4_up(100910).bin tplink.bin
root@OpenWrt:/tmp# mtd -r write /tmp/tplink.bin firmware
Unlocking firmware ...

Writing from /tmp/tplink.bin to firmware ...
Rebooting ...

After the WR740N reboots point your web browser to its default http://192.168.1.1 now you will see the login page.


Congratulations! you have just reverted your TP-LINK WR740N version 2.1 to its original stock firmware from OpenWrt without using the serial debricking kit.

May 14, 2020

TP-Link WR886N Chinese Third Party Firmware

Here we go after we done moding the FLASH and RAM its time for us to Brush it with the third party firmware. This device WR886N version 3.0 is supported by OpenWrt, SuperWrt, DD-Wrt and Gargoyle Linux opensource firmware. What we need is a USB cheap 25Q FLASH programmer and USB to TTL for the serial console. Next is decide to which boot loader you want to be accustom with.


The first boot loader utility is BREED aka  Boot and Recovery Environment for Embedded Devices is a close source boot loader by hackpascal, its in Simplified Chinese language just use Google translate to let you understand their script. You can download it on Google filename breed-tp9343.bin.

The second boot loader is also a BREED but modified version of the Simplified Chinese language its in English version. Download on the Giant Search engine filename u-boot_tp9343.bin.


The third boot loader is from TP-Link WR940N version 3.0 stock firmware stripped u-boot, filename is u-boot_tp-link_wr940nv3.bin.


The first brushing I did is with the TP-Link stock firmware WR940N version 3.x is also identical to WR941ND version 6.x such SoC. RAM and FLASH. Likewise WR940N version 4.x and 5.x too.


This is TP-Link stock firmware version 4.x if you want to know more about the internal web graphical user interface just visit tp-link.com for the respective wireless router emulator.


Brushing with third party firmware such as OpenWrt is straight forward since you can just upload via web interface if the wireless router is in the TP-Link stock firmware, TFTP is another method on brushing the firmware its usually use for device recovery from bricked devices.


I have more favor on OpenWrt third party firmware because of its plenty packages for the wireless router. Successfully also tested on LEDE both WR940N and WR941ND. On the Chinese forum someone mention that the WR886N ver3.0 can be flashed with TP-Link WR940N version 5.x, ow true is it?


This is TP-Link new web graphical user interface that added some features like Access Point only, Repeater or Range Extender, and WISP unlike the old version this addition function is not supported except for WDS and Wireless router only. The said added features were only exclusive for the TP-Link WA series device not on WR and WDR. The firmware option brushing may depends on the users, what I like on OpenWrt firmware is SoC TP9343 can be fully enhanced to 26dBm or 398mW of power.

If you know other third party Linux firmware that I did not mention let me know I want to brush it with your firmware that you have tried.

Oct 31, 2017

For TP Routing: Modify firmware size, unlock U-boot partitions, add Fullflash partitions

TP-Link TL-WR703N factory default has only 4MB of flash and 32MB RAM, if you want to play with the OP is simply powerless, so I changed the 8M Flash and 64M RAM.

First, modify the firmware size

OpenWrt in the compile time will be based on each model profile to generate the firmware, if the generated firmware integrated too much software and more than 4MB it will be error, you will find that the firmware can not be generated.

Specific symptoms See my last Post start compiling and compiling openwrt.

Compilation passed, but did not find the firmware in ./openwrt/bin/ , turned up the compile output prompt, and found a similar

  1. [mktplinkfw] kernel length aligned to 914864
  2. [mktplinkfw] *** error: images are too big
  3. make[3]: [install] Error 255 (ignored)
Here's how to modify the default firmware size of the TP series router


Actually very simple, find the target/linux/ar71xx/image/Makefile, search for the model you want to modify, such as 703N, find the relevant 703N parameters

Then change the tplink-4mlzma to tplink-8mlzma on the line, and then

  1. define Device/tl-wr703n-v1
  2. $(Device/tplink-8mlzma)
  3. BOARDNAME := TL-WR703N
  4. DEVICE_PROFILE := TLWR703
  5. TPLINK_HWID := 0x07030101
  6. CONSOLE := ttyATH0,115200
  7. endef

After you save the exit, you can compile the 8M firmware for tl-wr703n.

Note: Some outdated tutorials on the web say that you also need to modify tools/firmware-utils/src/mktplinkfw.c after I test, the latest source code inside this file is not about 703N and other router parameters, you do not need to modify.


II. Unlocking u-boot Partitions

The horse has the hoof, the person has the slip, does not have to die u-boot how dares the confidence to play the OP? Here we will talk about U-boot, U-boot is the embedded Linux system boot, equivalent to the computer BIOS. The traditional u-boot is only responsible for booting the firmware, once the firmware does not start, then the entire router is brick, there is a TTL is also easy, no one can only on the programmer. But there is not dead u-boot, in fact, with the Web Brush Machine interface U-boot, MA Ma no longer have to worry about my machine into bricks, completely without the demolition machine can save bricks. Want to know their own Google, recommended Enshan hackpascal breed, and brush into U-boot tutorial , I do not discuss how to use u-boot, mainly brush into the u-boot will encounter

  1. could not open mtd device u-boot ,can't open device for writing

This is because OpenWrt is locked by default, unless it is unlocked when the firmware is compiled. U-boot

Locate /target/linux/ar71xx/files/drivers/mtd/tplinkpart.c, search for U-boot, find

  1. parts[0].name = "u-boot";
  2. parts[0].offset = 0;
  3. parts[0].size = offset;
  4. parts[0].mask_flags = MTD_WRITEABLE;
Then remove parts[0].mask_flags = MTD_WRITEABLE; This line will be recompiled.

WARM hint: TP series Brush finished breed must change the MAC address for a valid value, otherwise wireless will hang!
III. Add Fullflash partitions

Now the bricks can be saved, but save back the data are all gone, but also start the configuration, want to think all big ah, the good habit of nurturance is to fall roar! Add Fulllash partitions so that you can back up the entire programmer firmware with the DD command, and there is no such thing as an art loss.
Same as /target/linux/ar71xx/files/drivers/mtd/tplinkpart.c to add the following code

  1. parts[5].name = "fullflash";
  2. parts[5].offset = 0;
  3. parts[5].size = master->size;

As shown in the figure


After recompiling and brushing, you can see the Fullflash partition.

View partitions with cat /proc/mtd

Effect as shown


You can then simply back up the programmer firmware through the dd if=/dev/mtd6 of=/tmp/fullflash.bin !

5aimiku

Dec 3, 2013

myBRO : Green Packet DV235T WiFi Weak Signal Solved

On my previous post I have experimented my Green Packet DV235T 4G WiMAX wireless broadband modem router CPE with the  leaked stock firmware (web_update-3_5G-v2.10.14-g.1.0.5-gp.tar) on my device the SmartBro new product aka myBRO. So far so good after upgrade it did not brick the device with the said stock firmware but it is mismatch with the hardware model it is suppose for WIXFMM-129 and not for WIXFMM-114 the DV235T board. There are few bugs that we netizens have faced by upgrading with this new updates, although I can connect to the network but the most concern among others is the WLAN. The WiFi signal drops significantly even if you are closer or nearer to the device you will really get disappointed on hooking your Smartphone, Tablet or even with your Lappy. To solve this bugs the only way to go is to upload the correct stock firmware (web_update-2_3G-v2.10.14-g1.0.4-gp.tar) of the device, so here's how to do it. Some of the screenshot I have provided as guide to those who are newbies to the myBRO DV235T CPE.


Update: I added this screenshot above because of so many misleading forumers  seeding/leaking the Green Packet Stock Firmware appearing to be legit or the right one, but you will end up with discouragement when you find out it is just same firmware that same guy leaching it. If you really want to make sure that you uploaded the correct firmware to your myBRO DV235T is correct here's the inside to the two (2) Green Packet stock firmware comparison.

First, login to the Green Packet DV235T with the default username and password as "admin".


Next, navigate to the Main Menus above on the graphical user interface (gui) of the DV235T as you can see on the screenshot below. On the left corner Sub-menu click Upgrade button, then  the Browse button and locate your downloaded Green Packet DV235T stock firmware (web_update-2_3G-v2.10.14-g1.0.4-gp.tar) then Upload.


If you are sure now with the file that you have download is the correct or the appropriate stock firmware for the myBRO DV235T 4G WiMAX wireless modem router, then its time for you to upload it.


Finally, just click the Apply button to confirm that the stock firmware to be uploaded to the CPE. Wait, the progress indication bar will appear from zero (0) until it successfully to be completed at 100%.


After the 100% progress indication bar completed the firmware upgrade now is done, click the button Close then the myBRO DV235T Green Packet CPE will reboot automatically in 70 seconds.


Wait until the graphical user interface (gui) login page will refresh and you will be prompted again to enter the device with same username and password. Now everything will be in placed your DV235T is now already being updated with the right stock firmware, the WiFi issue now is already solved.

You can leave your message on my comment box, I also offer repairs and upgrade for myBRO DV235T just email or PM me I can help you. Enjoy!

Aug 27, 2015

Brush TM UniFi DIR-615 (D-Link) With DD-WRT Firmware

The TM provided DIR-615 (the orange router) with custom DD-WRT firmware. The primary goal of this guide will basically be to guide users who wish to flash their TM provided Unifi DIR-615 routers with dd-wrt. However, users who have spare dd-wrt flashed routers around will also be able to use the information here, to set up the VLAN tagging for the PPPoE connection that is required by Unifi.


Pros of using DD-WRT firmware
  • The router gets increased stability
  • Less lockups/crashes
  • Less connection drops (I'm looking at you, generic VPN protocol!)
  • Support for a larger amount of concurrent connections
  • The ability to increase your wifi signal strength (stock firmware has really weak wifi transmit power)
Cons of using DD-WRT firmware
  • Unifi home users (VIP5/10/20) lose IPTV access
  • You lose TM support for your Unifi service (it was pretty much non-existent in the first place!)
  • You probably void the warranty on the router
  • You might brick the router if you don't know what you're doing
WARNING!!
  1. Before we begin, we would like to remind that we are not responsible, if you absolutely screwed up your UniFi router and are left with dial-up/Streamyx access for the next 3 weeks (or at least until TM decides it's time to pass you a new unit).
  2. This guide requires basic to advanced networking computer knowledge. Read through all the steps that listed down here and make sure you understand it. If you don't, get a friend who does to follow this guide and do it for you.
Requirements (MAKE SURE YOU HAVE THESE FIRST!!):
  1. Original TM DIR-615 G2 Firmware (Just for backup)
  2. Brainslayer's DD-WRT DIR-615 REV D factory webflash - http://dd-wrt.com/others/eko/BrainSlayer-V24-preSP2/2010/08-07-10-r14896/dlink-dir615d/dlink-dir615d-factory-webflash.bin
Must Comply these Requirements

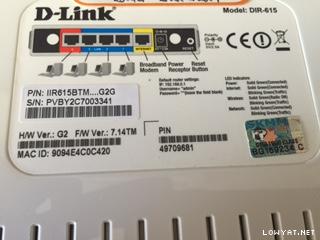
a.) Router's firmware revision - This can found in the bottom of the router. (The D-Link DIR-615 Revision G2 runs on RT3052F@384 chipset which is same with Revision Dx, so using firmware from Dx version is possible)

b.) The firmware is supported - We can check this via dd-wrt router-database.


c.) Router's firmware revision


HOW TO FLASH TM UniFi DIR-615 Router WITH DD-WRT

1.[ Set a static IP for your PC in the 192.168.0.x range with a subnet mask of 255.255.255.0 (Example: 192.168.0.50).
2.[ Connect a network cable from your computer's network interface card to the WAN PORT (not LAN port, WAN port) of your DIR-615 G1.

3.[ Turn off your DIR-615. The router is now in Emergency Room mode. (Hold down a pin to the RESET button of the router (at the back next to its power socket) and turn on the router while holding this RESET button down. If you did this properly, the power button on the router should now be orange and blinking continuously).
4.[ Open up Internet Explorer and head over to http://192.168.0.1/ You should be able to see the Emergency Room interface. (Please use Internet Explorer as Firefox/Google Chrome can cause some weird issues with this particular web interface).
Emergency Roon After Reset The DIR-615 Router


5.[ Hit the Browse button and select the Brainslayer DIR-615 rev D webflash firmware (dlink-dir615d-factory-webflash.bin) that you downloaded earlier. Upload it to the router. (Upon a successful upload, you should be able to see a success confirmation message).


6.[ Let the router reboot by itself.
7.[ Once power light turns GREEN.. Unplug the network cable from the WAN port and plug into any LAN port on the DIR-615 router (Recommended, ports 1-3).
8.[ The routers IP should now be 192.168.1.1, so change your PC's LAN IP from 192.168.0.0/255.255.255.0 to something in the 192.168.1.0/255.255.255.0 range. (Example: 192.168.1.50 with a subnet mask of 255.255.255.0).
9.[ Go to http://192.168.1.1 and configure your router's security (password) settings.
10.[ Before you continue to setup your PPPoE link, please setup your wireless security. The wireless radio should be on by default and will be accepting connections.

DONE ! FLASHING THE TM UNIFI D-LINK DIR-615 ROUTER WITH DD-WRT FIRMWARE.

Jan 15, 2014

New firmware for Mp4 Chinese player

Its technically not a new firmware because there are no enhancements. But it change the look of the player. You get a new user interface like the iphone style. You get a new opening and closing animation etc.


See the picture to see what the new interface looks like.

Warning it will only work on the player that look similar to the one in the picture.

For others who want to change their mp4 player firmware here is are some software you will need.

Download S1fwx to extract your firmware on to your computer

its a dos program just extract it and click extract.bat and let it run and when asked give the driver letter of your mp4 player. and it will download a file called dump.bin which is your mp4 players firmware.

It should take like 30 seconds or so.

Download S1res to edit your firmware

Once you download the firmware you can open the file in this program and edit the firmware by adding your own pictures or text etc.

Then using the mp3 player utilities upgrade tool update the player firmware.

The upgrade takes only 30 seconds or so. Be sure not to update the wrong firmware. Good luck

Download the New mp4 firmware here

Jan 16, 2014

Flashing And Upgrading Chinese MP4 Player Firmware

If your are not an audiophile and don't care much about audio/video quality, cheap chinese MP3/MP4 players are just for you, these devices are quite popular and just get the job done, since there is no quality control over these devices they do not last long, one of the most common problems faced with these portable players is the issue of firmware software corruption, I encountered a similar problem with my friends PMP which refused to start getting stuck at loading screen, the only solution was to flash the firmware but the problem was unavailability of any information and tools to get the job done, after long research and flashing the firmware I was able to successfully recover the MP4 player to working condition.

Here is an step-by-step tutorial on how to identify your MP4 player, download its firmware and flash it using appropriate tools :


WARNING : This procedure can render your device dead, so do not try if your player is working fine.

The most important step of the whole process is to correctly identify your device CONTROL CHIP and CPU, using wrong firmware or flashing tool may cause damage to your device, unscrew and open your device and write down all chip id's and motherboard numbers you see, you can also try the EasyChips - firmware identification utility but it did not worked for me.


You will now need to download the correct firmware and flashing utility for your device, visit sites below and search for your control chip and cpu to download the firmware and flashing utility, you can also post on user-forums to get help identifying the firmware :
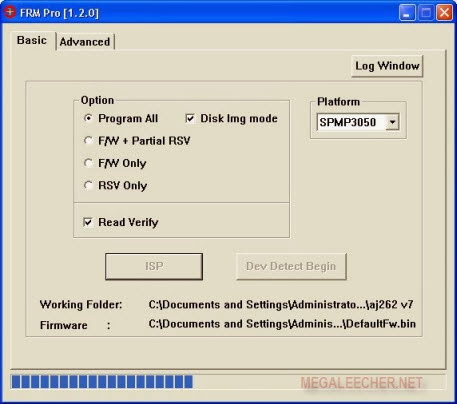
In my case the chipset was Sunplus AJ262-V7 and the utility needed to flash it was FRM Pro.
Once identified you need to connect your device to computer via USB in camera mode (Press A + OK button and plugin USB cord on player), for Windows to identify this mode you will need camera drivers you need to point Windows Found New Hardware Wizard to Driver folder downloaded with the FRM Pro utility above, this will install the first camera driver, for correct identification by flashing utility you need to install a second camera driver - open Windows Hardware Manager and install unidentified camera device drivers by pointing the driver wizard to Driver folder used earlier.

Now install and launch FSM Pro flashing utility and follow these instructions to install the new firmware.


Let the process finish, this will take a while, do not disconnect or interrupt the process until you see a success message in log window.


Unplug your PMP from computer and it should be working now.

Nov 20, 2013

MyBro : How-To Change MAC Green Packet DV-235T

We all know that the new product of SmartBro the "MyBro Abot Kaya Broadband" 4G WIMAX is a super secured customized firmware by Smart/PLDT ISP as of today. Saying that so its not insecured because many of us has already have tried navigating it graphical interface (gui) including the telnet portion with used of "smart" username and password account but end up with limited privileged, some of the menus are missing likewise on the command line interface (cli) if your wireless modem device is already updated with the firmware v2.10.14-g1.0.6-smart over the air (OTA) then the chances on tweaking your MyBro CPE is none of the above.

In this section, the oldest released of MyBro 4G WiMAX DV-235T that the firmware has not been updated OTA is firmware version v2.8.7.2-154 if you have this kind of CPE customized firmware by Smart/PLDT then you are all the way to be able to change the WAN MAC address of your Green Packet DV235T.

So here's the DIY on how-to change the MAC address of MyBro 4G WiMAX Green Packet DV-235T.


First, if you are not at eased with telnet utility then you can use Putty as an alternative to it you can download from here. Extract anywhere on your desktop, then login to the Web gui default address http://192.168.0.254 with the username and password as "admin".


Check the Network Status, take note of your current WAN MAC address in case you want to put it back just save it on a notepad. Next is open the Putty utility via SSH or Telnet the option is yours with the default IP address 192.168.0.254.


Login as "admin" for the username and password its same with the web gui account.


The next thing we do is use these following commands orderly to change the WAN MAC address successfully.

enable
router
wan mac
commit
exit
wimax
wmx freq add 2505000 10
wmx freq add 2507500 10
wmx freq add 2510000 10
wmx freq add 2602000 10
wmx freq add 2612000 10
wmx freq add 2622000 10
wmx freq add 2638000 10
commit
wmx widescan add 2505000 2639000 1000 10
commit
exit
reboot


From the screenshot above we have just successfully change the WAN MAC address of MyBro 4G WiMAX Green Packet DV-235T likewise the allotted working frequency of the wireless broadband modem. Please wait the CPE will reboot, login again verify that your MyBro DV235T WAN MAC address now has totally changed.


The MyBro firmware version v2.8.7.2-154 is very rare to find since all CPEs are being updated thru TR069 over the air (OTA) by the Smart/PLDT system the chances to get this firmware is very reluctant because the person who have this don't want to leak or seed it to any forum (their business). Its not totally a hopeless for us since there is already an alternative of doing this, there is another Green Packet firmware its a stock firmware you can upload the firmware via web gui if you do not have the NAND flash programmer or write it directly with the TSOP48 socket with any alternative NAND flasher.

Jun 26, 2019

PLDT Fibr ONU AN5506-04-FA RP2631 Super Admin

Oh Well!!! Today when I woke up something strange happen to my PLDT Fibr Optical Network Unit (ONU) AN5506-04-FA as I have been expecting the so called RP2631 firmware update will be enforce and will be force to whether I like it or you don't, it will and will really be patched including YOURS and MINE.

What is new to the PLDT Fibr ONU firmware update RP2631? The Giant Telco ISP likes and wants their AN5506-04-FA/T ONU will serve just like a sitting duck as much as possible it would be a media converter only, why because 171 is fed up already about your calls you are so annoying!!!

Here's the quick and simple summary that PLDT wants to their all-in-one device aka the Fiberhome AN5506-04-FA/T Optical Network Unit and likewise a wireless access point (WAP) router built with two WiFi frequency such as 2.4GHz and 5GHz, it is also equip with two FXS for POTS but in addition you can insert your USB media device too. SAMBA and FTP server is great on this ONU device if were not restricted on the custom PLDT Fibr firmware.

Let see on the Graphical User Interface (GUI), the AN5506-04-FA/T RP2627 firmware downward you can login on the insecure port 80 via HTTP but not here in RP2631 HTTPS is being enforce while port 443 is use.


Next let see if the http://192.168.1.1/info.asp is still vulnerable without using any credential to login to the Fiberhome AN5506-04-FA/T ONU device.


Good patching the firmware already updated, its no longer accessible unlike before you can see the details without going to login to the PLDT Fibr ONU device. Thanks for that effort!


Now the exciting one, lets login to the PLDT Fibr AN5506-04-FA/T firmware RP2631. The username "admin" with the password "1234" for ordinary user account is no longer accepted its now being omitted. So what about the account for the username "adminpldt" with the password "6GFJdY4aAuUKJjdtSn7dC2x" will it be still accessible? And another thing is what happen to the Super Admin Account the username "fiberhomesuperadmin" with the password "sfuhgu" will it still work here on the new firmware updates.


As I have tested and verified all three previous username and password for PLDT Fibr ONU device AN5506-04-FA/T is no longer valid such as username "admin" password "1234", username "adminpldt" password "6GFJdY4aAuUKJjdtSn7dC2x" and username "fiberhomesuperadmin" password "sfuhgu" after the updates. Forget about your custom username and password that you have saved its totally gone.

When I dive and go into the shell I see two account credentials is allowed to get in,  only the Administrator account and the Super Admin account that the PLDT Fibr ONU is giving the permission to do login into the device nothing else can access the Graphical User Interface as for moment in time for my ONU. 

To access the PLDT AN5506-04-FA/T RP2631 firmware GUI Administrator account you have to point your web browser to https:/192.168.1.1/fh but you have to login first as Super Admin and enable the Web Admin Switch from the Management>> Device Mangement>> Debug Switch. Once enabled the Web Admin Switch logout and login again as Administrator account you can now again enjoy the privilege that have been enjoyed before of your ONU PLDT device.


Seen the above screenshot? Yes, that is the new PLDT Fibr ONU AN5506-04-FA/T RP2631 firmware update for the Super Admin account username "f~i!b@e#r$h%o^m*esuperadmin" its a 27 character so be careful on typo error its case sensitive. For Administrator account username still its "adminpldt" the password is no longer "1234567890" nor "0123456789" and certainly not "6GFJdY4aAuUKJjdtSn7dC2x" they changed it already. I am still planning to make a tutorial for the firmware downgrade from RP2631 to RP2627 will follow it soon to write.