Dec 19, 2014

Coraid ZX NAS Combines ZFS and Scale-Out Ethernet SAN

Coraid Inc., developer of Ethernet SAN solutions with more than 1,500 customers, unveiled the ZX-Series family of NAS servers.


Designed for cloud, video and big data customers, this unified storage solution is powered by the Oracle Solaris ZFS file system combined with Coraid's EtherDrive technology to enable scalability, performance and operational simplicity.

"Organizations are increasingly challenged to provide predictable, cost-effective file performance in the face of uncontrolled data growth," said Carl Wright, EVP at Coraid. "By extending our product family to include a best-in-class NAS offering, Coraid can meet that challenge with a unified storage solution that takes full advantage of the scalability and performance of Ethernet SAN."

For Cloud, Video and Big Data Workloads

Capturing, storing and analyzing ever-larger sets of human- and machine-generated data stresses the scalability of legacy NAS systems. The ZX-Series is for processing large data sets such as consumer behavior analysis or HD and 3D video format editing because it provides the throughput and scale necessary to support accelerating data growth.

The ZX-Series delivers performance using read- and write-optimized flash caches and parallel 1Gb/10GbE connectivity.

By connecting to Coraid EtherDrive SRX arrays via ATA over Ethernet for a scale-out architecture, the ZX-Series scales performance to multi-petabyte capacity across a shared pool. The performance and scale is complemented by data protection and features including triple-parity RAID, redundant array of independent nodes (RAIN), active-active clustering, unlimited snapshots, deduplication and compression.

"Our research confirms that scale-out storage designs built on Ethernet align well with the evolving architecture of the virtualized data center," said Roger Cox, research VP at Gartner. "Functions such as hybrid storage pools, data deduplication and compression optimize storage utilization, thus reducing acquisition costs and improving TCO."

ZX-Series features include:

  • EtherDrive integration for multi-petabyte scalability and simplicity
  • Real-time analysis and diagnosis of performance to monitor and enforce service levels
  • Active-active cluster option for high availability
  • Data compression and in-line deduplication to improve storage efficiency
  • File-based snapshots, clones and replication for data protection
  • Automated storage hierarchy with hybrid storage pools (HSPs) containing DRAM, flash cache and HDDs to optimize performance
  • Seamless multiprotocol integration and secure data sharing between Microsoft Windows, Linux and Unix environments

Coraid

Coraid is High Performance and Low Cost Networked Storage

Coraid is redefining the fundamental economics of storage with Ethernet SAN solutions that provide enterprises of all sizes with flexible, high-performance, scale-out storage ideally suited to dynamic High Performance Computing, video, virtualization and cloud environments. The key is Coraid’s use of the advanced protocol ATA over Ethernet.

Business Benefits
  • Large amounts of shared storage at low prices.
  • Better performance than traditional storage technology.
  • Especially good for storing video and deploying Virtual Desktop Environments.
  • Over 1300 Satisfied Customers of Coraid including Ford and Disney.
  • New storage access technology means lower price and higher performance with better reliability.
Technical Features and Benefits
  • 5-8x Price/Performance advantage over Fibre Channel and iSCSI storage arrays.
  • CorOS™ parallel processing scale-out SAN operating system.
  • Distributed, modular architecture scales from a few Terabytes to Petabytes.
  • Automatic Load Balancing reduces bottlenecks; ideal for VMware environments.
  • Continuous RAIDShield™ testing fixes disk bad blocks; reduces drive failures.

New Technology Designed for Rapid Access at Low Cost (see above)
  • Layer-2 Ethernet
  • Less than $1,000/TB
  • Incredibly fast (>1,800 MB/s)
  • Plug-and-play configuration
  • Scale-out architecture
Better Than Traditional Fibre Channel or iSCSI Networked Storage (see above)
  • Expensive
  • Controller hurts performance
  • Complex to set-up and maintain
  • Difficult to scale

Simplified SAN Management

Coraid’s CorOS™ software provides the intelligence that enables rapid installation (minutes not hours), simple management, and RAID redundancy. The simplicity of EtherDrive Storage makes it easy to manage, because it’s easy to understand.

EtherDrive is a disk connected to your server via Ethernet. That disk may actually be a RAID volume, but it just looks like a local disk to the server. No need to learn complicated technology like Fibre Channel. Just add SAS, SSD or SATA disks to the EtherDrive Storage Appliance and you have all the space you want available for any server attached to the Ethernet SAN. It’s that simple.

Disruptive Price/Performance

Coraid’s EtherDrive® Ethernet SAN storage solutions deliver flexible, high-performance, scale-out storage designed from the ground up for simplicity and virtualization. EtherDrive® storage enables lower OPEX and 5-8x price performance advantage over legacy Fibre Channel systems.

How-To Diskless AoE – 09 Preparing a Real PC Lan Booting

To boot a real PC you should need to Convert a Windows installation to a .vhd, .vmdk or .img file, but in some cases you can use the VirtualBox Windows installtion to boot real machines ! So maybe you dont need to Convert.

The cases are if the NIC Card is recognized by operating system Windows XP/7/8 by default. Verify your onboard NIC and mark if that exists on default Windows drivers list. The CCBoot(r) Client have a PNP tool that list and collect the NIC Drivers from Windows system and put this nic drivers available to diskless boot.


See the CCBootPnP:


Click in the 3 buttons to apply the Drivers…  Now procedd to try boot your .vhd or .vmdk file from Diskless Server.

If Windows loading freeze,

 you need to Convert a real Installation, try this procedure:
Converting the Real PC with Windows installed ( apply to xp, 7, 8, etc…)

On PC Windows Station:
Task 1 – Download HDClone http://www.miray.de/products/sat.hdclone.html and install.
Task 2 – Download AoE Initiator http://www.starwindsoftware.com/aoe-ataoverethernet-initiator and install.
 
On Diskless Server:

Task 3 – Create a virtual disk with a required Windows size (that can support the actual partition size of your current Windows Station). You can use the graphical VirtualBox Manage to create .VHD 

Files, or use the ‘VBoxManage.exe’ tool.

If you running in a Windows Server with VirtualBox installed, you will have the VBoxManage.exe command:


example creating 25 Gb of disk:

On Windows:


On Linux Distro (version 0.0.15+):


Task 4 – on server export as a AoE target with vblade (Windows Server or Linux Distro method).

On PC Windows Station:

Task 5 - Use AoE Initiator from StartWind to connect to the exported aoe disk by Diskless Server, with  ”Automount the device” option unmarked.

Vblade tool from Windows Diskless Server exporting a disk:

The disk wil be connected:


Task 6 - Use HDClone — Clone hdd physical to virtual attached disk by AoE Initiator.


Task 7 – Validate the Conversion ( cloned ), initialize/activate the disk on ‘Disk Managment’ on ‘Computer Manager’, after Windows recognize the disk, view the disk by Windows Explorer.


Task 8 - Remove the physical HDD from PC Station and try to Boot From Diskless Server;

How-To Diskless AoE – 08 Editing with notepad++ the menu file ‘menu.lst’ of TFTP Root

Now its time to configure the Boot Menu of your Diskless Solution.

We already copy the necessary files to TFTP Root folder ( grldr, the new ipxe.iso and menu.lst) .

Open with Notepad++ the file ‘menu.lst‘.

Erase all the contents, copy and paste this code block above:

title === MENU BOOTS ===
()
title
()
title Windows 7 Diskless
map --mem (pd)/ipxe.iso (0xff)
map --hook
chainloader (0xff)

Now start, DHCP Server and TFTP Server and test the system with VirtualBox with a machine without disks.

Of course Boot from LAN:

Your menu will open:

Press <ENTER> and see the magic !


Select the respective option and go, your Windows Diskless will be booted.

Thats all ! Cya

To prepare a Real PC , go to Step 9

Dec 18, 2014

How-To Diskless AoE – 07 Rebuilding the file ipxe.iso with UltraISO

Now its time to create the POINTER to the AoE Target to automaticaly boot.


* – watch in HD on Youtube.

We are using the ipxe.iso with a little additions to do this.

You will need download the ipxe.isoUltraISO and Notepad++ Software to complete this task.

Task 1 – On UltraISO open the file ipxe.iso


Drag the file ISOLINUX.CFG to outside UltraISO window and edit this file with notepad++, put the last line with ‘INITRD conf.ipxe‘,  save and drag the file again into UltraISO. Overwrite YES.
# These default options can be changed in the geniso script
SAY iPXE ISO boot image
TIMEOUT 30
DEFAULT ipxe.lkrn
LABEL ipxe.lkrn
KERNEL ipxe.krn
INITRD conf.ipxe

Task 2 – With Notepad++ create the file  ’conf.ipxe‘  with content:
#!ipxe
dhcp net0
set keep-san 1
sanboot aoe:e0.0

Important ! Save the file conf.ipxe with notepad++, and drag the file backing into UltraISO.

Your UltraISO looks like this:


Task 3 – Save another ISO

On UltraISO menu, go to ‘Save as’ and save ipxe.iso into your TFTP Root folder.

Now you have a ipxe.iso with aoe target address (ex. e0.0) to boot.

Its time to create a PXE Menu to boot your new ipxe.iso !

Proceed to the Step 8

How-To Diskless AoE – 06 Installing and Configuring vBlade Target System

Now its time to install the Target AoE Server, we will use the vBlade ported to Windows to start.


* – Watch in HD on Youtube 

With this software we will export a aoe target (like e0.0) with the virtual disk file ( .VHD or .VMDK ) from the prepared Windows 7 that we installed on Virtual Box.

Important: To vblade work properly on your Server you should have WinPCAP installed already.

After download the installer

Task 1 – Install:


Configuring

Task 1- Open the icon ‘Run vBlade’ on Program Group


Task 2 - on cmd window export your new .VHD or .VMDK Windows Virtual Machine to AoE Target !

Type:

First find the Device Name of your Network Card with bogus caracters (xxx).
c:\vblade.exe -b 65 0 0 xxx "d:\path_to_you_vhd\windows.vhd"

after copy and paste the \Device\{value}


c:\Program Files (x86)\vBlade\vblade.exe -b 65 0 0 "\Device\{value}" "d:\path_to_you_vhd\windows.vhd"


*- where \Device\{value} of your NIC !

Your target is e0.0 ( shelf 0 slot 0 , you can export many .vhd or .vmdk files to many diskless workstations )

ok, now you have your Target UP !

Tip: Control your vBlade’s Session with a nice Interface

Note: Make sure your Windows Firewall are disabled and your Anti-Virus Protection will not block the connections.

Continue to Step 7

How-To Diskless AoE – 05 Instaling a virtual machine in VirtualBox with WinAoE driver and CCBoot Client

Now we gonna change the focus, to prepare a Virtual Machine with VirtualBox to test our environment while we configuring the the Diskless Server.


* – Watch in HD on Youtube
- So, first Install VirtualBox, and create a VirtualMachine to Install one Windows. We gonna choose now the Windows 7 ok ?

Task 1 – Install Windows 7 VirtualMachine.


You should have the .ISO DVD from your Windows to install with Virtual Box.

Specifications for Virtual Machine:  Standard, 1 or 512 mb memory, Disk 25 gb, etc.

Note: Create the disk with .VHD or .VMDK format with fixed size !

- Install WinAoE Driver

Task 1 - To driver be loaded we should disable the Integrity checks for sign certification of drivers.

( Note: Windows XP not need to use this two commands, the driver will install clearly, proceed… Task 3 )

In Windows open a cmd ( command prompt ) and type
C:\>bcdedit  -set  TESTSIGNING ON
C:\>bcdedit -set loadoptions DDISABLE_INTEGRITY_CHECKS


Task 2 - reboot Windows ( mandatory )

Task 3 - Download the driver here, because this version is self signed : winaoe.zip

Task 4 - Uncompress file into a folder

Task 5 - Go to Start Button -> Run –> type ‘hdwwiz.cpl’

Task 6 - Install driver fwith type Storage Adapter from aoe.inf


Task 7 – reboot Windows

Task 8  - Open ‘Device Manager and see is the AoE Driver is correctly runnig


Open a cmd ( command prompt ) and type command ‘aoe’ , type command ‘aoe scan’, the result must be ‘No AoE targets found’, your AoE Driver is working !


 - Install CCBoot Client

After install Windows, you should download the CCBoot Client ,install it and Run It to complete the installation on Virtual Machine with this settings. ( no mark options ).

Task 1- Click on “Install CCBoot Client” button to finish.  Power off the Virtual Machine.


Task 2 - Shutdown the Virtual Machine.

Proceed on How-To to Step 6

How-To Diskless AoE – 04 Putting the necessary files of grub4dos on TFTP Root folder

After download the grub4dos package from the project website. Open it and extract the files grldr and menu.lst and put on  your  tftp-root folder.


* – watch video in HD.

Task 1 – Extract two files


Task 2 – Your tftp-root folder should be like this, with this two files (+ ipxe.iso will see later):


Proceed on the How-to to the next Step 5

How-To Diskless AoE – 03 Instaling and configuring TFTP Server on Server

Choose your TFTP Server from the suggestions.

Im using a TFTP Server from SolarWinds, its completly freeware and works fine.  To explain configuration im using this package. But as you know, you can done with other.

Installing

Task 1  - <INSTALL>


Task 2  -  <NEXT>


Task 3  - <NEXT>

Task 4  - waiting…


Task 5  - <FINISH>


Task 6  - Click on Start Windows button and find SolarWinds TFTP menu program group. Open the program.


Task 7  - Menu “File” -> “Configure”


Task 8  - Configure like image, and choose your own tftp-root folder.

Proceed on How-To to next Step 4 - Putting the necessary files ( grub4dos )

How-To Diskless AoE – 02 Instaling and configuring DHCP Server on Server

* – watch video in HD, click on Youtube

Im using a DHCP from Uwe.Ruttkamp. The explain configuration im using this package. But as you know, you can done with other. Just put the option bootfilename string as ‘glrdr‘. ( alternative download link: glrdr )

Its very simple and have with a nice Wizard. To start click on ‘dhcpwiz.exe‘


Task  1:  Just click in <Next>;


Task  2: Select your internal network interface;


Task  3: If you want to use the TFTP from this package, mark TFTP option and choose a folder. Note: on the root path folder put the file ‘grldr‘ and ‘menu.lst‘. If NOT just Click in <NEXT>;


Task 4: Write the string ‘grldr’ on bootfile option and your internal domain. Click in <NEXT>;


Task 5: Mark overwrite and click on “Write INI file” and <NEXT>;
 
Task 6: Start the Service. and <FINISH>;

Done

If you want to use other package for TFTP continue to the step 3, if NOT skip to Step 4.

How-To Diskless AoE – 01 Overview of the Solution

This How-To enable a Windows based solution that uses AoE technology to bring an entirely new range of solutions, flexibility and cost reductions to businesses. The feature of AoE is a server based network where software applications and programs are held on the server, and runs on Client PCs (Diskless Node). Therefore, Client PCs do not require a hard disk anymore. Centralizing operating system data by deploying AoE enables storage virtualization at the level of the local hard drive, and allows extremely fast server and desktop deployment. This makes AoE Diskless an ideal network management software which is suitable for all kinds of networked environment industries such as Education Institutions, Training Centers, Offices, Cybercafé, Karaoke, and can also be used in cluster computing.

Until today, administrators or technical support staffs are still having frustrations when it comes to troubleshooting and maintaining a group of networked PCs. The majority of problems faced by administrator or technical support staff in a networking environment are:-
  • Programs/Applications/Games/Windows Updates to all PCs
  • Maintain different PC specification
  • Efficiency and Troubleshooting of PCs
  • Identifying faulty hardware and replacements
  • Hard disk limitation and upgrades
  • Virus attacks and Virus removal
  • Operating System Backup / Restoration
  • Windows / Files Protection
  • Freeze/Unfreeze PCs when doing updates (Recovery system)
Listed below are some quick facts if you use this How-To:

COST SAVING IN:
  • Investment for hard disk and future hard disk upgrade
  • Monthly electricity bill, go Green
  • Recovery software / hardware
  • Backup / cloning software and other update software
  • Antivirus / Anti Trojan software
  • Faulty hard disks replacements
TIME SAVING IN:
  • Programs/Applications/Games/Windows Update to all PCs
  • PC maintenance enabling easy manage on multiple branches remotely
  • Virus attacks and Virus removal
  • Windows / Files Protection
  • Maintaining different specification PCs
  • Operating System Backup / Restoration
  • Freeze/Unfreeze (Recovery system)
SUPPORT:
  • Different Client PC specification with different drivers (Motherboard / Display / Sound / etc)
  • Multi Restore Points
  • Multi Sync between Servers
  • Multiple Images – Multiple Window. (Example: 10PC using English Windows + 10PC Malay Windows + 10PC Chinese Windows)
What is AoE ?

ATA over Ethernet (AoE) is an open standards based protocol that allows direct network access to disk drives by client hosts. Using disk storage arrays that support AoE shared storage networks (SAN) can be built that leverage the power of “Raw” Layer 2 Ethernet.
  • AoE has been native in the Linux kernel since 2005
  • AoE delivers a simple, high performance, low cost alternative to iSCSI and FibreChannel for networked block storage by eliminating the processing overhead of TCP/IP.
  • Layer 2 Protocol which encapsulates ATA (the command set used by most commodity disk) in Ethernet Frames – An Ethernet request which has in it, give me block ‘00’ from disk ‘01’ on shelf ‘1’.
Protocol

AoE is a stateless protocol which consists of request messages sent to the AoE server and reply messages returned to the client host.

Messages have two formats:
  • ATA Message
  • Config/Query Messages
AoE utilizes the standard Ethernet MAC header for IEEE 802.3 Ethernet frames and has a registered Ethernet type of 0x88A2.

Legacy Fibre Channel and iSCSI protocols consist of several complex software layers see the diagram below. These layers force users through mandatory SAN point-to-point connection configuration procedures for each network path for all storage LUNs. Ethernet SAN is a connectionless protocol that connects servers and storage directly across layer 2 Ethernet. It does not require TCP/IP or user configured multi-path IO (MPIO) software. The use of layer 2 Ethernet represents a simpler approach for SAN.

grub4dos

GRUB4DOS is an universal boot loader based on GNU GRUB. It can boot off DOS/LINUX, or via Windows boot manager/syslinux/lilo, or from MBR/CD. It also has builtin BIOS disk emulation, ATAPI CDROM driver, etc.


Grub4DOS is a boot manager that can be easily installed to a flashdrive or hard drive (internal or external). It allows booting multiple operating systems directly as well as booting into bootable partitions.

grub4dos is a boot loader system. We will use this software to make a boot menu for PXE Boot.

Website of grub4dos: http://sourceforge.net/projects/grub4dos/

Download required file: grub4dos-0.4.4.zip

Alternative Download Blog Link: grub4dos-0.4.4.zip

How-To Boot Windows Diskless with AoE instead iSCSI

1.] Preparing Windows to Boot Diskless with VirtualBox/Vmare Workstation/ESX
  • Install Windows 7/8/2003/2008 on a Virtual Machine ( create a disk type .vhd with fixed size )
  • open a cmd as administrator and type two commands:
  • C:>bcdedit  -set  TESTSIGNING ON
    C:>bcdedit -set loadoptions DDISABLE_INTEGRITY_CHECKS
    
  • reboot the /virtual machine
  • Download and Install WinAoE Driver as Storage Controller
  • Download and Install CCBoot Client without options
  • Shutdown Virtual Machine
2.] On Server
  • Install a DHCP Server with option bootfilename grldr
  • Install a TFTP Server and set tftp-root folder
  • Download grub4dos and extract 'grldr' and 'menu.lst' files to the tftp-root folder
  • Edit menu.lst file only with this content:
  • title === MENU BOOTS ===
    ()
    title
    ()
    title Windows 7 Diskless
    map --mem (pd)/ipxe.iso (0xff)
    map --hook
    chainloader (0xff)
    
  • Create a text file 'conf.ipxe' with this content:
  • #!ipxe
    dhcp net0
    set keep-san 1
    sanboot aoe:e0.0
    
  • Download ipxe.iso and with UltraISO, open the ipxe.iso with UltraISO and edit ISOLINUX.CFG with this content:
  • SAY iPXE ISO boot image
    TIMEOUT 30
    DEFAULT ipxe.lkrn
    LABEL ipxe.lkrn
    KERNEL ipxe.krn
    INITRD conf.ipxe
    
  • Update the ISOLINUX.CFG on UltraISO with new content
  • Drag the file 'conf.ipxe' to inside UltraISO and save the file.
  • Put ipxe.iso on the tftp-root folder
  • Start DHCP Server
  • Start TFTP Server
  • Download and install WinPCAP and vBlade Target System ( AoE ) and export the target of .vhd.
  • Open vblade from Icon on Program Group
  • First find the Device Name of your Network Card with bogus caracters (xxx).
  • vblade -b 65 0 0 xxx “d:path_to_you_vhdwindows.vhd”
  • after copy and paste the Device{value}
  • vblade -b 65 0 0 “Device{value}” “d:path_to_you_vhdwindows.vhd”  enter 
  • Ready ! Boot one machine by LAN Boot, or create a VirtualBox/Vmware Virtual Machine without Disks !
  • You can boot a lot of Machines creating a specific ipxe.iso for each one, dont forget to edit 'conf.ipxe' with diferent targets ( e0.0, e0.1, e0.01), create respective ipxe-e0.0.iso for each workstation, add the menu.lst entry too for each ipxe-e0.x.iso, export each .vhd with vblade changing slots ( 0 1 , 0 2 etc..)
via http://windowsdisklessaoe.wordpress.com

Dec 14, 2014

How To install and configure HyperV manager on Win7 machine

If I am using HyperV - Core edition as hyper visor then what options are available to manage VM from remote ?

How are you going to manage it from your desktop PC? You do not want to have to use Remote Desktop Protocol (RDP) to connect to the server and launch the Hyper-V manager, every time that you want to administer Hyper-V. Thus, you need the Hyper-V tools for remote management up and running whenever you need them.

What about if i am not using domain environment. (what permission required to authenticate both machine which each other).

So what will my scenario prerequisite:

A client computer that is running Windows 7, and that is connected to the same network where the virtualization server is connected (both computers in a workgroup or both in a domain).

You can install Hyper-V Manager on a Window 7 machine , and from that computer, you can manage the virtual machines that are running on your virtualization server. The user experience is the same as that of Hyper-V Manager running on the virtualization server.

Download the Remote Server Administration Tools (Windows 7 Professional or Ultimate only)

On your Windows 7 Download the correct version of the tool from
http://www.microsoft.com/download/en/details.aspx?displaylang=en&id=7887

There is a 32 bit (Windows6.1-KB958830-x86-RefreshPkg.msu) version and a 64 bit (Windows6.1-KB958830-x64-RefreshPkg.msu)

Install the application.

Create the same administrator user on your Windows 7 and Hyper-V node

On windows 7 create an administrator user: Start > Control Panel > Add or Remove user accounts.

On hyper-v create the same user with the same password

Open the Hyper-V Server Configuration by typing sconfig.cmd in the command prompt

Read more @Expert-Exchange

Running Hyper-V on Windows 7 Client

Run Hyper-V on Windows 7? Unpossible!

Ok, so I lured everyone in with a provocative title, and I can’t exactly deliver – there is no way as far as I know to directly run Hyper-V on any client version of Windows 7. But there’s an important bit of software that has an obscure name that can really help you out.

The caveat is, you need a machine that’s free and supports hardware virtualization (i.e. AMD-V or VT-x). Not all machines support it, and a lot of them need some BIOS fiddling to make it work properly.

Hyper-V Server 2008 R2 costs exactly zero dollars

Nobody knows about this, and I don’t know why it’s not more popular – Microsoft gives away the Server Core Hyper-V SKU. For free. No dollars. Go over here and download it. Set this up on a machine and it should drop you at a command prompt – that’s all there is to Server Core, just a cmd prompt; that’s all you need for Hyper-V though.

Remote Server Administration Tools for Windows 7

A lot of people think that you need to have Windows Server installed to be able to administer other servers – otherwise you don’t have the MMC snap-ins, so people resort to TSing into their boxes to administer them. Ever since Vista, we’ve made a package called the Remote Server Administration Tools (RSAT), which brings all of the snap-ins like the Active Directory admin page, the DNS page, everything that’s on Server – only on Vista / Win7.

This won’t magically make your Windows 7 box be able to be a Domain Controller though, you’ll only be able to connect to other machines. However, this includes all of the Hyper-V client components – you’ll be able to view the console, manage/add machines, etc. Here’s the only trick though, the installer is kind of goofy – installing the package only adds the entry in the Add Optional Features list. Then, you have to actually choose what to install.

Combine these two, and you’ve got Hyper-V on Win7 for free

Just like the heading says, if you combine these two, you’ve got Hyper-V for free. Yahtzee! Combine this with disk2vhd, and you can get rid of a bunch of test machines and move them to VMs. Move VHDs using the SMB admin shares, like \\mycoolbox\C$\Users\Public\Documents\Hyper-V Disks

How-To Install Hyper-V Manager on Windows 7

Download and install the RSAT tools for Windows 7 from here: http://www.microsoft.com/downloads/details.aspx?FamilyID=7D2F6AD7-656B-4313-A005-4E344E43997D&displaylang=en. Install either the 32-bit or 64-bit depending on what version of Windows 7 you’re using.

Next, go to Start - Control Panel and click on Programs.


Next, you’ll see an option to Turn Window features on or off. Click on this option.


Under Remote Server Administration Tools - Role Administration Tools, find the option for Hyper-V Tools, check the checkbox and click OK. You can now type Hyper-V Manager at the Start Menu


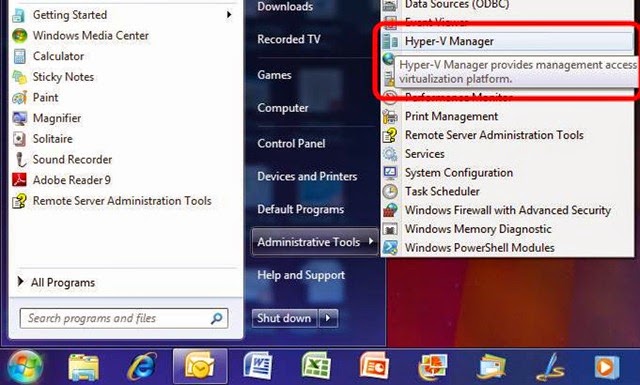
You can now type Hyper-V Manager at the Start menu or go to Start - Administrative Tools -Hyper-V Manager.


Dec 13, 2014

How to configure OpenFiler v2.3 iSCSI Storage for use with VMware ESX

Until recently I had been running my ESX VM’s on local disk. This is mostly due to not having enough time to get some shared storage up and running.

I however was determined to get something up and running for my ESX lab so that I can play around with some of ESX’s more powerful, and interesting, features such as DRS, HA and VMotion.

As with most of you money is a serious consideration so as I am not in a position to implement a fibre attached SAN solution – though this would be nice. The next best option is iSCSI. I am running both VMware ESX 3.5 and ESXi 3.5 in my lab and both provide iSCSI functionality by default to connect through to an iSCSI target.

There are a handful of good free (free is always good :) ) iSCSI software that can be downloaded. Some are standalone installs, others come in the form of virtual appliances and some both.

Here is a list of those that I know of (there will no doubt be many more):
I decided to give OpenFiler a go – as I’d heard good things about the latest release, v2.3. Here’s a link to a really good document on the OpenFiler site that details the underlying

Read more @techhead

How To setup a Diskless Swap System

This is a simple guide to setting up your computer with solid state swap devices, a much faster method of memory management(i.e. your computer runs lots faster during paging operations).

Hardware Requirements

A) Minimum 4 USB2.0 memory storage devices of identical make and model of at lest 512MB in size. (I can get a 2G stick down the street for less then 10$)
B) A motherboard with USB2.0 ports properly configured in BIOS. (A hub should be alright but I have not tested for that... yet)

Procedure

1.) Open a text file with gedit for recording device information.
2.) Open a Terminal(Applications->Accessories->Terminal) and enter

Code:

tail -f /var/log/messages
3.) Now insert the usb device and you should see something like the following...

Read more at linuxforum

SAN vs NAS vs iSCSI Comparison

List of Diskless Booting Software


List of Diskless Booting Software for iCafe and LANshop

CCBoot by YoungSoft ( Comercial ) - iSCSI based

iShareDisk ( Free ) - iSCSI based

RichTech Diskless by RichTech ( Comercial ) - iSCSI based

Serva Diskless Installation System ( Comercial ) - iSCSI based

OBM Diskless by OBM ( Comercial ) – iSCSI based

EMS358 by EMS ( Chinese, comercial )

Depth Internet Diskless System ( Chinese, comercial )

KeyDone Diskless ( Comercial )

NxD Diskless ( Comercial ) Free

WinTarget AoE Server ( Free 1 connection / Comercial )

DDS Diskless Solution for Cybercafe | MichaelSoft

Orb Diskless

SanDeploy

Diskless Remote Boot in Linux (DRBL)

Q. Q. Diskless Solutions | links